
Halloween is just around the corner, and you know what that means – it’s time for some serious spooky fun in the kitchen! My favorite part? Getting to whip up treats that are as much a decoration as they are a snack. These Frankenstein Rice Krispie Treats are an absolute hit every single year. Seriously, they’re the easiest way to get that big, festive Halloween payoff with zero fuss. I remember the first time I made them with my niece; her face lit up like a jack-o’-lantern, and the giggles when we added the candy eyes just made my whole day. They’re the perfect no-bake endeavor for little hands – or even just for you when you need a quick, deliciously spooky addition to your Halloween party spread. Trust me, these little green guys are going to be the talk of the party!
- Why You'll Love These Frankenstein Rice Krispie Treats
- Gather Your Ingredients for Frankenstein Rice Krispie Treats
- Step-by-Step Guide to Making Your Frankenstein Rice Krispie Treats
- Decorating Your Spooky Frankenstein Rice Krispie Treats
- Tips for Perfect Frankenstein Rice Krispie Treats
- Storage and Reheating Instructions
- Frequently Asked Questions about Frankenstein Rice Krispie Treats
- Estimated Nutritional Information
Why You’ll Love These Frankenstein Rice Krispie Treats
You’re going to seriously adore these Frankenstein Rice Krispie Treats for so many reasons!
- Super Easy & Quick: Seriously, melt, stir, press, cut, decorate! You can whip these up in under 30 minutes. Perfect for last-minute party plans!
- Kid-Friendly Fun: They’re practically begging for little hands to help press them into the pan and, of course, decorate those silly monster faces.
- No-Bake Bliss: No oven required means less mess and less heat in your kitchen. Perfect for warm autumn days or when you want a quick treat without the fuss.
- Spooktacularly Cute: They look amazing! That vivid green and the goofy Frankenstein details are just too fun for Halloween. Kids (and adults!) will devour them.
- Classic Taste, Fun Twist: You get all the nostalgic, delicious flavor of classic Rice Krispie treats, but with a festive Halloween vibe. It’s a win-win!
Gather Your Ingredients for Frankenstein Rice Krispie Treats
Alright, let’s get our monster lab ready! Here’s what you’ll need to conjure up these spooktacular Frankenstein Rice Krispie Treats. Grab these goodies, and we’ll be one step closer to Halloween yumminess!
- Butter: 1/4 cup (that’s half a stick!) of unsalted butter is perfect for melting.
- Marshmallows: One standard 10-ounce package is usually around 40 marshmallows. Use the mini ones or cut up the big ones – either works!
- Green Food Coloring: About 1/2 teaspoon, sometimes a little more or less, to get that perfect Frankenstein green. Gel coloring gives the most vibrant color, if you have it!
- Rice Krispies Cereal: You’ll need a good 6 cups of that crispy, puffy goodness.
- Candy Eyes: These are non-negotiable for Frankenstein’s goofy stare! You can find them in most baking aisles.
- Black Licorice or Melted Chocolate: This is for all the fun monster hair and those signature stitches. Twizzlers work great!
- Pretzel Rods (Optional): If you want to add those classic bolts to his neck, grab a few pretzel rods. They add a fun little crunch!
That’s it! See? So simple. No fancy stuff, just good old pantry staples ready to become something amazing.
Step-by-Step Guide to Making Your Frankenstein Rice Krispie Treats
Alright, let’s get cooking! Making these Frankenstein Rice Krispie Treats is super straightforward, and honestly, it’s the most fun part. Just follow these steps, and you’ll have a pan full of adorable green monsters ready for decorating in no time. Remember to have your 9×13 inch pan greased and ready before you start – it makes life so much easier! If you want to see some other fun no-bake ideas, you should totally check out my chocolate chip banana bread sometime!
Preparing the Monster Green Base
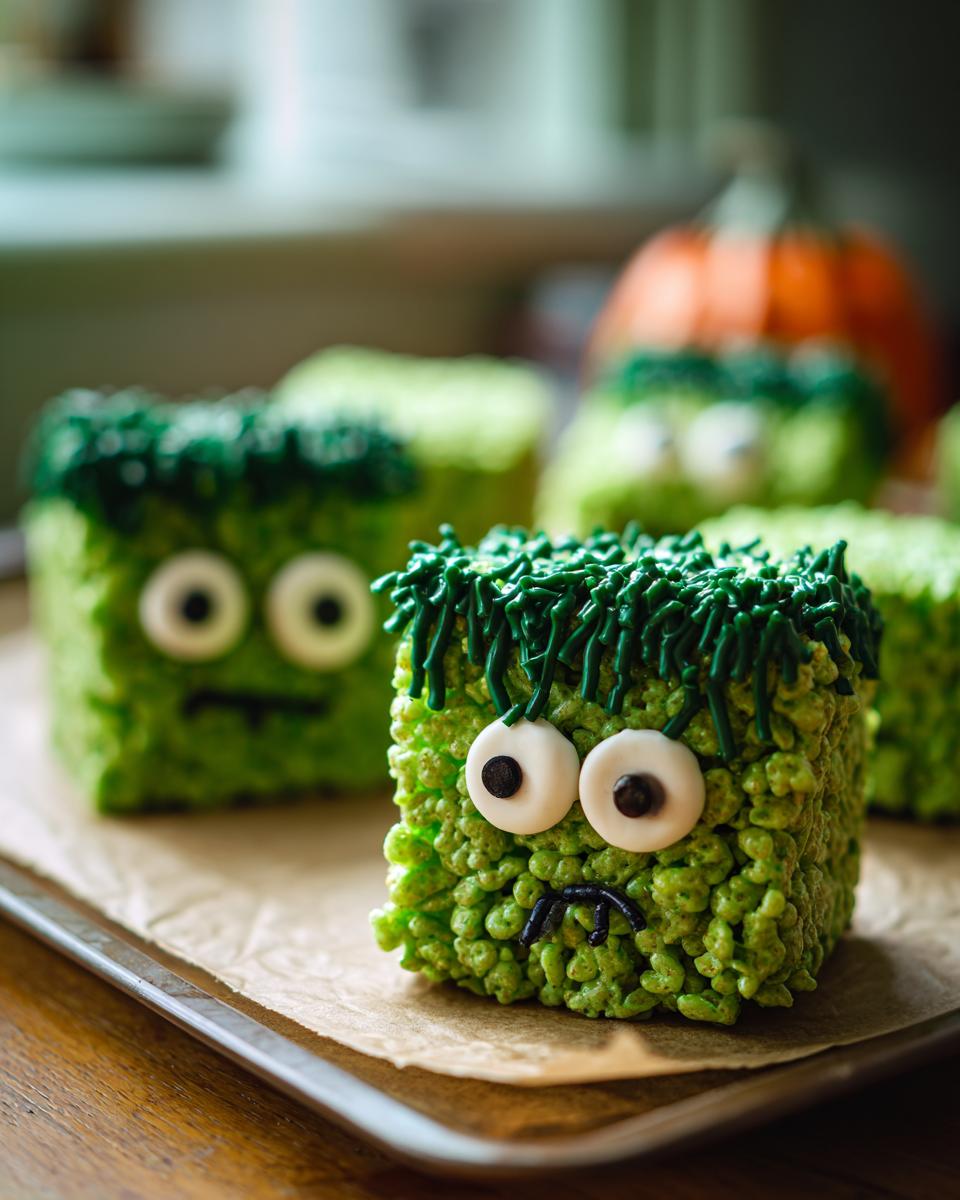
First things first, let’s get that melting magic going. Grab a big saucepan and toss in that 1/4 cup of butter. Set it over low heat. You just want it to melt nice and slow, not burn! Once it’s all liquid gold, dump in that whole package of marshmallows. Keep stirring gently until they’re completely melted and smooth. Now for the fun part: take the pan off the heat and stir in about 1/2 teaspoon of green food coloring. Keep mixing until you get this gorgeous, vibrant monster green! If it’s not quite green enough for your liking, add a tiny bit more, but don’t go overboard. We want that classic Frankenstein hue!
Mixing and Pressing the Cereal
Okay, with your green marshmallow goo all ready, it’s time to add the crunch! Pour all 6 cups of Rice Krispies cereal into the pot with the marshmallow mixture. Now, here’s where you might want to get your hands a little messy (or use a buttered spatula!). Stir everything together really well until every single crispy piece is coated in that yummy green goo. Once it’s all mixed, dump this glorious mixture into your greased 9×13 inch pan. Use your greased hands or that spatula to press it evenly and firmly into the pan. Make sure it’s a nice, flat layer all the way across – this helps them cut cleanly later!
Cooling and Cutting Your Treats
Now comes the hardest part: waiting! You absolutely *have* to let the treats cool completely in the pan. This usually takes about an hour, maybe a little longer if your kitchen is warm. Patience, my friend! Once they’re totally cool and firm, you can turn the whole slab out onto a cutting board. To get nice, clean squares, I like to use a serrated knife. It cuts through the crispiness without squishing everything. Just run the knife over the surface, and you’ll get perfect squares ready for their monster makeover.
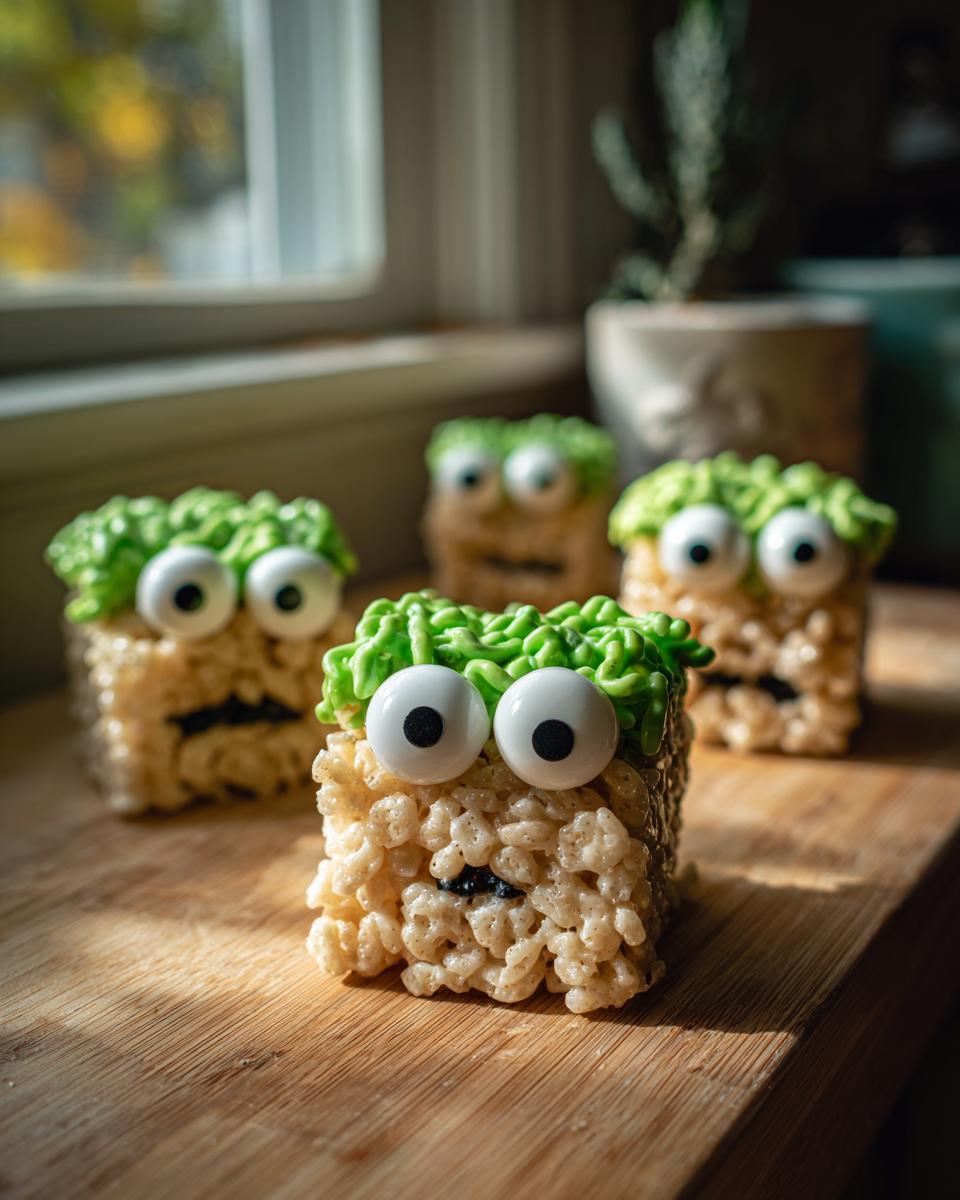
Decorating Your Spooky Frankenstein Rice Krispie Treats
Now for arguably the MOST fun part – bringing these green guys to life as Frankenstein monsters! It’s where a plain Rice Krispie treat turns into a spooky, silly Halloween star. Don’t worry about perfection here; Frankenstein is supposed to look a little bit quirky, right? I love doing this part with kids because their creativity always surprises me. For even more fun decorating ideas, you could peek at my homemade pizza post for some inspiration on how simple ingredients can transform!
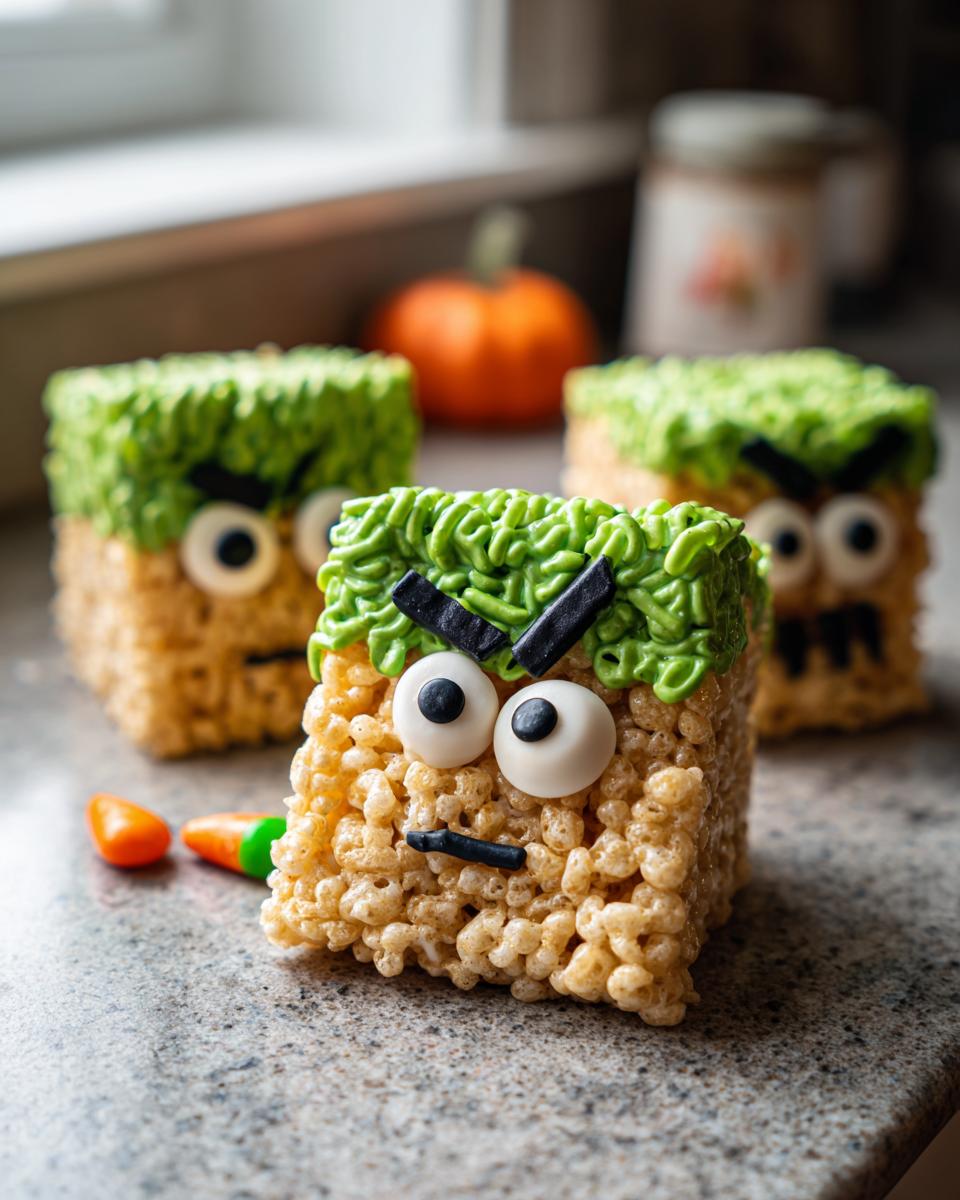
Adding Frankenstein’s Face
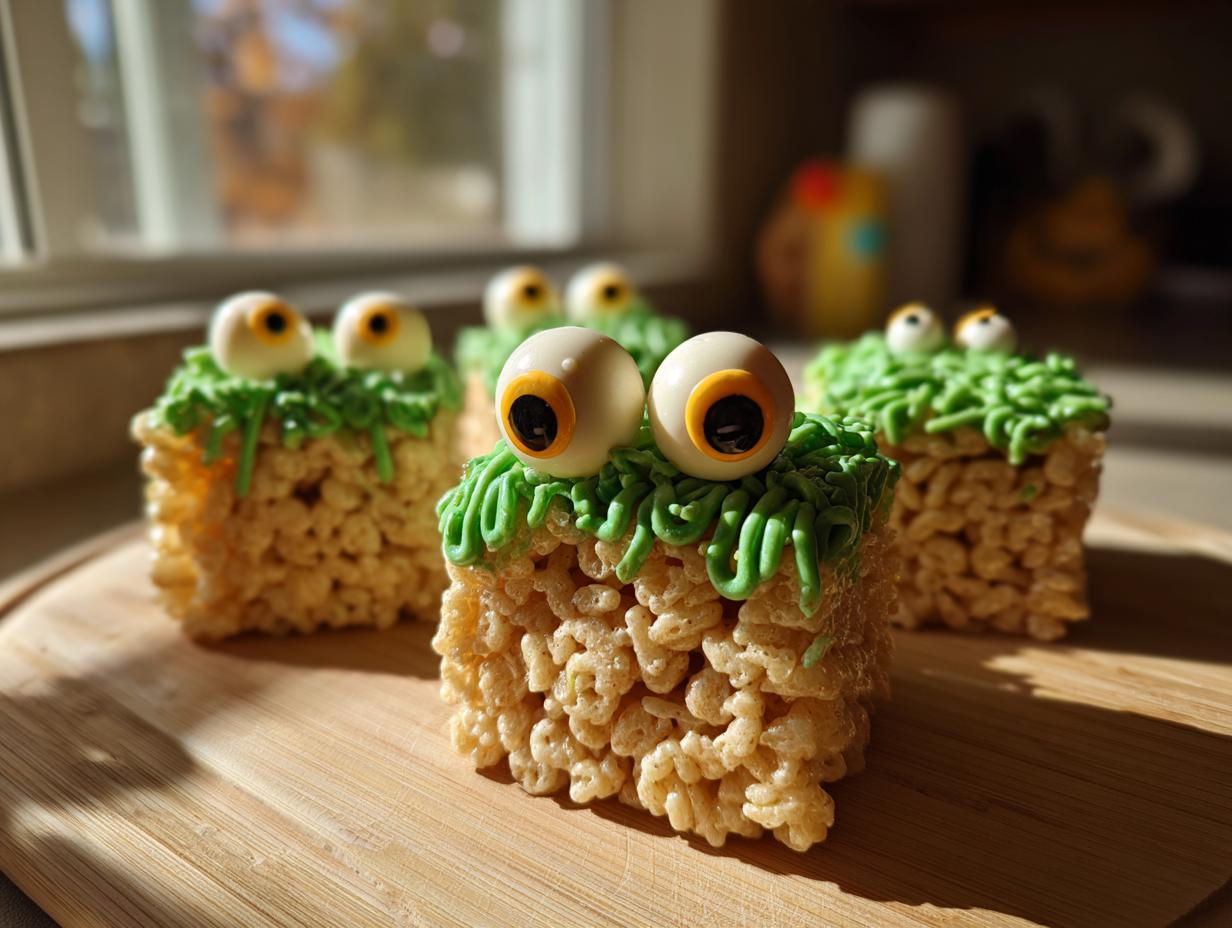
Let’s give our monsters some personality! For the eyes, just press two candy eyes onto each treat. They usually stick pretty well on their own once the treats have cooled and firmed up. If they feel a little loose, a tiny dab of melted chocolate or even a dot of canned frosting can act like glue. Place them towards the top half of the treat, leaving a little space for that furrowed monster brow. You can play around with the spacing to give them different expressions – wonky eyes always make them extra cute!
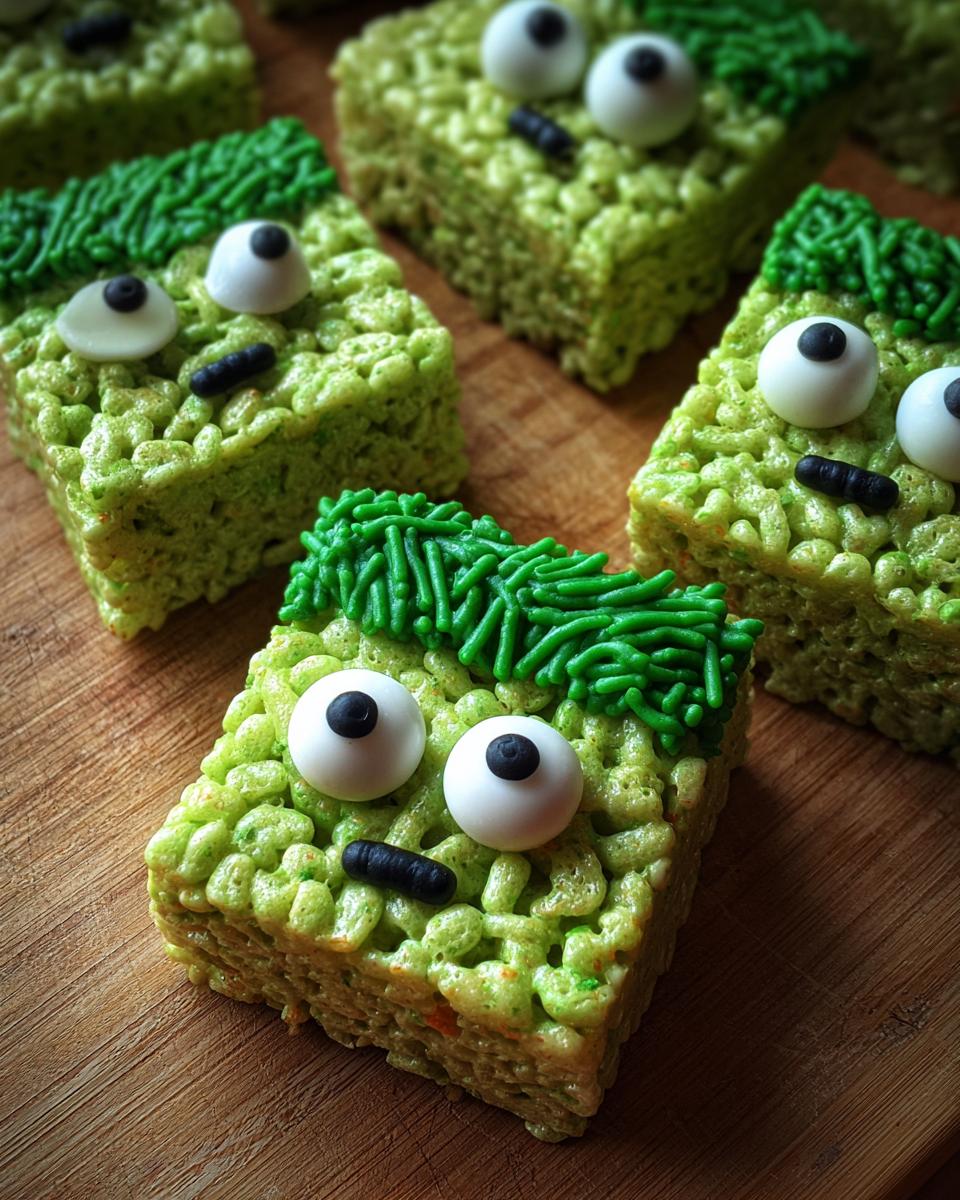
Hair, Stitches, and Bolts
Time for the signature Frankenstein details! For hair, I like to use strips of black licorice or pipe some melted dark chocolate in a zig-zag pattern across the top. It gives him that wild, just-been-brought-to-life look. For the stitches, a little squirt of melted chocolate or thin strips of licorice down the sides or across the middle adds that classic Frankenstein flair. And if you’re going all out, stick a pretzel rod, or even just half a pretzel rod, into the sides of each treat for those iconic neck bolts. It really completes the look and adds a little salty crunch!
Tips for Perfect Frankenstein Rice Krispie Treats
Okay, so you’ve got the basics down, but let me give you a few tried-and-true tips that I’ve picked up over the years that really make these Frankenstein Rice Krispie Treats sing. These are the little tricks that ensure they’re perfectly textured, look amazing, and are just plain delicious!
- Don’t Skimp on the Butter & Marshmallows! Seriously, use good quality butter and fresh marshmallows. Stale marshmallows won’t melt right, and using butter instead of margarine makes a HUGE difference in flavor and texture. It’s the base for that yummy, gooey taste we all love.
- Grease EVERYTHING! I mean it. Grease your spatula, grease your hands (or those little plastic gloves if you prefer!), and definitely grease that 9×13 pan. This mixture gets sticky FAST, and being prepared means you won’t have a giant mess on your hands trying to press it down. Trust me on this one – a greased hand makes for a happy baker!
- Resist the Urge to Press Too Hard: When you’re pressing the cereal mixture into the pan, be firm but don’t mash it down with all your might. You want it to be an even layer, but if you press too hard, your treats can end up dense and tough instead of perfectly chewy. Think gentle but firm pressure.
- Let Them Cool Completely: I know, I know, the temptation to cut into them is HUGE, especially when they smell so good! But you *really* need to let them cool all the way through for about an hour. This is crucial for clean cuts and so your decorations stick properly. Trying to cut them warm is a recipe for a crumbly disaster.
Follow these little pointers, and you’ll have the best Frankenstein Rice Krispie Treats on the block! For more quick and easy ideas, especially when you’re busy during the week, you should absolutely check out my easy weeknight dinners post!
Storage and Reheating Instructions
Once your adorable Frankenstein Rice Krispie Treats are all decorated and perfect, you’ll want to keep them fresh and spooky for as long as possible! The best way to store them is in an airtight container at room temperature. They’ll stay wonderfully chewy and delicious for up to 3 days like this. I usually just use a large Tupperware or cover the pan they’re already in with plastic wrap, making sure it’s sealed tight. Honestly though, they disappear SO fast, you probably won’t have any leftovers!
Reheating isn’t really necessary for these treats because they’re so good at room temp, but if yours happen to get a little stiff after a day or two, you can give them a very quick zap in the microwave for just a few seconds. Just be careful not to overdo it, or they’ll get too gooey again!
Frequently Asked Questions about Frankenstein Rice Krispie Treats
Got questions about these spooky little monsters? I’ve got answers! These are some of the things people always ask me. I hope this helps make your baking adventure even smoother!
Can I use different types of cereal for these monster marshmallow treats?
Totally! While Rice Krispies are the classic for a reason (they get super crispy and hold their shape!), you can absolutely use other puffed rice cereals. Some people like using a mix for extra texture. Just keep in mind that brands with added sugar or different shapes might change the flavor or how sturdy your treats turn out. For that classic monster marshmallow treat feel, sticking with plain puffed rice cereal is usually your best bet!
How do I get a really vibrant green color for my Frankenstein Rice Krispie Treats?
This is key to that awesome Frankenstein look! My secret? Use gel food coloring instead of the liquid stuff. Gel colors are way more concentrated, so you need less, and they give you a super vibrant, concentrated color without adding too much extra liquid to your mix. Start with about 1/2 a teaspoon, stir it in really well, and then add more tiny bits at a time until you hit that perfect, electric monster green. Don’t be afraid to experiment a little to get the shade you love!
Are these Frankenstein Rice Krispie Treats suitable for a kid-friendly Halloween snack?
Oh, absolutely! These are *perfect* for a kid-friendly Halloween snack. They’re a no-bake treat, which means little ones can help with mixing (with supervision, of course!) and the decorating is super fun and forgiving. Plus, who doesn’t love a classic Rice Krispie treat? Just a heads-up, standard marshmallows and cereal contain gluten, so if you’re worried about allergies, you might want to look for gluten-free versions of these ingredients.
Estimated Nutritional Information
Now, about those tasty Frankenstein Rice Krispie Treats! Keep in mind these numbers are just estimates because every batch can turn out a little different based on how you measure or the brands you use, you know? But generally, each of these adorable monster treats has about 150 calories. You’ll get around 3g of fat, 1g of protein, and about 28g of carbohydrates, with roughly 15g of that being sugar. They’re a fun treat, not exactly health food, but totally worth it for Halloween! For more about our baking philosophy, check out our About page!
PrintFrankenstein Rice Krispie Treats
Create fun and spooky Frankenstein Rice Krispie Treats for a festive Halloween snack that kids will love. These no-bake treats are easy to make and perfect for parties.
- Prep Time: 15 min
- Cook Time: 5 min
- Total Time: 20 min
- Yield: 24 servings 1x
- Category: Dessert
- Method: No-Bake
- Cuisine: American
- Diet: Vegetarian
Ingredients
- 1/4 cup (1/2 stick) unsalted butter
- 1 package (10 oz, about 40) marshmallows
- 1/2 teaspoon green food coloring
- 6 cups Rice Krispies cereal
- Candy eyes
- Black licorice or melted chocolate for hair and stitches
- Pretzel rods for bolts (optional)
Instructions
- Melt butter in a large saucepan over low heat.
- Add marshmallows and stir until completely melted.
- Remove from heat. Stir in green food coloring until you achieve a vibrant monster green.
- Add Rice Krispies cereal and stir until well coated.
- Press the mixture evenly into a greased 9×13 inch baking pan.
- Let cool completely.
- Cut into squares.
- Decorate each square to look like Frankenstein’s monster using candy eyes, licorice or chocolate for hair and stitches, and pretzel rods for bolts if desired.
Notes
- For easier handling, grease your hands or a spatula with butter or cooking spray before pressing the mixture into the pan.
- Use a serrated knife to cut the cooled treats for cleaner edges.
- Store in an airtight container at room temperature for up to 3 days.
Nutrition
- Serving Size: 1 treat
- Calories: 150
- Sugar: 15g
- Sodium: 100mg
- Fat: 3g
- Saturated Fat: 2g
- Unsaturated Fat: 1g
- Trans Fat: 0g
- Carbohydrates: 28g
- Fiber: 0g
- Protein: 1g
- Cholesterol: 10mg