
Oh, Halloween! It’s my absolute favorite time for baking. There’s something so magical about getting all cozy, the air getting crisp, and knowing you’re about to whip up something utterly spooky and delicious. Forget complicated cakes that take forever to slice; my go-to for parties these days has to be these incredible Halloween Cheesecake Bars. They’re just so darn easy to serve, and you can’t beat that rich, smooth cheesecake flavor, all wrapped up in a fun, festive package. I remember one year trying to make this super elaborate haunted house cake… let’s just say it was a beautiful disaster! These bars? They’re the real deal – pure bliss with minimal fuss, perfect for any Halloween bash.
- Why You'll Love These Halloween Cheesecake Bars
- Gather Your Ingredients for Halloween Cheesecake Bars
- Crafting Your Spooky Halloween Cheesecake Bars
- Tips for Perfect Halloween Cheesecake Bars
- Ingredient Notes and Substitutions for Halloween Cheesecake Bars
- Serving and Storing Your Halloween Party Bars
- Frequently Asked Questions About Halloween Cheesecake Bars
- Nutritional Information for Halloween Cheesecake Bars
- Share Your Spooky Creations!
Why You’ll Love These Halloween Cheesecake Bars
Trust me, these aren’t just any cheesecake bars. They’re:
- Super easy to make – seriously, even if you’re new to baking!
- Visually stunning with fun, spooky swirls and colors.
- Perfect for Halloween parties because they’re handheld and crowd-pleasing.
- Incredibly delicious – that creamy, sweet cheesecake filling with a graham cracker crust is just divine!
Gather Your Ingredients for Halloween Cheesecake Bars
Alright, let’s get our spooky station ready! For these amazing Halloween Cheesecake Bars, you’ll need:
- 1 ½ cups of graham cracker crumbs (crushed up, of course!)
- ¼ cup granulated sugar
- 6 tablespoons unsalted butter, all melted and ready to go
- But wait, there’s more! You’ll need 3 (8 ounce) packages of cream cheese, make sure they’re softened up nicely
- 1 cup granulated sugar for that creamy filling
- 3 large eggs
- 1 teaspoon of pure vanilla extract
- And for the Halloween magic: gel food coloring in orange, purple, and green!
Crafting Your Spooky Halloween Cheesecake Bars
Alright, let’s get this spooky party started! Making these Halloween Cheesecake Bars isn’t hard at all, just follow these steps and you’ll have a masterpiece. Make sure your oven is preheated to 350°F (175°C) and you’ve got an 8×8 inch baking pan all lined up with parchment paper. I like to leave a little overhang – it makes lifting the whole thing out so much easier later on!
Preparing the Crust for Your Halloween Cheesecake Bars
First up, the crust! In a bowl, just mix together your graham cracker crumbs, that’s the 1 ½ cups, with ¼ cup of sugar. Then, pour in your melted butter – that’s the 6 tablespoons – and give it a good stir until it all looks like damp sand. Press this evenly into the bottom of your lined pan. Pop this into the oven for just 10 minutes to get it nice and toasty, then pull it out and let it cool a bit while we make the yummy filling.
Making the Creamy Cheesecake Filling
Now for the star of the show! Grab a big bowl and beat your softened cream cheese (that’s all three 8-ounce packages) with 1 cup of sugar until it’s super smooth. You don’t want any lumps, so really get in there! Then, add in your 3 large eggs, one at a time, mixing after each addition. Finally, stir in that teaspoon of vanilla extract. Easy peasy, right?
Adding Color and Swirls to Your Halloween Cheesecake Bars
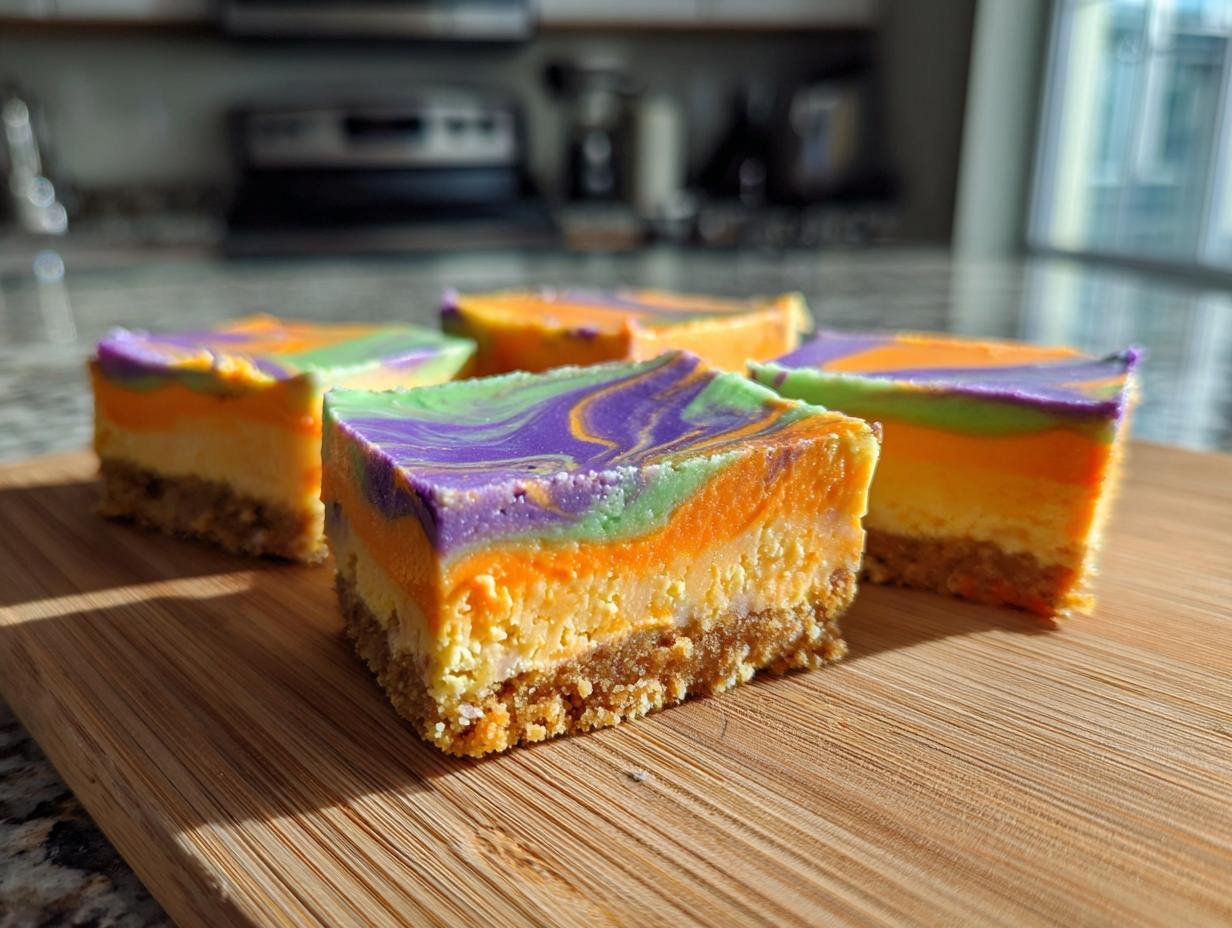
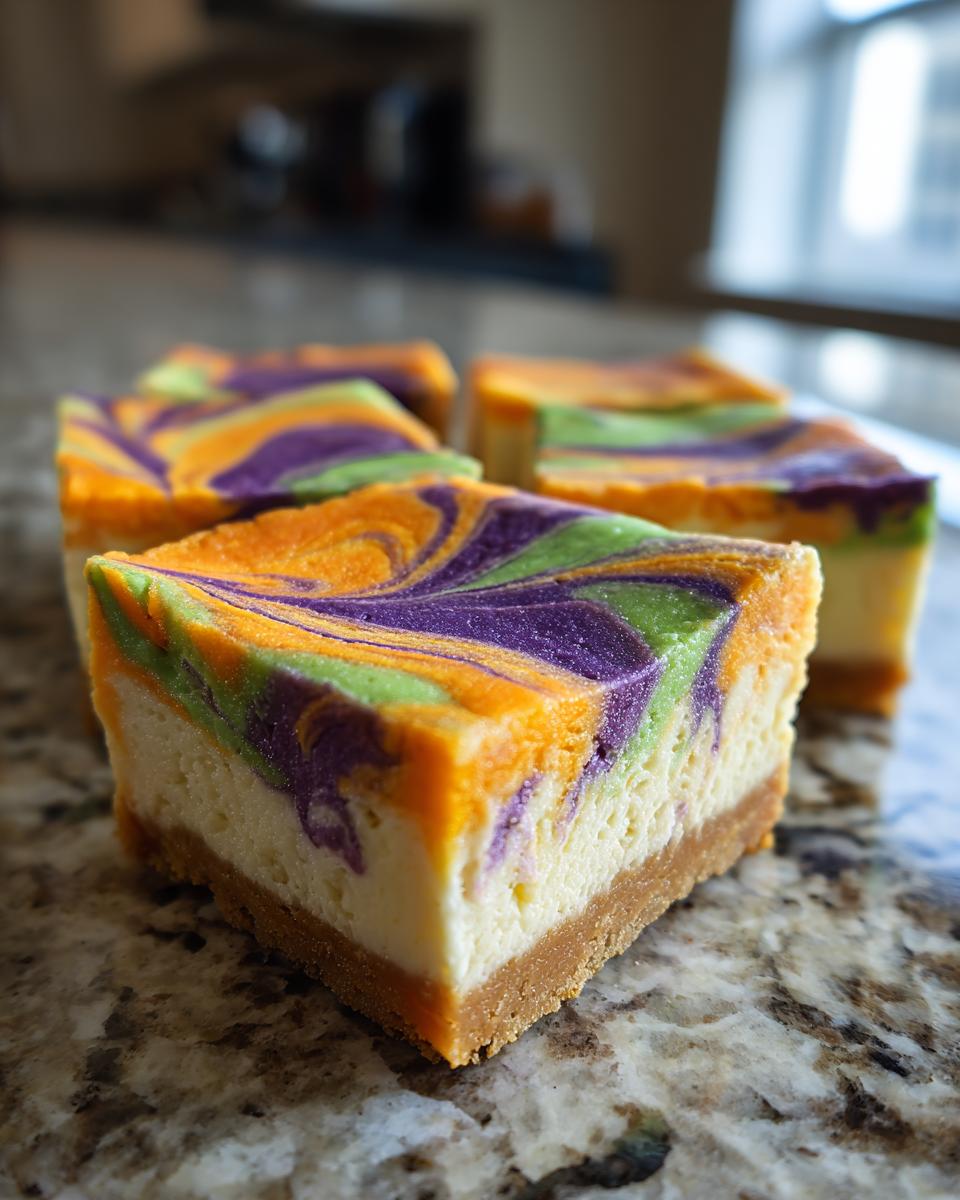
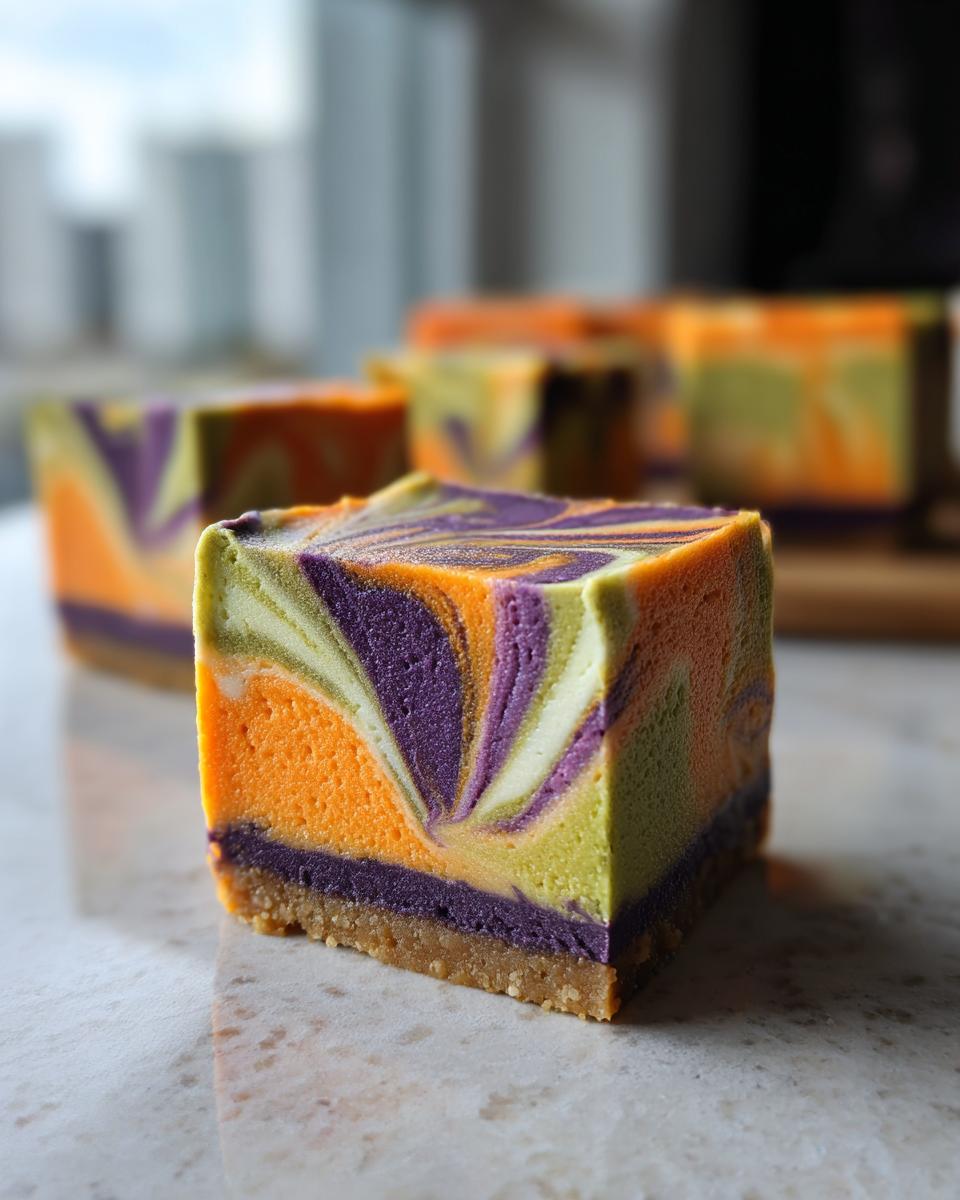
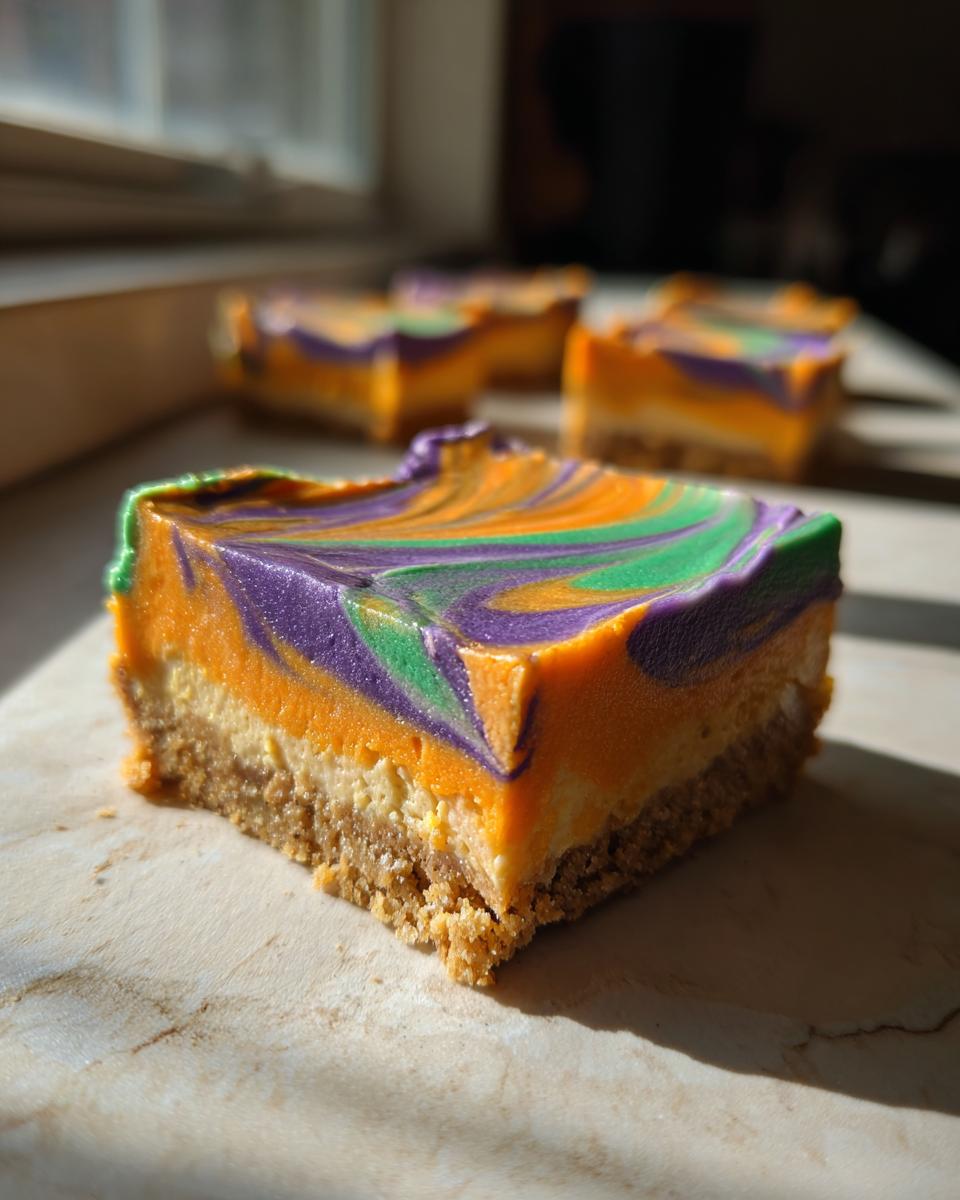
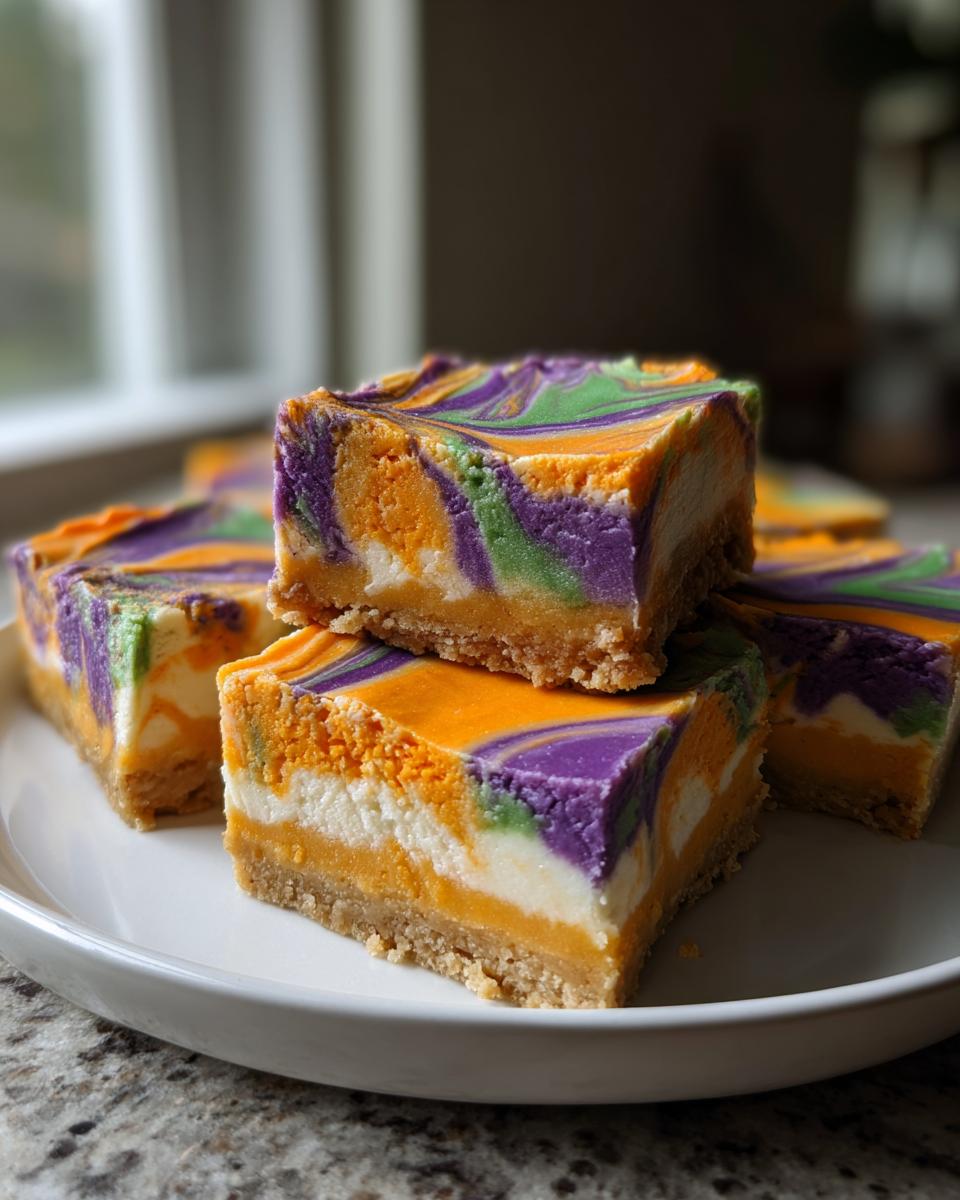
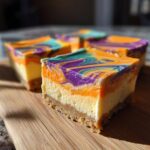
This is where the fun really happens! Divide your lovely, smooth cheesecake batter into three separate bowls. Now, take your gel food coloring – I’m using vibrant orange, spooky purple, and eerie green – and add a different color to each bowl of batter. Mix it up until the color is bright and even. Don’t be shy with the color if you want it really pop! Then, just start dolloping spoonfuls of each colored batter randomly all over your cooled crust. Once it’s all looking like a colorful mess, grab a skewer or a toothpick and gently swirl the colors together. You can make pretty marbling, or drag the skewer in circles for a cool spooky swirl cheesecake effect!
Baking and Chilling Your Halloween Cheesecake Bars
Time to bake! Pop your swirled creation back into that 350°F oven for about 30-35 minutes. You’re looking for the edges to be set, but the center should still be just a little bit jiggly – that means it’ll be perfectly creamy, not dry. Once they’re done, let them cool completely in the pan on a wire rack. Seriously, don’t rush this part! After that, cover it gently and pop it into the fridge for at least 2 hours to chill solid. This chilling step is key for getting those clean cuts!
Tips for Perfect Halloween Cheesecake Bars
Okay, friends, let’s talk about making these Halloween Cheesecake Bars absolutely *perfect*. I’ve learned a few tricks over the years, and they really make a difference! First off, for those amazing vibrant colors, you absolutely *have* to use gel food coloring. Liquid coloring can mess with the batter’s consistency, and we want that super smooth, creamy texture, right? So, gel is the way to go for that intense hue. If you’re feeling extra fancy and want to dive into a real spiderweb cheesecake recipe, here’s my little secret: reserve a tiny bit of plain batter, or tint a small amount ghostly white or gray. Dollop tiny circles of this inside your colorful swirls, then use a toothpick to drag lines from the center outwards. It’s easier than you think and looks so cool!
Another common cheesecake woe is cracking. While these bars are more forgiving than a full cheesecake, overbaking is the main culprit. Pull them out when the center is *just* barely set – it’ll finish cooking as it cools. And remember, don’t skip that chilling time in the fridge! It’s crucial for getting those clean cuts you see in pictures. It’s a bit like waiting for fudgy chocolate brownies to set up perfectly; patience really pays off!
Ingredient Notes and Substitutions for Halloween Cheesecake Bars
When you’re making these festive purple and orange cheesecake delights, a couple of ingredients are key to get that perfect spooky look and taste. Like I mentioned, gel food coloring is really your best friend here. It gives you that super bright color without adding extra liquid, keeping your cheesecake batter thick and creamy. If you can’t find gel, you *could* try a tiny bit of liquid food coloring, but add it very slowly, maybe just a drop at a time, and be prepared for a slightly softer texture. For the crust, graham crackers are classic, but you could totally switch it up! A chocolate cookie crust would be amazing for a darker, more mysterious look, or even some crushed Oreos for a “dirt” effect!
Serving and Storing Your Halloween Party Bars
Okay, so your amazing Halloween party bars are all ready to go! The most important thing is to serve them chilled. Trust me, that cold, creamy texture is just *chef’s kiss*. Once they’ve had their proper chill time in the fridge (at least 2 hours!), they’re ready to be sliced and devoured. If you happen to have any leftovers – which is rare in my house! – just pop them back into the fridge. They’ll stay wonderfully fresh for about 3-4 days in an airtight container. Easy!
Frequently Asked Questions About Halloween Cheesecake Bars
Got some burning questions about these spooky-good Halloween Cheesecake Bars? I’ve got you covered!
Can I make these Halloween Cheesecake Bars no-bake?
While this recipe is baked for that classic creamy texture, you could adapt it for a no-bake version! You’d need to pre-bake your crust as usual, then use a no-bake cheesecake filling (often made with whipped cream or sweetened condensed milk) and chilling time. Just be aware the texture will be a bit different – lighter and less dense than this baked version.
How do I get really vibrant colors for my cheesecake swirls?
Ah, the colors! For the most intense and vibrant hues, you really need to use gel food coloring. It’s concentrated, so a little bit goes a long way, and it doesn’t add extra liquid that could mess with your batter’s consistency. If you’re going for that purple and orange cheesecake look, you’ll want a good quality gel dye.
What’s the best way to cut clean bars from my cheesecake?
This is key for that picture-perfect look! Make sure your cheesecake bars are well-chilled – at least 2 hours in the fridge. Then, use a long, sharp knife. Run the knife under hot water, wipe it dry, and then make your cut. Repeat this between each cut. It might sound like a lot of work, but it helps you get those super clean slices every time, just like with a good apple crisp recipe!
Nutritional Information for Halloween Cheesecake Bars
Just a friendly heads-up: the nutrition facts below are estimates for one serving of these delicious Halloween Cheesecake Bars. Since we all use slightly different ingredients and measures, your exact numbers might vary a bit. Enjoy every bite!
- Calories: ~300
- Fat: ~18g
- Saturated Fat: ~11g
- Carbohydrates: ~30g
- Sugar: ~25g
- Protein: ~5g
Share Your Spooky Creations!
Alright bakers, now it’s YOUR turn to make some magic happen! I seriously can’t wait to see your amazing Halloween Cheesecake Bars. Did you try a wild swirl pattern? What colors did you go with? Leave a comment below, tell me all about it, and if you feel like it, send over a photo! I love hearing from you and seeing your creations is the best part of all this!
PrintHalloween Cheesecake Bars
Easy Halloween cheesecake bars with spooky swirls and vibrant colors, perfect for parties.
- Prep Time: 20 min
- Cook Time: 35 min
- Total Time: 2 hours 55 min
- Yield: 16 bars 1x
- Category: Dessert
- Method: Baking
- Cuisine: American
- Diet: Vegetarian
Ingredients
- 1 ½ cups graham cracker crumbs
- ¼ cup granulated sugar
- 6 tablespoons unsalted butter, melted
- 3 (8 ounce) packages cream cheese, softened
- 1 cup granulated sugar
- 3 large eggs
- 1 teaspoon vanilla extract
- Gel food coloring (orange, purple, green)
Instructions
- Preheat your oven to 350°F (175°C). Line an 8×8 inch baking pan with parchment paper, leaving an overhang on the sides.
- In a medium bowl, combine graham cracker crumbs, ¼ cup sugar, and melted butter. Press the mixture evenly into the bottom of the prepared pan.
- Bake the crust for 10 minutes. Remove from oven and let cool slightly.
- In a large bowl, beat the softened cream cheese and 1 cup sugar until smooth.
- Beat in the eggs one at a time, then stir in the vanilla extract.
- Divide the cheesecake batter into three separate bowls.
- Add a different gel food coloring to each bowl (orange, purple, green) and mix until the color is uniform.
- Dollop spoonfuls of the colored cheesecake batter randomly over the cooled crust.
- Use a skewer or toothpick to swirl the colors together, creating a marbled or spiderweb effect.
- Bake for 30-35 minutes, or until the edges are set and the center is almost set.
- Let the cheesecake bars cool completely in the pan on a wire rack.
- Once cooled, use the parchment paper overhang to lift the bars out of the pan.
- Chill for at least 2 hours before cutting into bars.
Notes
- Gel food coloring is recommended to maintain the cheesecake batter’s consistency.
- For a spiderweb design, drop small dollops of white batter (tinted with a tiny bit of black or gray) on top of the colored swirls, then drag a skewer from the center outwards.
- These bars are best served chilled.
Nutrition
- Serving Size: 1 bar
- Calories: 300
- Sugar: 25g
- Sodium: 150mg
- Fat: 18g
- Saturated Fat: 11g
- Unsaturated Fat: 7g
- Trans Fat: 0g
- Carbohydrates: 30g
- Fiber: 1g
- Protein: 5g
- Cholesterol: 60mg