
Oh friends, have I got a creation for you today that just screams special occasion! Sometimes baking needs to be a mashup, right? We take two absolute champions of the dessert world and smash them together until they become one glorious thing. That’s exactly what happened when I developed this tiramisu cheesecake fusion. It’s got that classic Italian coffee kick blended perfectly with the velvety smoothness we all crave from a good baked cheesecake.
Here at Bliss Batter, our mission, thanks to the way Claire Sterling always approaches things in her baking, is making sure these amazing recipes are totally doable for you at home. I promise, this recipe is tested, perfected, and won’t leave you feeling like you need a culinary degree just to mix a few bowls. If you want to read more about how we approach accessible baking, check out our story over at Bliss Batter!
- Why This Tiramisu Cheesecake Recipe Delivers Dessert Bliss
- Gathering Ingredients for Your Tiramisu Cheesecake
- Step-by-Step Instructions for Baked Tiramisu Cheesecake
- Expert Tips for a Flawless Tiramisu Cheesecake
- Storage and Serving Your Tiramisu Cheesecake
- Variations on the Classic Tiramisu Cheesecake
- Frequently Asked Questions About Tiramisu Cheesecake
- Nutritional Estimates for Rich Tiramisu Cheesecake
- Share Your Homemade Tiramisu Cheesecake Creation
Why This Tiramisu Cheesecake Recipe Delivers Dessert Bliss
When you bring this dessert to the table, people will think you spent days on it. Trust me, I love that look! This recipe takes two powerhouse desserts and marries them up beautifully. It really hits all the right notes for a show-stopper.

- The texture is just unbelievable; it’s decadent without being heavy.
- It nails that sophisticated coffee and dark cocoa flavor profile we know and love from traditional tiramisu.
If you are looking for other crowd-pleasing recipes that are perfected for your home kitchen, pop over and browse our full collection of delicious dessert recipes!
Creamy Texture Meets Coffee Kick
We get that amazing, dense, creamy base from the cheesecake magic, but then we layer in that bold, slightly bitter hit from the espresso and slightly tart note from the mascarpone. It’s a balancing act, and gosh, does it work!
Perfect for Special Occasions
Even though this is a baked cheesecake, my process keeps everything super manageable. You get a dessert that looks high-end and fancy, but I guarantee the clear steps mean you whip this up with total confidence, proving you don’t need to be a pastry pro to impress everyone.
Gathering Ingredients for Your Tiramisu Cheesecake
Okay, let’s get organized! The secret to any successful bake—especially something this rich—is having all your bits and pieces measured out before you even think about turning on the mixer. Trust me, stepping away mid-mix to find the liqueur is a disaster waiting to happen. You want everything ready to go for this coffee-kissed treat!
We’ve broken the ingredients down into the three main areas so you can tackle them one at a time. Don’t skip the ingredient notes in your head while prepping. For instance, your cream cheese and mascarpone need to be nice and soft, ready to play well together.
For the Chocolate Crust
This part smells like heaven even before it bakes! It gives us that perfect dark contrast to the creamy filling.
- 1 1/2 cups chocolate wafer crumbs
- 1/4 cup granulated sugar
- 6 tablespoons unsalted butter, melted
For the Mascarpone Cheesecake Filling
This is where all the magic happens! Make sure you’ve brewed your espresso nice and strong, and let it cool completely before measuring it out. We aren’t trying to cook our cream cheese!
- 3 (8 ounce) packages cream cheese, making sure it’s fully softened
- 1 1/2 cups granulated sugar
- 1 teaspoon vanilla extract
- 1/4 cup strong brewed espresso, which must be completely cooled
- 1/4 cup coffee liqueur (if you skip this, use an extra tablespoon of espresso!)
- 1 cup mascarpone cheese (softened is key here, folks!)
- 3 large eggs, brought up slightly close to room temperature if you can remember
Oh, and don’t forget the final touches that give it that classic dessert look! We need some heavy cream for a soft topping and, of course, plenty of good quality cocoa powder for dusting.
Step-by-Step Instructions for Baked Tiramisu Cheesecake
Alright, let’s get down to business! Making this baked dessert is much smoother if you tackle it in phases. Don’t rush the oven time or the cooling—those are the steps that separate an okay cheesecake from the truly spectacular coffee cheesecakes we’re aiming for. Remember what I always say: patience is the best baking ingredient!
Preparing the Crust and Oven Setup
First things first, we need heat! Go ahead and preheat your oven to 325 degrees Fahrenheit. Grab that 9-inch springform pan and line the bottom with parchment paper—this saves so much sticking trouble later, I promise. Now for the crust: mix those chocolate wafer crumbs with the quarter cup of sugar, then pour in the melted butter. It should look like wet sand when you’re done mixing. Press that mixture firmly onto the bottom of your prepared pan and pop it in the oven for just 10 minutes. Let it cool while you whip up the main event!
Creating the Coffee-Infused Cheesecake Filling
Time for the glorious batter! In the biggest bowl you have, beat that softened cream cheese with the 1 1/2 cups of white sugar until everything looks wonderfully smooth. Then, slowly pour in your cooled espresso and optional coffee liqueur, mixing until it’s just blended. Next, incorporate your mascarpone cheese until the mixture is completely uniform. This is crucial: add those eggs one by one, only mixing on low speed after each one until you see it disappear. Seriously, stop mixing when the egg is gone! Overmixing is how we invite cracks into our beautiful cheesecake recipe.
Baking and Essential Cooling for Perfect Tiramisu Cheesecake
If you decided to layer, pour half your batter over the cooled crust, arrange those espresso-soaked ladyfingers (if using!), and then dollop the rest of the batter on top. We absolutely have to bake this in a water bath—it’s our trick for humidity. Bake it for 60 to 75 minutes. The center should have a tiny jiggle, like jelly. The single most important step happens when the timer goes off: turn the oven *off*, prop the door open slightly, and let it cool down slowly inside the oven for a full hour. This gradual temp change prevents cracking like magic!
Expert Tips for a Flawless Tiramisu Cheesecake
Look, I know cheesecake can be intimidating. Those cracks? That weeping business? Nobody wants that on their showstopper dessert! I’ve been there, scraping sunken centers into the trash. But once you know the small secrets, keeping your coffee cheesecake perfect becomes second nature. Think of these tips as the last little bits of wisdom I’ve gathered from conquering this particular recipe.
My biggest piece of advice, which applies to everything from this dessert to my favorite layering tricks, is temperature management. If your cream cheese or mascarpone is cold, you’re going to end up whipping air into it unevenly, which leads to lumps and potential separation later on.
Water Bath Technique for Even Baking
You absolutely must use a water bath for this rich tiramisu cheesecake, trust me on this one. What the bath does is create this wonderfully steamy, humid environment in the oven. Cheesecakes are mostly eggs and dairy, which means they bake quickly and can dry out around the edges before the center is set. The steam keeps everything moist and helps the entire dessert spread its heat evenly. It’s the key to that incredibly smooth texture that makes this fusion dessert so decadent!
Achieving the Best Espresso Flavor
Since coffee is such a huge part of the flavor profile here, don’t try to cheat the system with regular instant coffee that you just mix with water. That’s usually too weak, and honestly, it can taste weirdly bitter in a rich dairy setting. You need *flavor*. My recommendation is always to brew espresso—like, the strongest stuff you can make—and let it cool totally. If you don’t have an espresso maker, use a Moka pot, or even an AeroPress. If you must use instant, mix two tablespoons of a dark roast instant coffee with just 1/4 cup of hot water—you want that concentration!
Storage and Serving Your Tiramisu Cheesecake
Okay, the hard part—baking—is done, but don’t even think about slicing into this masterpiece yet! Patience is the real final test, I swear. This beauty needs time in the cold to firm up properly so it holds its shape when you slice it. We’re looking for a minimum of six hours chilling time in the refrigerator, but honestly, if you can let it go overnight, you’ll be rewarded with the absolute best, creamiest texture.
When you are finally ready to serve, gently run a thin, sharp knife all around the edge of the pan before you even think about unclamping the springform side. This stops the dessert from sticking to the sides when you try to release it and prevents those horrible little cracks or breakage. Once the ring is off, it should look stunning!
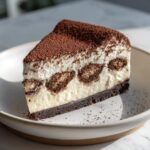
Now for the final flourish! We whipped up some heavy cream—just plain cream, maybe with a teaspoon of powdered sugar, nothing fancy—and spread a generous layer right over the top. And of course, the signature move: grab your finest sieve and dust the whole thing *heavily* with a good quality cocoa powder. It gives it that authentic, slightly bitter coffee counterpoint. It looks so good, and you made it yourself! If you need inspiration for other amazing desserts to try out after this one, check out my favorite dessert recipes!
Variations on the Classic Tiramisu Cheesecake
One of the best things about a great base recipe, like the one we used for this incredible pumpkin cheesecake recipe, is that you can totally tweak it without ruining the integrity. This dessert is no different! While I am obsessed with the baked version, you might want something even faster for a last-minute gathering.
The coffee-cocoa profile is so flexible. Don’t be afraid to experiment a little once you’ve mastered the core technique. These small changes keep things fresh, even if you find yourself craving this coffee cheesecake weekly like I do!
No-Bake Tiramisu Cheesecake Alternative
If you’re looking to skip the whole water bath drama—and trust me, I understand those days!—you can absolutely pivot this recipe into a no-bake treat. The provided notes mention this, and it’s a fantastic shortcut. You just skip steps 1 through 4 entirely. That means no preheating, no blind baking the crust, and definitely no oven time!
For the no-bake version, you’ll mix up the crust ingredients—the chocolate crumbs, sugar, and butter—and just press them firmly into the bottom of your springform pan. Then, you chill that raw crust in the freezer for about 20 minutes to firm up while you mix your filling. Instead of baking, you add the mascarpone/cream cheese filling mixture to the pan and chill it in the refrigerator until it’s totally firm. The key takeaway here, like the recipe note suggests, is that chilling time increases: think at least 8 hours, or better yet, overnight, so that filling sets up nice and sturdy!
Also, for an extra layer of rich flavor in this variation, try soaking your ladyfingers in a mix of strong espresso and a splash of dark rum instead of just espresso before layering them into the chilled crust mixture. That little extra boozy depth really elevates the final flavor of your no-bake mascarpone dessert.
Frequently Asked Questions About Tiramisu Cheesecake
I’ve spent so many hours perfecting this recipe that I fully expect you lovely bakers to have a few questions before diving in! It’s a bit more involved than just whipping up a quick cookie, so let’s go over the common sticking points for this decadent coffee cheesecake. Knowing these little things upfront means success when you pull it out of the oven!
Can I make this coffee cheesecake ahead of time?
Oh, yes, please do! Seriously, making this dessert ahead of time is not just allowed, it’s highly encouraged. That 6 hours of chilling isn’t just to make it firm; it’s when the complex coffee and cocoa flavors truly meld into that creamy mascarpone base. If you cover it tightly and keep it chilled, it tastes even better the next day. I often make mine on a Saturday because the Sunday guests enjoy it so much more once it’s had a full 24 hours to settle down and get luxurious!
What is the best substitute for coffee liqueur in this mascarpone dessert?
That coffee liqueur adds such a deep note, but if you’re avoiding alcohol—or just ran out like I sometimes do—you have a couple of great options! The recipe suggestion is to simply add an extra tablespoon of strong, cooled espresso to make up the volume, and that works perfectly fine for flavor. However, if you want that warmth without the alcohol, try substituting the liqueur with one teaspoon of pure almond extract mixed with two teaspoons of water. Almond and coffee are amazing partners! Just ensure you add whatever substitute you use slowly when mixing it in with your espresso.
How do I prevent my baked cheesecake from cracking?
This is the eternal question, isn’t it? My absolute biggest defense against cracks, time and time again, comes down to two things we talked about: slow cooling and batter texture. First, never, ever overmix once those eggs go in—we want smooth, not airy, because air bubbles collapse and cause surface tension upon cooling. Second, and this is non-negotiable for this rich cheesecake: use that water bath and then let it cool completely in the turned-off oven with the door propped open for an hour. That gradual temperature change is your insurance policy against a cracked top.
Nutritional Estimates for Rich Tiramisu Cheesecake
Now, I know some of you lovely bakers track nutritional info, so here’s a little snapshot based on one slice. Keep in mind, this is what I got when calculating based on the ingredients list, especially with the optional coffee liqueur in there! If you use an alternative, or skip the heavy cream topping, those numbers are going to shift, of course. This is just a helpful guide, not a guarantee!
- Serving Size: 1 slice
- Calories: 450
- Sugar: 35g
- Fat: 30g
- Protein: 8g
Share Your Homemade Tiramisu Cheesecake Creation
And there you have it, friends! You managed to wrangle the delicious chaos of coffee, cream cheese, and cocoa into one stunning homemade masterpiece. I am so incredibly proud of you for tackling this decadent dish. My deepest hope, following Claire’s vision here at Bliss Batter, is that this recipe brought you a moment of pure, joyful peace while you were in the kitchen.
Now that you’ve tasted the perfection that is this homemade tiramisu cheesecake, I truly want to hear all about it! Did the ladyfingers soak just right? Did you dust that cocoa powder on heavily? Head down to the comments section below and leave a rating—even one star helps me know how the recipe is holding up in different kitchens!
And please, if you took any photos, tag us on social media! Seeing your creativity shine when you bring these bakery-quality treats into your own home is honestly the best reward I could ever ask for. Let’s keep spreading the baking happiness together. Happy enjoying!
PrintRich Tiramisu Cheesecake Fusion
This recipe combines the creamy texture of cheesecake with the classic espresso and cocoa flavors of tiramisu. It results in a smooth, rich dessert perfect for special occasions.
- Prep Time: 30 min
- Cook Time: 75 min
- Total Time: 105 min
- Yield: 12 servings 1x
- Category: Dessert
- Method: Baking
- Cuisine: Italian-American
- Diet: Vegetarian
Ingredients
- 1 1/2 cups chocolate wafer crumbs
- 1/4 cup granulated sugar (for crust)
- 6 tablespoons unsalted butter, melted
- 3 (8 ounce) packages cream cheese, softened
- 1 1/2 cups granulated sugar (for filling)
- 1 teaspoon vanilla extract
- 1/4 cup strong brewed espresso, cooled
- 1/4 cup coffee liqueur (optional)
- 1 cup mascarpone cheese
- 3 large eggs
- 1/2 cup heavy cream
- Cocoa powder, for dusting
- Ladyfingers, soaked in espresso (for layering, optional)
Instructions
- Preheat your oven to 325 degrees Fahrenheit. Prepare a 9-inch springform pan with parchment paper on the bottom.
- Make the crust: Combine chocolate wafer crumbs and 1/4 cup sugar. Mix in melted butter until the mixture resembles wet sand. Press the mixture firmly into the bottom of the prepared springform pan. Bake for 10 minutes. Let cool.
- Prepare the cheesecake filling: In a large bowl, beat the softened cream cheese and 1 1/2 cups sugar until smooth. Mix in vanilla extract.
- In a separate bowl, whisk together the cooled espresso and coffee liqueur, if using. Slowly add this liquid mixture to the cream cheese mixture, beating until just combined.
- Beat in the mascarpone cheese until the mixture is smooth.
- Add the eggs one at a time, mixing on low speed after each addition until just incorporated. Do not overmix.
- Pour half of the cheesecake batter over the cooled crust.
- If you are layering, arrange a single layer of espresso-soaked ladyfingers over the batter. Pour the remaining batter over the ladyfingers.
- Bake the cheesecake in a water bath for 60 to 75 minutes, or until the edges are set and the center has a slight jiggle.
- Turn off the oven and let the cheesecake cool inside the oven with the door propped open for one hour. This prevents cracking.
- Remove the cheesecake from the oven and cool completely on a wire rack. Chill in the refrigerator for at least 6 hours, or preferably overnight.
- Before serving, gently run a thin knife around the edge before releasing the springform side. Top with heavy cream, whipped, and dust generously with cocoa powder.
Notes
- For a no-bake version, skip the oven steps and chill the filling until firm. This recipe is a great alternative to standard meal planning when you need a rich dessert.
- If you skip the coffee liqueur, add an extra tablespoon of strong espresso to maintain the coffee flavor.
- Use high-quality cocoa powder for the best dusting flavor.
Nutrition
- Serving Size: 1 slice
- Calories: 450
- Sugar: 35g
- Sodium: 300mg
- Fat: 30g
- Saturated Fat: 18g
- Unsaturated Fat: 12g
- Trans Fat: 0.5g
- Carbohydrates: 40g
- Fiber: 1g
- Protein: 8g
- Cholesterol: 120mg