

Okay, listen up. If you’ve been subjected to sad, dry scones that taste like dusty hockey pucks—the kind you get at some terrible coffee shops—we need to fix that immediately. Because you absolutely deserve better! I’m Claire, and my whole mission here at Bliss Batter is to prove that homemade baked goods are just so much better, and that you are totally capable of making them. These scones are the real deal: tall, buttery, marvelously flaky, and unbelievably moist thanks to the magic ingredient we rely on so heavily. We worked hard to get this recipe foolproof, so toss out any fear you have about baking tricky pastry. Get ready for bakery-style perfection!
- Why This Buttermilk Scones Recipe Guarantees Perfect Texture
- Gathering Ingredients for Tender Buttermilk Scones
- How To Make Scones From Scratch: Step-by-Step Instructions
- Scone Recipe Variations for Every Season
- Tips for Success: Mastering Moist Scone Baking Tips
- Serving Suggestions for Classic Plain Scones
- Storage & Make Ahead Scones Dough Instructions
- Frequently Asked Questions About Perfect Scones
- Share Your Homemade Scones Creations
Why This Buttermilk Scones Recipe Guarantees Perfect Texture
It drives me crazy when people say scones are always dry! My goal with this recipe is the exact opposite: I want you to achieve that fantastic texture you normally pay way too much for at the fancy cafes. The secret to flaky scones isn’t a complicated folding method; it’s mostly about temperature control and the power of buttermilk. These are the two non-negotiables for getting tender results every single time.
- We avoid tough gluten formation, which is what makes baked goods chewy instead of light.
- You get incredible flavor without overworking the dough, which is honestly the easiest mistake to make!
The Secret to Fluffy Scones Recipe: Cold Ingredients
Seriously, don’t let your butter or buttermilk get warm! We need those butter pieces to stay solid when they hit the hot oven. As they melt, those little pockets create steam, and that steam creates the light, flaky layers we are obsessed with. Cold ingredients also mean less mixing time, keeping that gluten happy and relaxed. You want a gentle hand here for truly fluffy scones!

Achieving Bakery Style Scones At Home with Buttermilk
Buttermilk is my MVP here. It’s acidic, right? That acidity reacts beautifully with the baking powder we use, giving the dough an extra lift and making sure they rise tall rather than spreading out flat. Plus, the fat content in the buttermilk works with the butter to coat the flour particles, which is what gives you those wonderfully moist scones inside. It’s science, but fun science!
Gathering Ingredients for Tender Buttermilk Scones
Okay, let’s look at what you need. Honestly, keeping the ingredient list short is part of why this is such an easy homemade scone recipe. We use everyday pantry staples, but I insist you respect the requirement for quality here! When we talk about ingredients, especially the butter, using the best quality you can afford really shines through in the flavor. We want those scones to taste like you spent all morning on them!
Remember, the basic framework is for classic plain scones, but don’t forget to grab whatever mix-ins you want. Keep everything chilled until the second you use it!
Essential Components and Preparation Notes
You’ll need 2 cups of all-purpose flour, a quarter cup of sugar, a tablespoon of baking powder, and half a teaspoon of salt whisked together first. The real showstopper here is the butter—we need 6 tablespoons of cold unsalted butter, cut into small cubes. And of course, the liquid: 1 cup of cold buttermilk. Don’t forget the egg and a splash of milk for brushing on top later. For the best scones, cold is the only temperature that matters!
How To Make Scones From Scratch: Step-by-Step Instructions
Alright, this is where we stop worrying about sad, dry scones and start making magic! First things first, get that oven nice and hot—400°F (200°C) is what we’re aiming for, and line up that baking sheet with parchment paper. No sticking allowed! We want to move fast on this so everything stays cold, which is the secret sauce for our perfect scones.

Mixing Dough for Scone Recipe Perfect Texture
We start by cutting in that cold butter into the dry mix until it looks like rustic cornmeal with some pea-sized chunks still floating around. Those chunks are essential for flakiness, so don’t try to blend them away! Now, pour in the cold buttermilk. Use just a fork to mix it until it barely comes together. I mean it—shaggy, messy dough is exactly what we want. If you keep mixing until it’s smooth, you kill the texture and end up with dense pucks. Stop when you can still see bits of flour clinging to the sides.
Shaping and Baking Your Scones
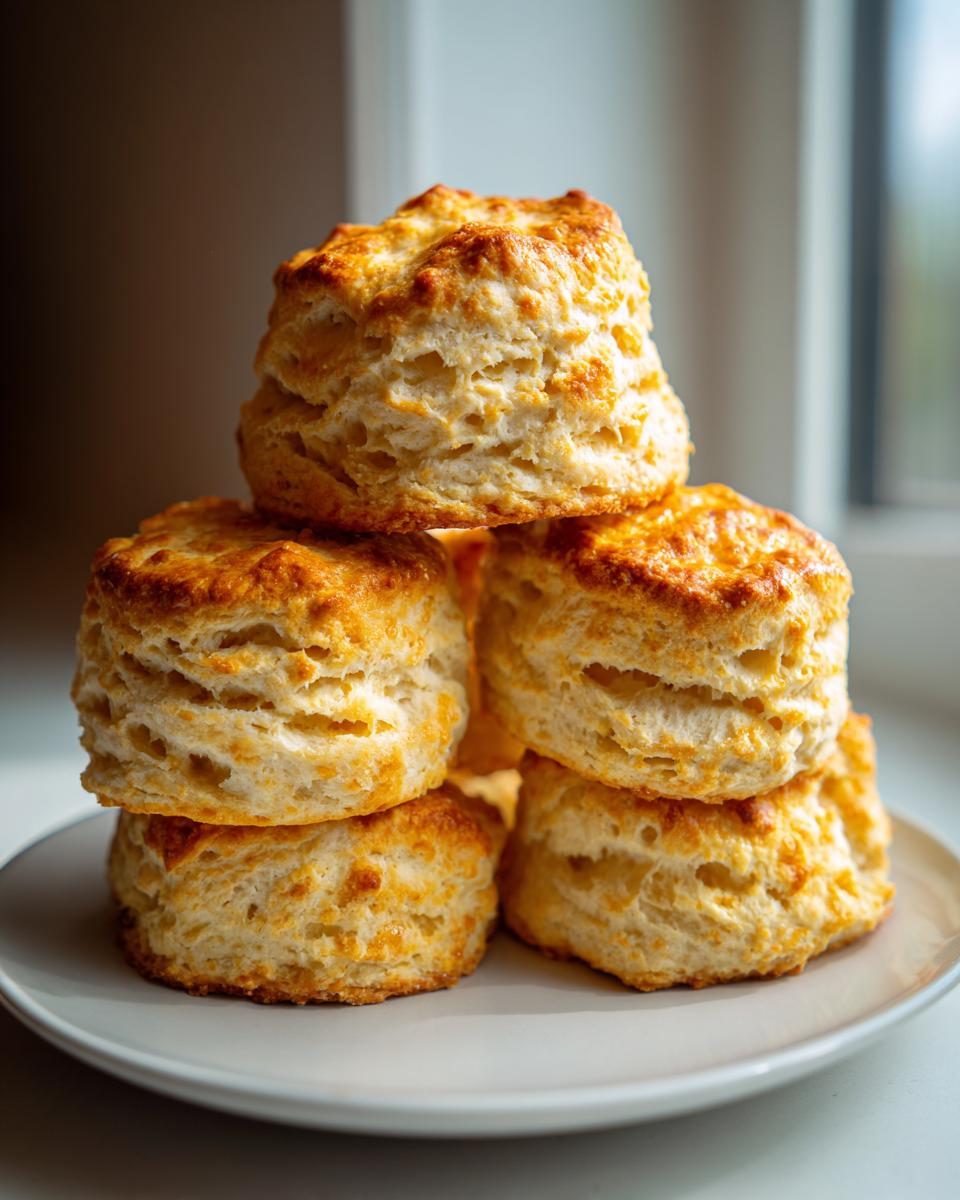
Turn that shaggy mess out onto a lightly floured surface. Give the dough just 3 or 4 gentle folds—literally just bring the edges to the center—to bring it together. Don’t knead! Roll or pat it into a thick circle, about 3/4 inch, and cut out your rounds or wedges. Remember, press straight down with your cutter and **do not twist** if you want those gorgeous tall scones! Brush the tops with your simple egg wash. Bake them for about 14 to 18 minutes until they’re gorgeously golden brown. That’s it!
Scone Recipe Variations for Every Season
Now that you have the foolproof method for the best scones, the world is your oyster! This base recipe is amazing on its own—a perfect classic plain scone—but it’s also practically begging for you to stir in some seasonal fun. If you’re getting organized with your weekly breakfast or brunch schedule, incorporating these variations is such a smart part of your meal planning because they are so quick to put together.
Fruity and Bright Blueberry Lemon Scones
If you want brightness to cut through all that buttery goodness, this is the ticket! For these Blueberry Lemon Scones, you just fold in about a half cup of fresh blueberries right at the end of Step 4, along with the zest of one whole lemon. Trust me, don’t skip the zest; that’s where all the zing lives! A simple lemon glaze on top after baking just takes them over the top.
Indulgent Chocolate Chip Scone Recipe Ideas
Who says scones have to be only for tradition? For a real treat, I love tossing in either white chocolate chips or semi-sweet chips. They melt just enough on the edges to make the whole scone feel decadent. These are fantastic additions to any grab-and-go breakfast lineup that needs a little sweetness. They also freeze beautifully after baking, making them great for quick prep when you are doing meal planning for the week ahead!

Warm Cinnamon Scones and Maple Pecan Scones
When the weather calls for coziness, lean into those warm spices! You can make Maple Pecan Scones by swapping out half the sugar for brown sugar and folding in some toasted pecans. For Warm Cinnamon Scones, just whisk a teaspoon of cinnamon into your dry ingredients. These options are amazing for making your kitchen smell incredible on a chilly weekend morning.
Tips for Success: Mastering Moist Scone Baking Tips
I know you’ve got the instructions down, but let me share just a few more things I learned over the years about achieving truly spectacular results. These extra little details are what separate a good batch from your new favorite recipe, focusing entirely on those Moist Scone Baking Tips. Honestly, it’s not about doing extra work; it’s about being smart with the work you already do!
For instance, if you are worried about overmixing, try chilling your flour briefly before you start. Yes, really! Room temperature flour seems innocent, but it absorbs liquid faster, which can fool you into adding too much buttermilk. Keep that flour, butter, and liquid as cold as ice, and you’ll naturally end up with those perfect light layers you want in every bite. I cover the science behind keeping baked goods tender over in my post about moist coffee cake crumb, but the same rules totally apply here!
Serving Suggestions for Classic Plain Scones
What do you do once you have these gorgeous, tall scones cooling on the rack? That’s the best part! While they are amazing all by themselves—truly, the buttery flavor shines—they are practically begging for something lovely to go alongside them. These are versatile enough for the most formal afternoon tea or just for a quick, delicious breakfast that feels special.
For a true, classic English experience, you absolutely must serve them split in half, warmed up just slightly, with high-quality preserves. Clotted cream is the gold standard, of course, but a good raspberry jam or strawberry jam works perfectly fine. Don’t feel like you have to stick to tradition, though! Since these are Classic Plain Scones, they are the perfect base for anything.
If you’re serving these for brunch, try setting out whipped honey butter or even a thick, homemade lemon curd. And of course, you need a fantastic beverage! A strong black tea is traditional, but a homemade latte feels like a serious upgrade. Honestly, eating these warm, fresh from the oven, makes any ordinary morning feel like a celebration.
Storage & Make Ahead Scones Dough Instructions
One of the best things about these scones is flexibility. If you are prepping for a busy weekend or trying to streamline your breakfast routine, you absolutely can make these ahead! If you happen to have leftovers (which, let’s be honest, rarely happens in my house), just seal them up in an airtight container at room temperature for up to two days. They actually stay surprisingly soft!
If you want them fresh but don’t want to spend time mixing dough in the morning, freeze the dough! After you cut your rounds or wedges but before you brush them with the egg wash, place them on a parchment-lined tray and pop that tray in the freezer. Once they are frozen solid—I usually leave them for about an hour—transfer them to a sealed zip-top bag. You can keep that Make Ahead Scones Dough frozen for up to a month!
When you’re ready to bake, just pull what you need right from the freezer. Don’t thaw them! Brush them liberally with the egg wash right away and pop them into the 400°F oven. You’ll need to add about 3 to 5 minutes to the baking time since they are starting frozen, but they bake up just as beautifully tall and flaky. It’s a lifesaver for quick brunches!
For reheating previously baked scones, I skip the microwave entirely. Pop them on a baking sheet at about 325°F for just 5 minutes. That slight warmth melts the butter just enough to bring back that soft, fresh-from-the-oven tenderness. Perfection!
Frequently Asked Questions About Perfect Scones
I get so many messages asking about tweaks and substitutions for these Easy Homemade Scones, and that’s fantastic! It shows you’re ready to bake. Because this recipe is so solid, it handles a few changes really well, but some things we just can’t mess with, especially if you want the Best Breakfast Scones.
Can I use regular milk instead of buttermilk in these scones?
You can try, but honestly, you’ll miss out on that signature tenderness! Buttermilk is really important here because of the acidity reacting with the leavening agent and tenderizing the dough. If you are totally out, you can fake it in a pinch: take 1 cup of regular milk and stir in 1 full tablespoon of white vinegar or lemon juice. Let it sit on the counter for 5 or 10 minutes until it looks slightly curdled. It acts like buttermilk in a pinch, but keep in mind, the texture won’t be quite as perfectly velvety as when you use the real thing.
What is the best way to cut scones for maximum height?
This is one of my biggest pet peeves when I see people struggle! We are trying to create layers, not compact the dough into a dense disc. When you use your biscuit or cookie cutter, you must push down firmly and straight down—like you are punching through the dough. Do not, under any circumstances, twist the cutter around! Twisting drags the sides of the dough together, sealing those beautiful layers shut and preventing your scones from rising tall. Keep it straight, keep it clean!
Are these scones good for meal planning if I am following a keto meal plan?
Oh, that’s a great question about integrating these into a specific meal planning strategy! I have to be upfront: this recipe relies heavily on traditional flour and sugar, so no, these specific buttermilk scones are not keto-friendly as written. If you are strictly following a keto meal plan, you would need to replace almost all the core ingredients with specialty flours and sweeteners, which changes the texture dramatically. You might want to check out some of my resources on low-carb baking substitutions if that’s your focus, but for the fluffiest texture, stick to this recipe as written!
Share Your Homemade Scones Creations
I am so genuinely excited for you to try making these scones! Baking is supposed to be joyful, and seeing what you all create is the best part of my job.
Once you’ve pulled your batch out of the oven—especially if you tried a fun variation like the Cranberry Orange Scones—I would absolutely love to hear about it!
Please do me a favor and come back here to leave a star rating and share your thoughts in the comments below. Did you stick to the classic plain scone? Did you try freezing the dough ahead of time? Let me know all the little things that made the recipe work in *your* kitchen. If you snap a picture of your fluffy, tall masterpieces, feel free to share it on social media and tag me! Happy baking, my friends! I can’t wait to see what you whip up next.
PrintThe Best Buttermilk Scones Recipe for Flaky, Moist Results

Make tall, buttery, flaky scones at home that rival bakery quality. This easy recipe uses buttermilk for a tender, moist interior and simple steps for perfect texture every time.
- Prep Time: 15 min
- Cook Time: 18 min
- Total Time: 33 min
- Yield: 8 scones 1x
- Category: Breakfast
- Method: Baking
- Cuisine: American
- Diet: Vegetarian
Ingredients
- 2 cups all-purpose flour
- 1/4 cup granulated sugar
- 1 tablespoon baking powder
- 1/2 teaspoon salt
- 6 tablespoons cold unsalted butter, cut into small cubes
- 1 cup cold buttermilk
- 1 large egg, beaten (for egg wash)
- 1 tablespoon milk or cream (for egg wash)
- Optional Add-ins: 1/2 cup blueberries, white chocolate chips, or dried cranberries
Instructions
- Preheat your oven to 400°F (200°C). Line a baking sheet with parchment paper.
- In a large bowl, whisk together the flour, sugar, baking powder, and salt.
- Add the cold, cubed butter to the dry ingredients. Use a pastry blender or your fingertips to cut the butter into the flour until the mixture resembles coarse crumbs with some pea-sized pieces of butter remaining. This step is key for flaky scones.
- If using add-ins, gently stir them into the flour mixture now.
- Make a well in the center of the dry ingredients and pour in the cold buttermilk. Use a fork to mix until just combined. Do not overmix; the dough will look shaggy.
- Turn the dough out onto a lightly floured surface. Gently knead the dough 3 or 4 times until it just comes together.
- Pat or roll the dough into a circle about 3/4 inch thick.
- Use a 2-inch round biscuit cutter (or a knife) to cut the dough into wedges or rounds. For taller scones, press the cutter straight down without twisting. Place the cut pieces onto the prepared baking sheet.
- In a small bowl, whisk together the beaten egg and 1 tablespoon of milk or cream for the egg wash. Brush the tops of the scones lightly with the wash.
- Bake for 14 to 18 minutes, or until the tops are golden brown and the scones are cooked through.
- Let the scones cool slightly on the baking sheet before moving them to a wire rack. Serve warm.
Notes
- For the best texture, keep your butter and buttermilk as cold as possible before mixing.
- If you want a sweeter scone, you can drizzle a simple glaze (1 cup powdered sugar mixed with 2 tablespoons milk or lemon juice) over the tops once they are cool.
- If you are planning your weekly meals, these scones freeze well after baking, or you can freeze the cut dough rounds before baking for quick future breakfasts.
- This recipe avoids complicated techniques often seen in meal planning guides for baked goods.
Nutrition
- Serving Size: 1 scone
- Calories: 320
- Sugar: 8
- Sodium: 280
- Fat: 17
- Saturated Fat: 10
- Unsaturated Fat: 7
- Trans Fat: 0
- Carbohydrates: 35
- Fiber: 1
- Protein: 6
- Cholesterol: 65