
If you’re like me, sometimes all you need after a long week is that perfect, familiar, cozy hug in a baking dish. Forget fussy dinners; we are talking about pure, unadulterated Tex-Mex comfort food done the Bliss Batter way! That’s why my family loves this super simple chili frito pie. It takes my favorite hearty beef chili, layers it with crunchy corn chips, and tops it all with gooey, melted cheddar cheese. It truly brings me that same simple joy I find when I’m perfecting a batch of cookies. Trust me, this entire recipe is tested, tweaked, and guaranteed to be accessible for even the busiest weeknights, so you can get to the happy part faster. Ready to make some magic? You’ll find more quick weeknight weeknight dinners right here!
- Why This Hearty Layered chili frito pie Recipe Works (E-E-A-T)
- Gathering Ingredients for Your chili frito pie Casserole
- Step-by-Step easy chili pie instructions for chili frito pie
- best Frito pie topping ideas for your chili frito pie
- Making a homemade Frito pie casserole vs. the Walking Taco Style
- Ingredient Notes and Substitutions for chili frito pie
- Storage and Make-Ahead Tips for chili frito pie
- Frequently Asked Questions about chili frito pie
- Estimated Nutritional Snapshot for chili frito pie
- Share Your Homemade chili frito pie Creations
Why This Hearty Layered chili frito pie Recipe Works (E-E-A-T)
What sets this recipe apart from just dumping everything in a bowl? It’s all about testing! We worked hard to figure out how to build this dish so that chip crunch lasts, which is key to any good Tex Mex comfort food experience. This is truly the best quick weeknight chili dinner because we nailed the structure.
Perfect Texture: Crunchy Chips Meet Rich Chili
The secret to keeping things crisp when you make a layered casserole is to isolate the Fritos. By placing half of them on the bottom and sprinkling the rest across the middle layer, you create pockets of air and a barrier against the moist chili. Everything gets deliciously heated through, but you don’t end up with mush!
Simple Steps for the Ultimate chili frito pie Assembly
I promised you accessible recipes, and this one delivers maximum flavor with minimum fuss. The assembly is so straightforward—just two simple, alternating layers and then straight into the oven. If you can layer ingredients, you can master this amazing chili frito pie assembly.
Gathering Ingredients for Your chili frito pie Casserole
At Bliss Batter, we believe in using good, honest ingredients—nothing fussy, promise! To build this truly spectacular, heartwarming chili frito pie, the quality of what goes into that chili base really makes a difference. We’re starting with basic pantry staples, but we’ll be specific about how everything needs to be prepped so your bake comes out perfectly layered. Don’t skip those small prep steps; they are what elevate this from quick dinner to true comfort classic!
Chili Base Ingredients
For the rich, slow-simmered flavor that defines our chili, gather these buddies. Remember, we want that deep flavor profile, so make sure you’ve got your spices ready to go when the onions are transparent!
- 1 tablespoon olive oil
- 1 pound ground beef (lean is great, but any kind works!)
- 1 medium onion, which you’ll want to have nicely chopped
- 2 cloves garlic, make sure this is minced finely
- 1 (15 ounce) can kidney beans, rinsed and drained well
- 1 (15 ounce) can black beans, rinsed and drained well
- 1 (28 ounce) can crushed tomatoes
- 1 (10 ounce) can mild enchilada sauce
- 2 tablespoons chili powder
- 1 teaspoon ground cumin
- 1/2 teaspoon dried oregano
- Salt and black pepper to taste
Layering and Topping Components for chili frito pie
These are the components that bring in the crunch and the cool creaminess. Having these on hand means you shift immediately into assembly mode once the chili is done simmering. This is what makes the final chili frito pie so satisfying!
- 1 (13 ounce) bag Fritos Original Corn Chips (This is crucial—hold the name brand!)
- 2 cups shredded sharp cheddar cheese (I use sharp because it melts beautifully)
- For Topping: Sour cream, chopped green onions, and sliced jalapeños (if you like a little kick!)
Step-by-Step easy chili pie instructions for chili frito pie
Okay, this is where the magic happens! Cooking should feel intuitive, not like following a complex military plan. These easy chili pie instructions break down the process so you can focus on the delicious smells filling your kitchen. We’re making a baked casserole here, which is perfect for serving a crowd, but remember the spirit of the ‘walking taco’ can be used if you’re feeling adventurous!
Preparing the Hearty Beef Chili
First things first, we need that rich, flavorful base. Put that oven on to preheat to 375 degrees Fahrenheit right away, and grab your 9×13 baking dish—give it a light coating of grease so nothing sticks later!
- Heat your tablespoon of olive oil in a big, heavy skillet over medium heat. Toss in your pound of ground beef and cook until it’s beautifully browned all over, scraping up those tasty brown bits from the bottom. Don’t forget to drain off any extra fat—we want flavor, not grease!
- Toss in that chopped onion and let it soften up until it looks a little translucent, which takes about five minutes. Then, add your minced garlic. Be careful here; garlic burns fast! Just cook it for one minute until you can really smell that wonderful fragrance.
- Now, for the main event! Stir in both cans of beans (remember, we rinsed and drained those!), the crushed tomatoes, the enchilada sauce, chili powder, cumin, and oregano. Give everything a good stir to combine all those spices.
- Bring the whole mixture to a gentle simmer. This is super important: let it simmer for a full 10 minutes, stirring now and then. Letting it simmer lets all those spices really marry together and deepens the flavor of your homemade chili—it’s worth those extra ten minutes! Season with salt and pepper until it tastes just right to you.
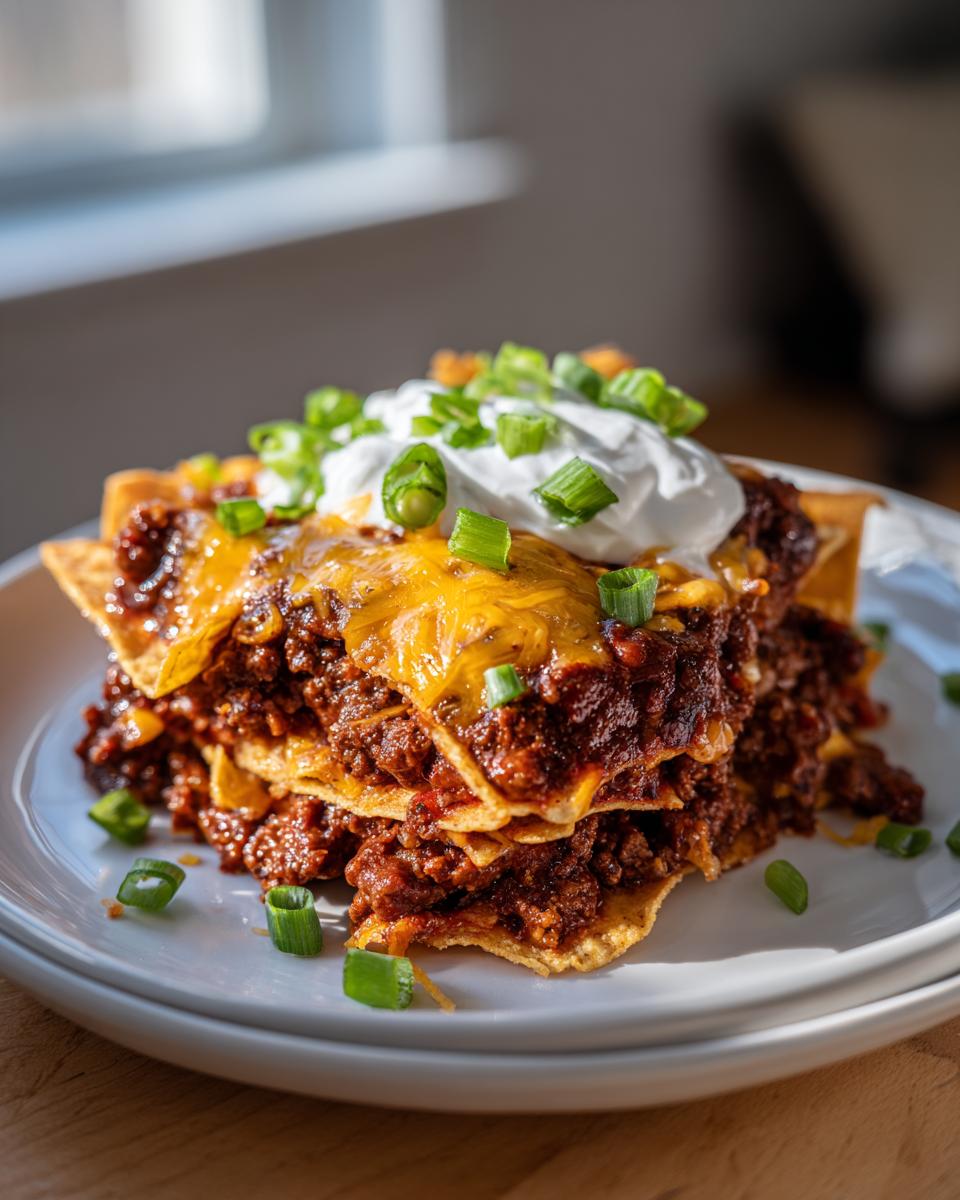
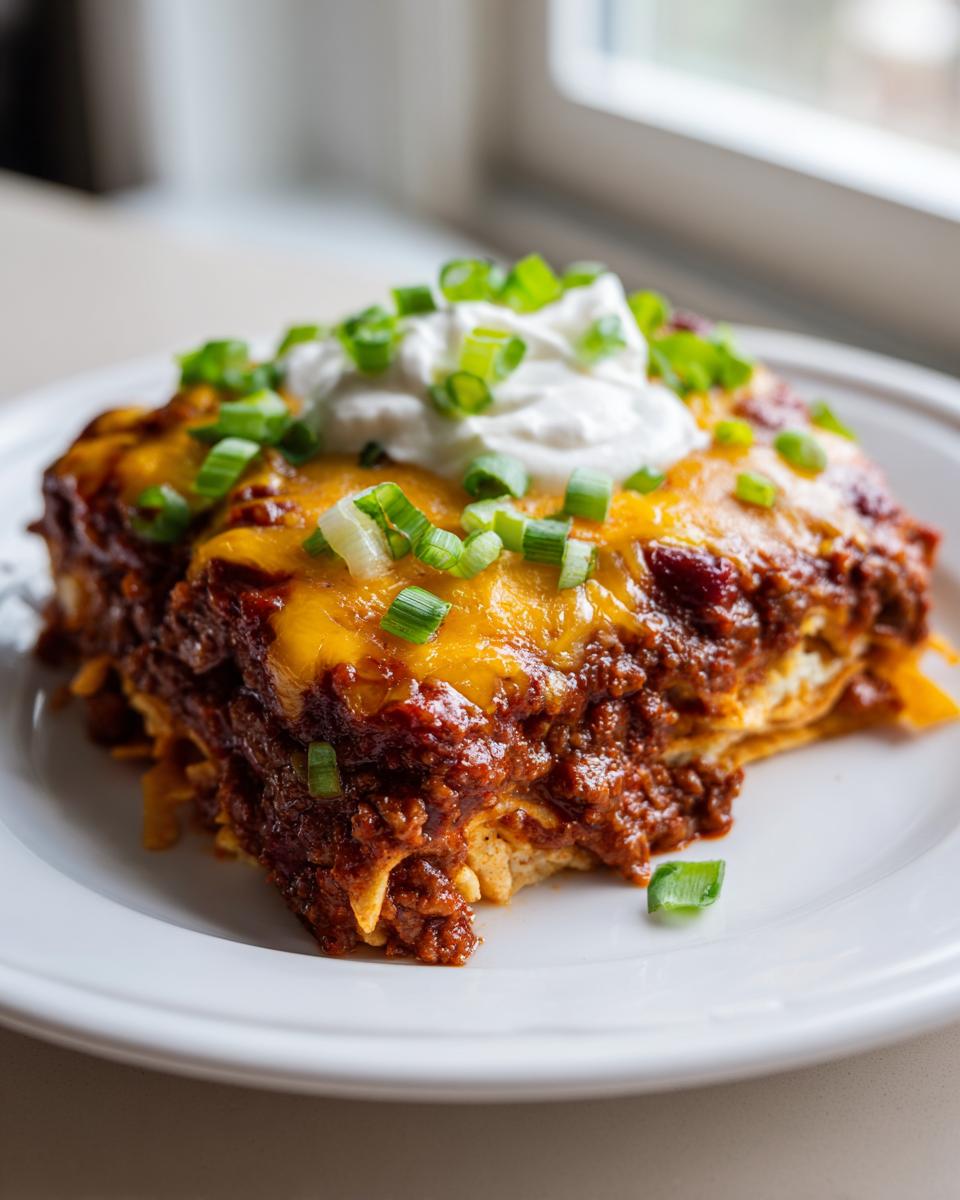
Constructing the Layers of chili frito pie
Once the chili has simmered and the house smells incredible, it’s time for assembly. This is where we make sure every serving gets that perfect crunch. Take your time spreading these layers evenly so you don’t end up with giant bare spots. If you layer correctly, this chili frito pie will hold up beautifully!
- Start by spreading half of your Fritos corn chips evenly across the bottom of your prepared baking dish.
- Next, spoon exactly half of that hot chili mixture right over the chips. Try to spread it gently so you don’t smash the chips too much. Sprinkle half of your bright cheddar cheese on top of that chili layer.
- Time to repeat! Place the remaining Fritos chips down, followed by all the rest of your chili, and finally, top everything with the last of that shredded cheese.
Baking and Finalizing Your corn chip pie recipe
We are almost done! The goal here is just to get that chili piping hot and the cheese melted into bubbly perfection. It doesn’t need long because the chili is already cooked.
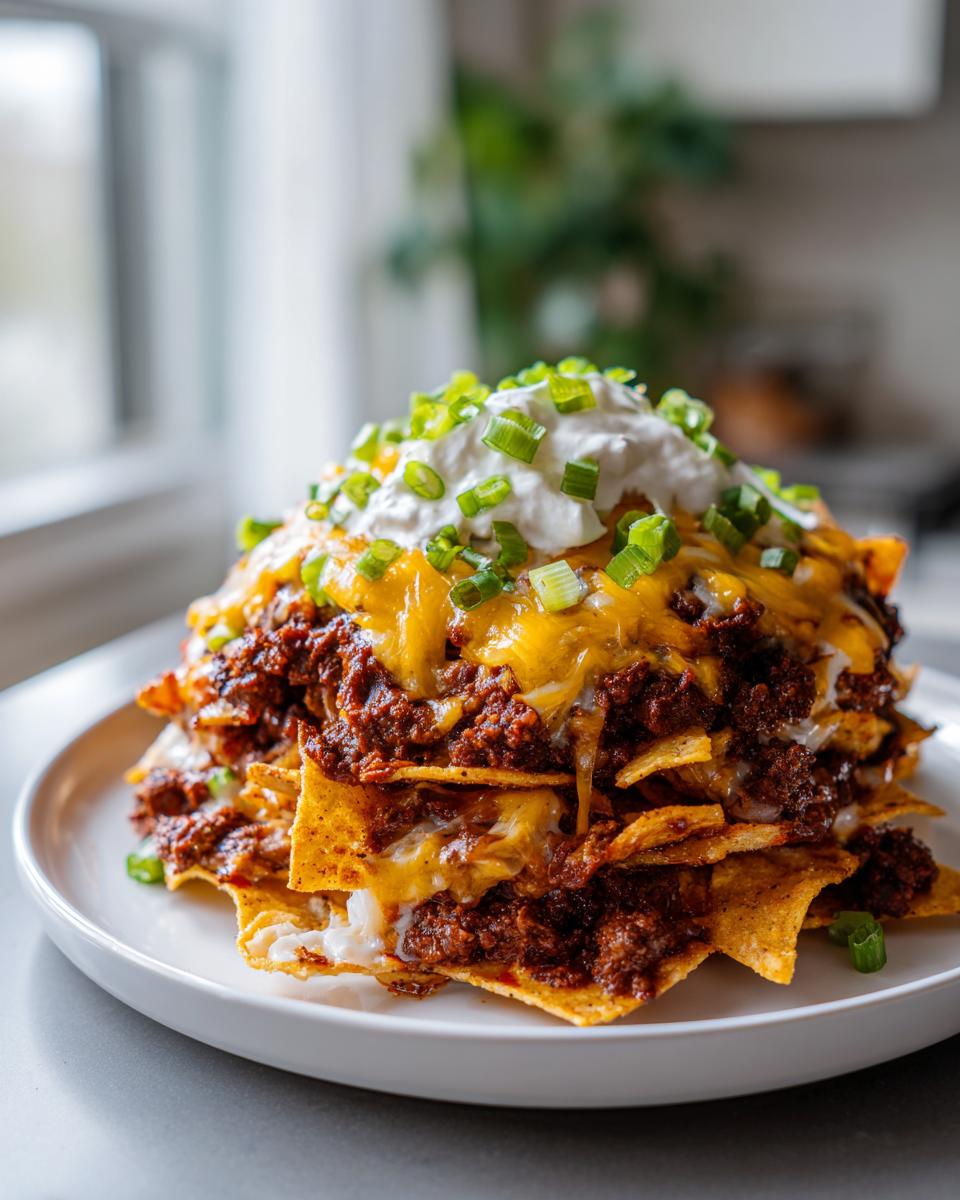
- Pop your glorious creation into that 375-degree oven. Let it bake for about 15 to 20 minutes. You’ll know it’s done when the cheese is completely melted, shiny, and just starting to bubble around the edges.
- This is my big tip for structural integrity: let the corn chip pie recipe rest for a good five minutes on the counter after it comes out. If you cut it too soon, it might slump a little. That five minutes lets the layers set just enough.
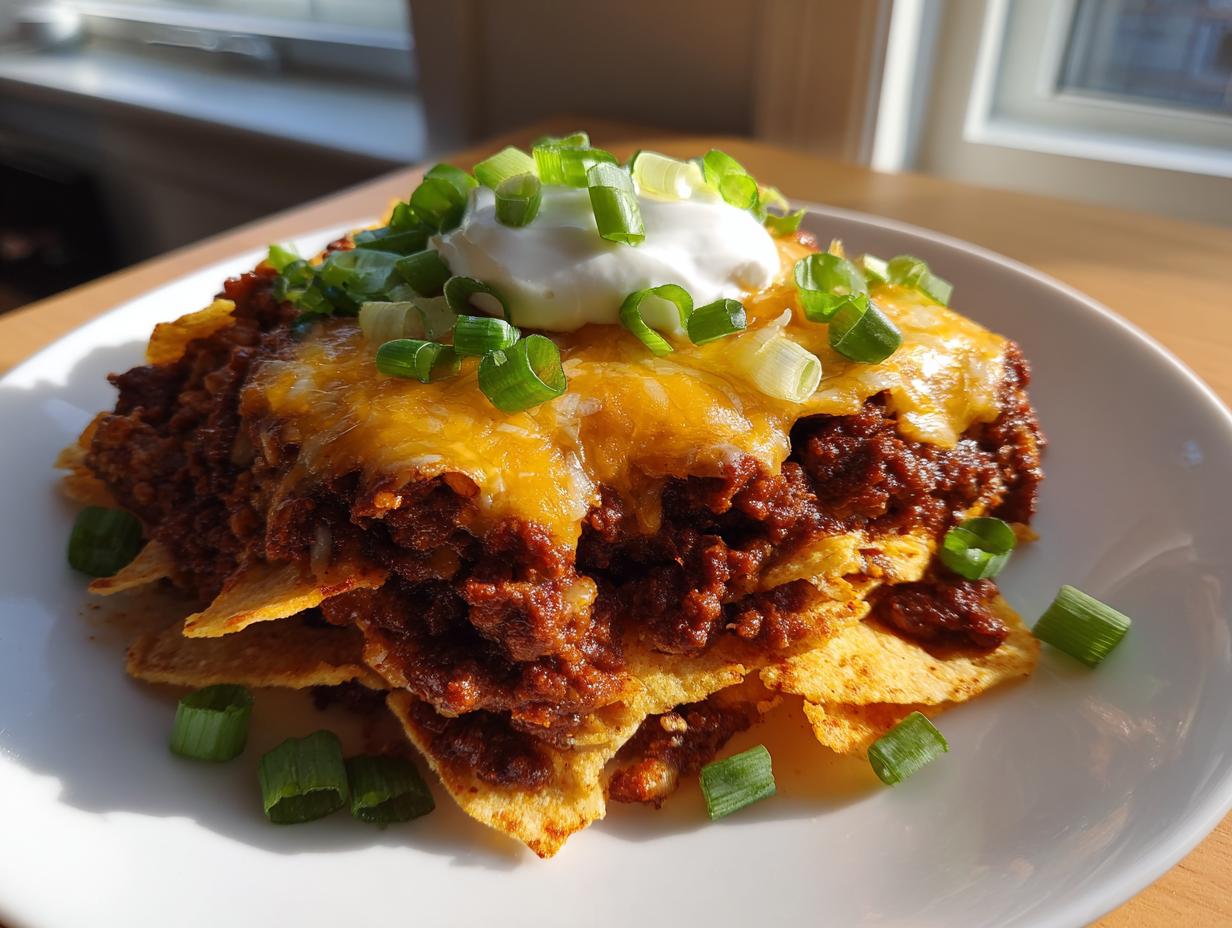
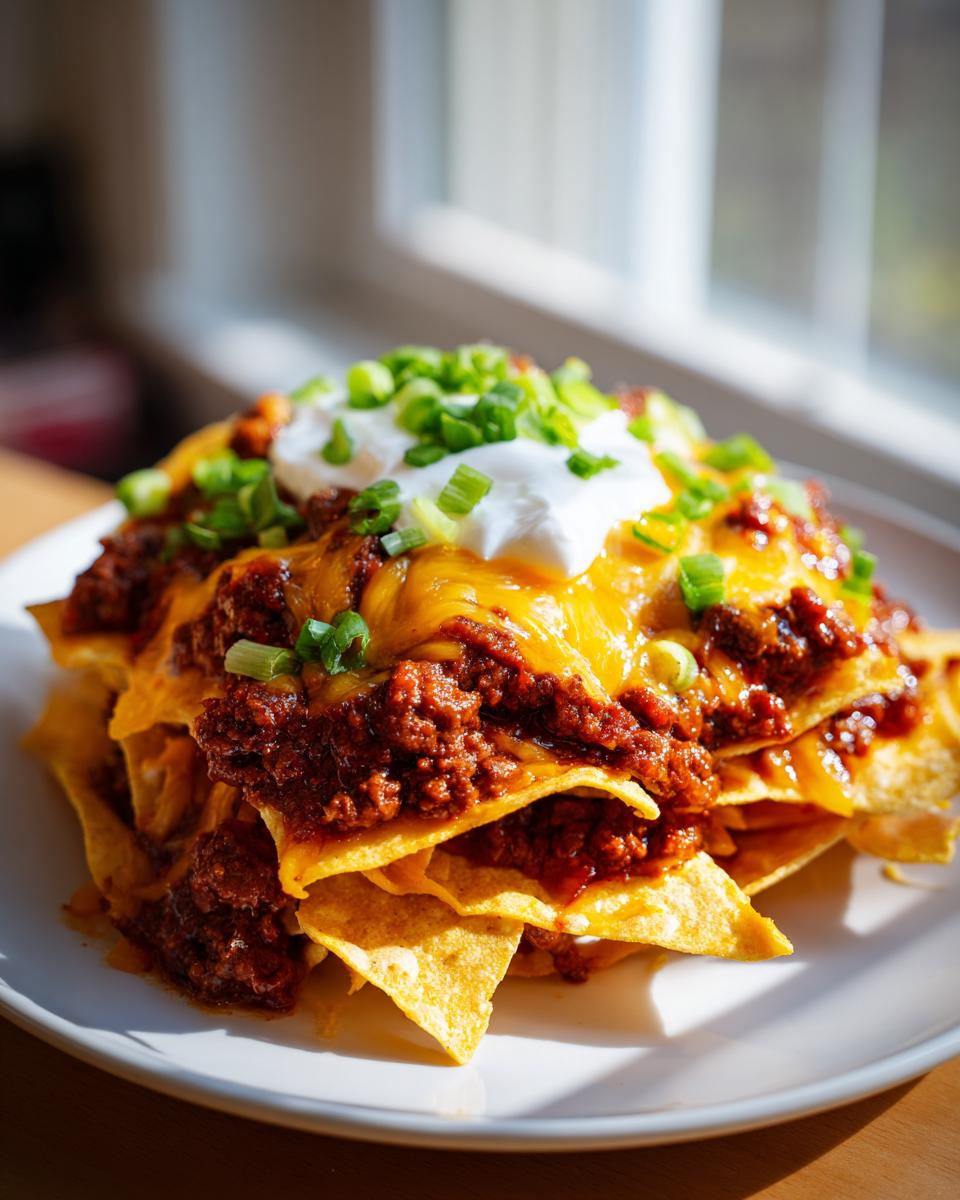
Serve it up hot and let everyone customize their slice with their favorite toppings. Enjoy that homemade goodness!
best Frito pie topping ideas for your chili frito pie
One of my absolute favorite things about making a big, comforting casserole like this is that it’s practically a blank canvas for customization! The chili and Fritos base is amazing on its own, but the right toppings can take your chili frito pie from great to show-stopping. Seriously, toppings are where you get to let your personality shine through. We’ve got the classics that everyone expects, but I also want to share some fun little additions that my friends always ask me about when I bring this dish to parties. You can find more ideas for effortless entertaining, like this party snacks collection, on the site!
Classic Toppings for Tex Mex Comfort Food
You can never go wrong with the staples. These three ingredients provide the perfect textural and temperature contrast to the hot, beefy chili layer. When you pull that bubbly cheese casserole out of the oven, have these waiting nearby so everyone can load up their plates!
- Sour Cream: This is non-negotiable for me! A big dollop brings that cooling creaminess that balances the richness of the beef and the slight heat from the spices. It mellows everything out beautifully.
- Chopped Green Onions: These give you a fresh, sharp bite. They cut through the richness perfectly and add a beautiful pop of bright green color, making the final plate look so much more appetizing.
- Sliced Jalapeños: If you want a little lingering warmth without making the whole casserole spicy, fresh or pickled jalapeños are the answer. They bring that essential Southwestern zing!
Creative Variations on the chili and Fritos recipe
If you’ve got those classic toppings covered, why not try branching out? These small additions make a huge difference when you’re eating leftovers the next day or just feel like jazzing up the presentation. These ideas work great whether you’re eating it straight from the dish or even using the portable walking taco method!
- Cubed or Sliced Avocado: Creamy, cool avocado is simply divine against hot chili. It adds healthy fat and makes the whole thing feel extra luxurious.
- Fresh Cilantro: If you’re a cilantro person (I totally am!), a generous sprinkle adds an herbaceous brightness this chili frito pie really responds to.
- Crumbled Cotija Cheese: Swap out some (or half!) of that cheddar for salty, crumbly Cotija cheese. It doesn’t melt quite as much, but it gives you that fantastic, tangy, slightly grainy texture right on top.
Making a homemade Frito pie casserole vs. the Walking Taco Style
The recipe I shared above gives you that beautiful, shareable, cheesy bake—the full homemade casserole experience. It’s perfect when you need a warm, comforting meal straight from the oven, ideal for a family dinner where everyone digs in together off one big platter. It holds all those lovely layers of meat, beans, chips, and cheese together until you cut into it. That’s the beauty of a great simple layered casserole recipe; it feels like a feast!
But let’s talk about the other side of the Frito Pie coin—the legendary ‘Walking Taco’ style. My mom used to make these for us when we were kids at camping trips or neighborhood block parties. It’s brilliant for portability! Instead of assembling everything in a 9×13 dish, you take an individual serving bag of Fritos (the smaller ones work best) and snip it open right along the side seam.
You load those chips right inside their own bag with your hot chili and toppings. You literally eat it right out of the bag using a fork or spoon! It minimizes cleanup like crazy and takes the fun factor up tenfold. It’s definitely a little messier, and you don’t get that satisfyingly crunchy baked cheese crust you get from the casserole version, but it captures that spontaneous spirit of American Southwest cuisine.
So, which one should you choose? If you’re staying home on a chilly night, go for the bake. If you’re heading out to a sporting event or need a super quick, single-serving lunch, the Walking Taco method is your best friend. Either way, you’re getting that amazing combination of chili and corn chips!
Ingredient Notes and Substitutions for chili frito pie
Even though my heart belongs to the classic beef version of this chili frito pie, I know that sometimes we need to adapt based on what we have or what we’re craving. Think of these little tweaks as ways to personalize your bake without losing the essential Tex-Mex comfort element. After all, a great recipe should work for *you*—that’s why we test things so thoroughly here at Bliss Batter! If you’re looking for more ways to keep dinner fast, check out my collection of quick weeknight dinners.
Making a Lighter chili frito pie
The ground beef gives us that wonderful savoriness and texture that helps the chili hold up so well between those chip layers, but if you’re looking to lighten things up for a weeknight, swapping the beef is super easy. You can absolutely substitute ground turkey or even ground chicken in this recipe.
When you use leaner poultry, though, I want you to be mindful of the fat content. You might need to add just a tiny splash more of the enchilada sauce or crushed tomatoes during the simmer phase, just because the poultry releases less liquid as it cooks compared to regular beef. Don’t worry, the flavor profile stays fantastic, and you still get that comforting bowl of chili frito pie goodness!
Adjusting Spice Level in Your chili frito pie
Everyone’s spice tolerance is different, right? Our base recipe leans toward mild, flavorful warmth using standard chili powder, but if you’re making this for folks who love that slow burn, ramping up the heat is simple!
The easiest way to boost the intensity without changing the whole flavor profile is by adding cayenne pepper right in with the cumin and oregano during the 10-minute simmer. Start small—maybe just a pinch—and taste as you go. You can toss in up to 1/4 teaspoon of cayenne if your crew likes things genuinely spicy. This gives you total control over the heat level of your wonderful homemade Frito pie.
Storage and Make-Ahead Tips for chili frito pie
One of the greatest things about a glorious casserole like this chili frito pie is that it’s absolutely fantastic as leftovers. Truly, the flavors deepen overnight, making Tuesday serving even better than Monday night’s dinner! If you’re aiming to save time later in the week, you have a couple of great options. This recipe works wonderfully as a freezer friendly chili pie, making it perfect for those emergency dinners when you just can’t face cooking!
For freezing, it’s slightly better to freeze the chili part separately before you bake it with the Fritos and cheese. However, if you have baked leftovers, we have solutions for that too! We’ve covered everything you need to know to keep this Tex-Mex comfort food delicious, even on day three. You can find more tips on extending the life of your bakes over at my freezer friendly chili pie page!
Reheating Leftover beef chili corn chip bake
So, you have some leftover baked chili frito pie and you’re ready to enjoy it again. The main challenge here is the chips—they naturally soften up a bit once they’ve been sitting soaking in that amazing chili overnight. That’s totally normal!
If you want to try and bring back a tiny bit of that original texture, the oven is your best bet. Scoop your portion onto an oven-safe plate or small baking dish, cover it loosely with foil, and heat it at about 350 degrees until it’s hot all the way through. The foil traps the heat so the chili warms up without aggressively drying out the chips.
If you’re in a major hurry, the microwave is fine, but just be aware that those chips will soften significantly more in the microwave. Heat it in short bursts, perhaps 45 seconds at a time, stirring gently between bursts. No matter how you reheat, make sure you add a fresh topping of cheese (if you have some!) and a dollop of cold sour cream right before serving—that temperature contrast is everything!
Frequently Asked Questions about chili frito pie
I totally get it—when you’re making a new favorite, you always have a few little questions about tweaking things or storing the leftovers. That’s the joy of home cooking; it should fit your life perfectly! Here are some of the common things I hear about this delicious bake. We want to make sure every batch is a success for you, whether you’re serving it up for a big game crowd or just looking for a great kid friendly dinner idea!
Can I use different types of corn chips for this recipe?
This is such a good question! While the recipe calls for Fritos Original Corn Chips, and trust me, they are the gold standard for this specific dish, you certainly can experiment if you need to. Fritos have a unique puffiness and seasoning that really locks in against the chili. If you use traditional tortilla chips, they will still be tasty, but they tend to be thinner and will definitely get softer much faster when layered. You might want to go heavy on the chips right before baking if you use those!
Is this a good kid friendly dinner idea?
Oh, absolutely! This is one of those meals that kids generally adore because it’s a little messy, very cheesy, and incredibly flavorful without being overwhelmingly spicy (since we kept the base mild). My biggest tip for the little ones is to serve the main casserole hot, but keep all the toppings totally separate. That way, they can load up on cheese and sour cream, maybe skip the onions, and enjoy their own personalized plate. It’s a fantastic kid friendly dinner idea that feels like a party!
Can I make the chili ahead of time for this simple layered casserole recipe?
Yes, you totally can, and I often do! Making the chili base ahead of time is the perfect way to streamline your evening efforts. You can cook the entire chili mixture—steps 1 through 4—up to two days in advance. Just store the chili in an airtight container in the fridge. When you’re ready to bake your simple layered casserole recipe, let the chili sit on the counter for about 30 minutes just to take the deep chill off, then proceed with laying the chips, chili, and cheese as instructed. It really speeds up the process when you’re aiming for that quick weeknight meal!
Estimated Nutritional Snapshot for chili frito pie
Here is the nutritional breakdown for one serving of our chili frito pie casserole, based on the recipe yields provided earlier. At Bliss Batter, we believe in honest food, and that includes being transparent about what goes into enjoying these treats! Remember, these numbers are always going to be estimates because we don’t know exactly how much salt you add or which brand of sharp cheddar you choose!
We used the breakdown provided in our recipe notes, but it’s good to see it all laid out here so you know what you’re getting with this wonderfully rich, fulfilling bowl of Tex-Mex goodness.
- Calories: Approximately 550
- Fat: Around 30g (with 12g coming from saturated fat)
- Carbohydrates: About 45g
- Protein: A solid 30g! Perfect for a hearty dinner.
- Fiber: Roughly 8g, thanks to those lovely beans!
- Sugar: About 10g
- Sodium: Approximately 850mg (This is where keeping that chili simmered is great, but don’t forget to taste before adding extra salt!)
- Cholesterol: About 75mg
This is a substantial, home-style meal, folks! It’s high in protein and fiber, which helps balance out the richness from the cheese and chips—truly a balanced bite of American Southwest cuisine!
Share Your Homemade chili frito pie Creations
Now that your kitchen smells amazing, and you’ve got that gooey, bubbly, crunchy chili frito pie sitting on your counter, the best part is sharing the joy! That’s what Bliss Batter is all about—creating happiness at home and sharing it with the people we love. I truly hope this simple layered casserole brought a little moment of cozy comfort to your busy week.
I pour my heart into testing these recipes just for you, so if you’ve made this Tex-Mex comfort food masterpiece, please let me know how it turned out! Did you stick with the classic sour cream and onions, or did you go wild with those creative toppings we talked about?
Take a snapshot of your beautiful creation—maybe when everyone is gathering around the plate digging in—and share it on social media! Tag us so I can see all the deliciousness happening in your home kitchens. If you tried the Walking Taco style, I especially want to see pictures!
When you share, please hit that 5-star rating for this recipe right here on the site. Those ratings mean the world to me; they let me know I’m sending you recipes that truly make life a little happier and tastier. And hey, if you ever have a burning question or just want to say hello, don’t hesitate to reach out through my contact page—I absolutely love hearing from my Bliss Batter community!
Happy scooping, and thank you for baking with me today!
PrintHearty Layered Chili Frito Pie

Make this simple, comforting Chili Frito Pie casserole. It combines a rich beef chili with crunchy corn chips and melted cheese for a quick weeknight dinner.
- Prep Time: 15 min
- Cook Time: 30 min
- Total Time: 45 min
- Yield: 6 servings 1x
- Category: Dinner
- Method: Baking
- Cuisine: American Southwest
- Diet: Low Lactose
Ingredients
- 1 tablespoon olive oil
- 1 pound ground beef
- 1 medium onion, chopped
- 2 cloves garlic, minced
- 1 (15 ounce) can kidney beans, rinsed and drained
- 1 (15 ounce) can black beans, rinsed and drained
- 1 (28 ounce) can crushed tomatoes
- 1 (10 ounce) can mild enchilada sauce
- 2 tablespoons chili powder
- 1 teaspoon ground cumin
- 1/2 teaspoon dried oregano
- Salt and black pepper to taste
- 1 (13 ounce) bag Fritos Original Corn Chips
- 2 cups shredded sharp cheddar cheese
- For Topping: Sour cream, chopped green onions, sliced jalapeños
Instructions
- Preheat your oven to 375 degrees Fahrenheit. Lightly grease a 9×13 inch baking dish.
- Heat the olive oil in a large skillet over medium heat. Add the ground beef and cook until browned. Drain off any excess fat.
- Add the chopped onion to the skillet and cook until softened, about 5 minutes. Add the minced garlic and cook for 1 minute more until fragrant.
- Stir in the kidney beans, black beans, crushed tomatoes, enchilada sauce, chili powder, cumin, and oregano. Season with salt and pepper. Bring the mixture to a simmer and cook for 10 minutes, stirring occasionally. This is your homemade chili.
- Spread half of the Fritos corn chips evenly across the bottom of the prepared baking dish.
- Pour half of the chili mixture over the layer of corn chips. Sprinkle with half of the shredded cheddar cheese.
- Repeat the layers: remaining Fritos, remaining chili, and remaining cheese.
- Bake for 15 to 20 minutes, or until the cheese is melted and bubbly.
- Let the casserole rest for 5 minutes before serving. Top individual servings with sour cream, green onions, and jalapeños as desired.
Notes
- For a portable ‘walking taco’ style, layer the chili and toppings directly into individual bags of Fritos instead of making a casserole.
- You can substitute turkey or ground chicken for the beef to make a lighter version.
- If you prefer a spicier flavor, add a pinch of cayenne pepper to the chili seasoning mix.
Nutrition
- Serving Size: 1 serving
- Calories: 550
- Sugar: 10
- Sodium: 850
- Fat: 30
- Saturated Fat: 12
- Unsaturated Fat: 18
- Trans Fat: 0
- Carbohydrates: 45
- Fiber: 8
- Protein: 30
- Cholesterol: 75