
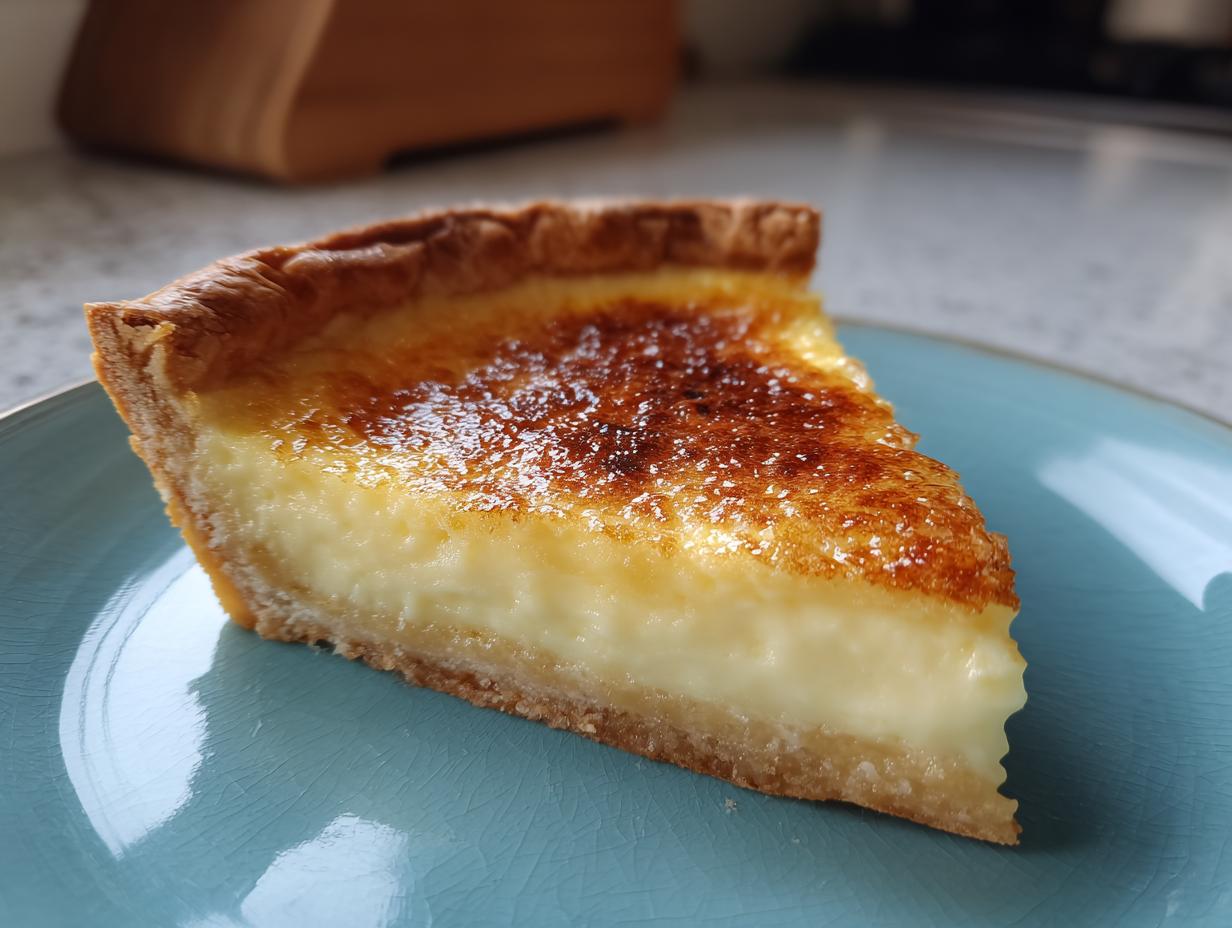
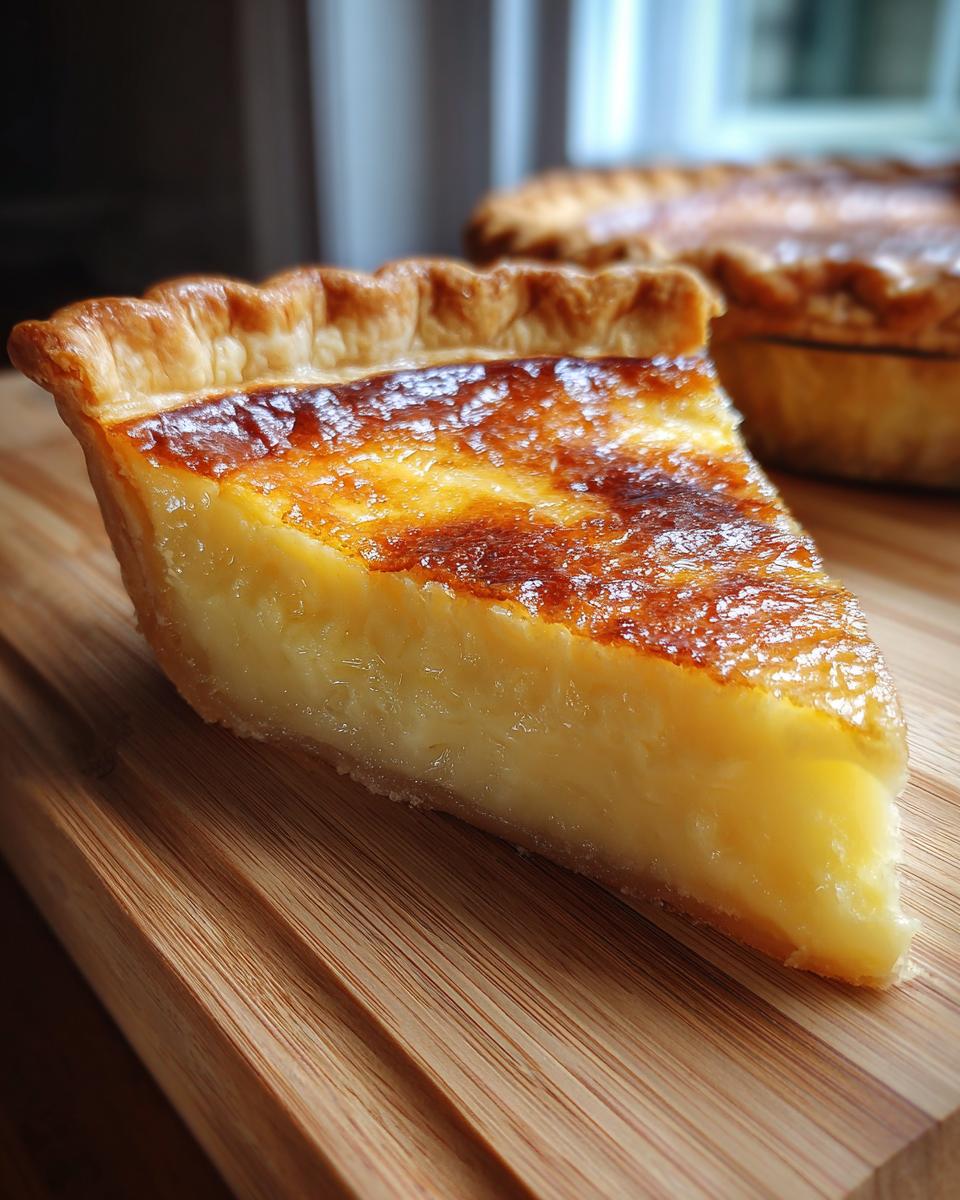
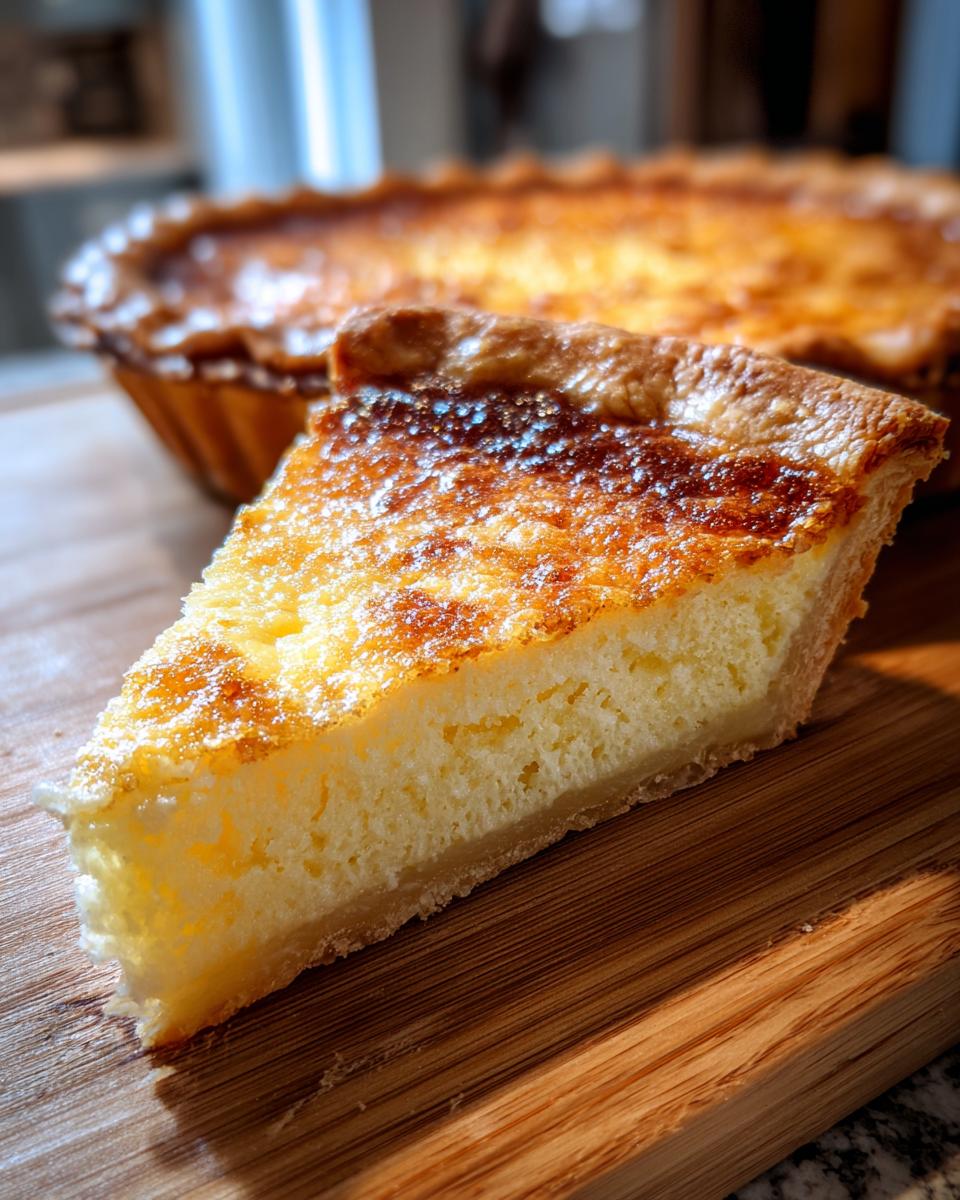
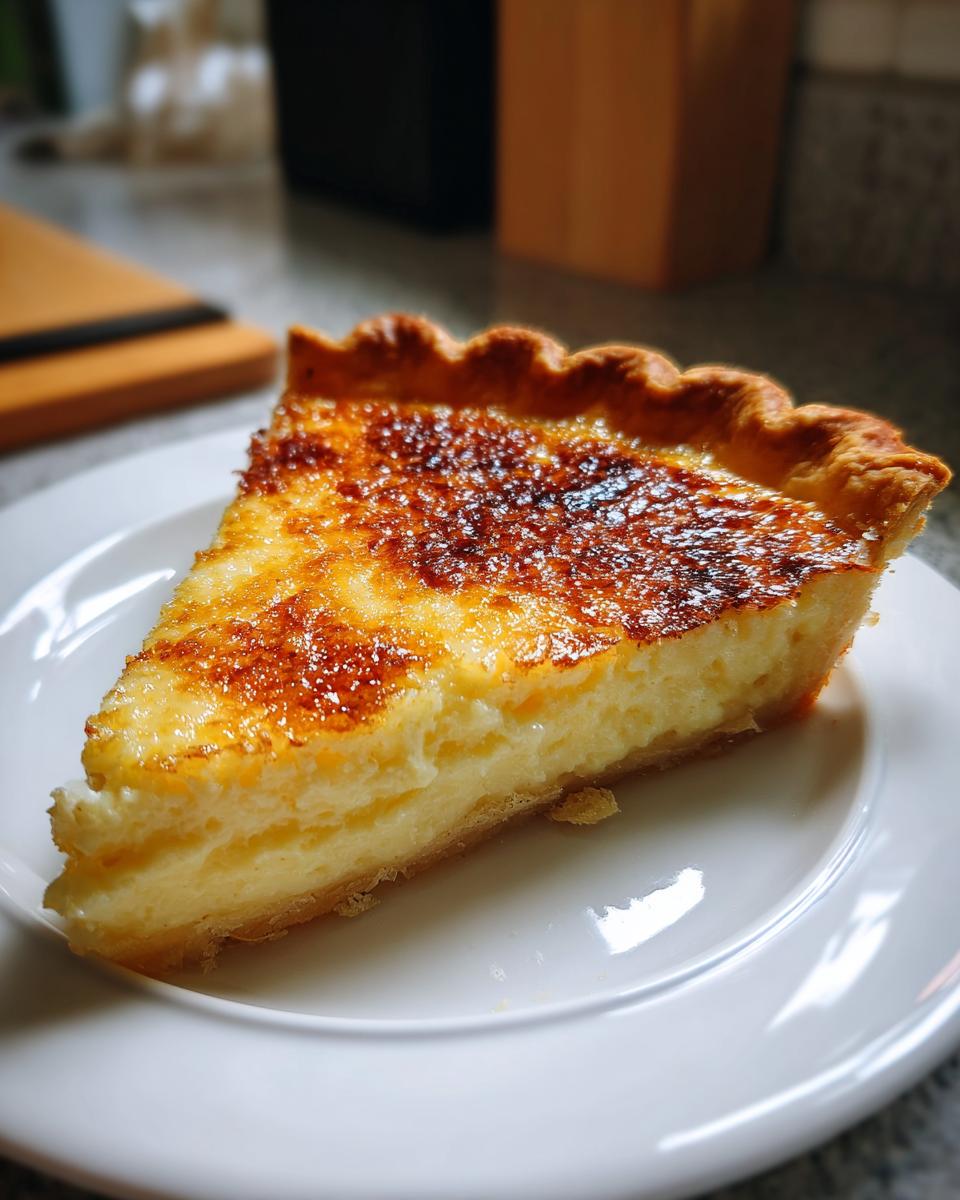
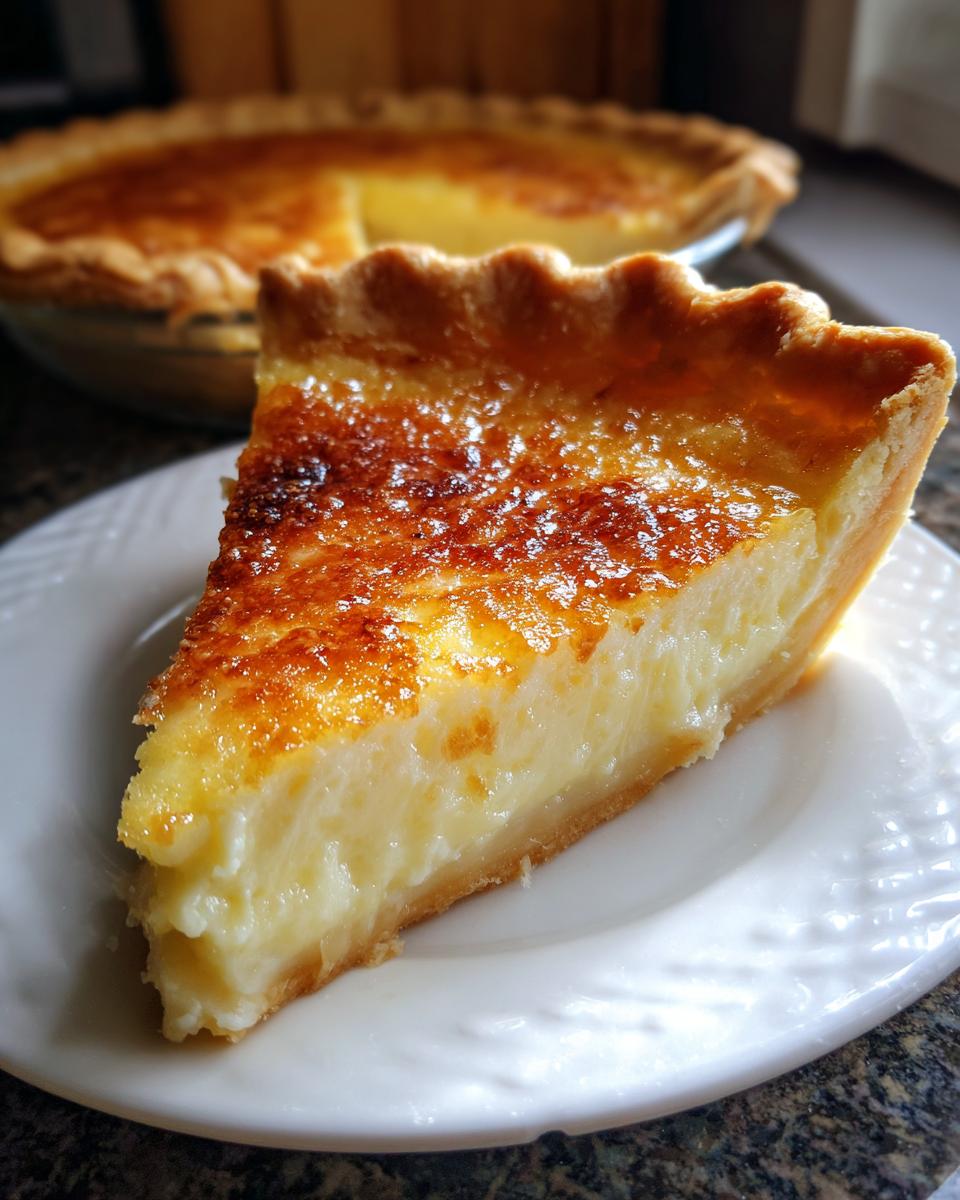
When the weather gets chilly or the holidays roll around, nothing beats the pure comfort of a dessert that tastes like home. If you’ve ever been burned by a crunchy, grainy filling or a pie that cracked all over when it cooled, trust me, I get it! That’s why I’m introducing you to the Old-Fashioned Creamy Vanilla Egg Custard Pie. This is truly the ultimate, foolproof recipe for achieving that perfectly smooth texture we all crave in a classic custard pie.
Here at Bliss Batter, I, Claire Sterling, focus on making sure every recipe is doable, whether you’re a beginner or dusting off your old baking tins. This recipe, which you can learn more about on our About Page, is tested until it shines, promising you creamy results without the stress. You are going to love how simple the ingredients are and how reliable the outcome always is when you bake it all from scratch.
- Why This Old-Fashioned Custard Pie Recipe Delivers Perfection
- Ingredients for Your Creamy Custard Pie
- Step-by-Step Instructions for the Best Custard Pie Recipe
- Tips for Success When Making Homemade Custard Pie
- Variations on the Traditional Custard Pie
- Serving Suggestions for Your Simple Dessert Pie
- Storage and Make Ahead Pie Instructions
- Frequently Asked Questions About Classic Custard Pie
- Nutritional Estimates for Your Baked Custard Dessert
- Share Your Perfect Custard Pie Creations
Why This Old-Fashioned Custard Pie Recipe Delivers Perfection
When it comes to a comforting, traditional dessert like this, the texture is everything. We aren’t messing around with anything that wobbles strangely or tastes granular. This recipe nails the creamy factor every single time, making it perfect for your big holiday table.
- The flavor is pure nostalgia—rich vanilla balanced beautifully by that warm kiss of nutmeg.
- We focus hard on preventing the dreaded crack! A little careful technique goes a long way here.
- It’s just so satisfying to know you made a perfect, homemade custard pie completely from scratch.
Achieving a Smooth Custard Filling Every Time
Smoothness is non-negotiable, right? That’s why we rely on two simple moves. First, we carefully temper those eggs. If you just dump the eggs into hot milk, well, you get scrambled things in your pie, and nobody wants that mess! Pouring the warm milk in slowly while whisking keeps everything silken.
Second, and this is huge for that creamy custard pie finish, we strain the entire mixture right before it hits the crust. Seriously, don’t skip the fine-mesh sieve! It catches any tiny bits that might have started to cook prematurely. And remember: pull this pie out when the center still has a slight jiggle. Overbaking is the number one cause of cracking, so trust the gentle wobble!
The Buttery Flaky Pie Crust Foundation
Even the creamiest filling needs a sturdy, flaky partner. This recipe starts with one 9-inch unbaked pie shell. Whether you use your absolute favorite store-bought brand or decide to whip up a homemade flaky pie crust (keep an eye out, I share my tips later!), the crust must be tender and buttery to complement that rich custard.
You want that buttery snap when you cut into it. A soggy or tough crust ruins the whole experience of this classic custard pie. We are aiming for contrast: silky filling against a crisp, flavorful base.
Ingredients for Your Creamy Custard Pie
Only the best ingredients make the best classic custard pie. Seriously, don’t try to skimp here, especially on the dairy! We want that rich, comforting melt-in-your-mouth texture, and that comes from using full-fat whole milk and good, large eggs. These simple components are what make this old-fashioned dessert shine.
You’ll notice we’re using three whole eggs plus an extra yolk. That extra yolk is my little secret for boosting the richness and smoothness of the filling just a tad bit more!
Essential Components for the Perfect Custard Pie
Here is exactly what you need to gather before you start warming that milk. Read this list twice, because precision matters when we are building that perfect smooth custard filling!
- 1 (9-inch) unbaked pie crust (I use my favorite homemade flaky crust recipe, but store-bought works in a pinch!)
- 2 2/3 cups whole milk (This is important—don’t swap it for skim!)
- 1/2 cup granulated sugar
- 1 teaspoon pure vanilla extract
- 1/4 teaspoon salt
- 1/4 teaspoon ground nutmeg, plus extra for dusting the top
- 3 large eggs, lightly beaten
- 1 large egg yolk
That’s it! No fancy thickeners, no weird extracts. Just pure, reliable goodness for your homemade custard pie.
Step-by-Step Instructions for the Best Custard Pie Recipe
Okay, this is where we turn those ingredients into magic! Baking a truly creamy custard pie involves a little bit of patience, but it’s not hard, I promise. We’re going to focus on the mixing sequence because that’s what keeps things silky smooth. If you want to learn more about layering techniques for other baked goods, check out my layering tips, as the precision here is just as important!
Preparing the Crust and Warming the Milk Base
First things first, get your oven humming along at 375°F (that’s 190°C). Gently set the unbaked pie crust into your 9-inch plate and crimp those edges up nicely. Give it a little care; we want those edges to look pretty!
Next, grab a saucepan and combine your milk, sugar, vanilla extract, and salt. Heat this over medium heat, stirring until that sugar disappears right into the milk. It should be warm—definitely not boiling! Once it’s warm, pull that saucepan straight off the burner. This is important: we need it warm, not scorching, before we introduce the eggs!
Tempering Eggs for a Smooth Custard Filling
Now for the most important part for avoiding scrambled bits! In a separate bowl, whisk your 3 whole eggs and that extra yolk just until they start looking uniform. Remember, we are tempering, which means slowly introducing the heat.
While you whisk the eggs non-stop, dribble in about one cup of that warm milk mixture, super slowly. See how it thickens up without looking cooked? Perfect! Then, gently pour that warmed egg mixture back into the saucepan with the rest of the milk and whisk gently to combine everything. To guarantee that smooth custard filling required for a magnificent custard pie, strain the whole thing through a fine-mesh sieve! Trust me, straining is the secret defense line against graininess.
Baking and Cooling Your Classic Custard Pie
Pour that beautifully smooth, strained custard right into your waiting pie crust. Sprinkle just a tiny, light dusting of nutmeg over the top—that’s our rustic touch. Bake this for about 40 to 50 minutes. If you notice those crust edges getting too brown too fast (they always do!), just loosely cover them with a small piece of aluminum foil after about 30 minutes of baking.
You know it’s done when the outer edges look set, but if you give the pie plate a *very* gentle shake, the very center has a slight jiggle. Do NOT wait until it’s firm all the way across, or you’ll have a cracked custard pie! Let it cool completely on a rack, and then chill it for at least four hours, or even better, overnight. That chilling period is what sets the filling perfectly for slicing!
Tips for Success When Making Homemade Custard Pie
We’ve covered the main recipe steps, but let’s talk about avoiding the one thing that ruins an otherwise gorgeous, old-fashioned custard pie: cracking! This happens because the edges cook faster than the center, and when the temperature changes too quickly, everything sinks and splits. Trust me, I’ve seen it happen, and it’s heartbreaking!
I have a few pointers—some are from my own testing, and one of my favorite techniques comes from those classic Southern pie recipes. If you want to make sure your crust is just as good as the filling, be sure to check out my tips for making incredible buttermilk biscuits, because those lessons about gentle handling apply here too!
Troubleshooting Cracking in Your Baked Custard Dessert
If you are nervous about getting that perfectly smooth appearance, you have to try the water bath, or what the fancy folks call a *bain-marie*. It’s the secret weapon for a perfectly cooked custard pie.
Here’s how you do it: Take a larger roasting pan and set your pie dish inside of it. Carefully pour hot tap water into that roasting pan until the water comes halfway up the sides of your pie plate. This gentle, steamy environment cooks the custard slowly and evenly, which is why the edges don’t seize up and crack when you pull it out. Remember what I said before? Never, ever overbake! Pull it out the second you see that tiny jiggle. That residual heat does the rest of the work for you!
Variations on the Traditional Custard Pie
While this classic vanilla custard pie is perfect just the way it is, I always love encouraging you to play around a little bit in the kitchen! Making simple tweaks is totally doable, and it keeps the recipe feeling fresh even if you make it every Sunday like some of my neighbors do. We aren’t changing the core ratios on the milk and eggs because that’s the backbone of the smooth filling, but we can certainly spice things up!
For instance, if you love warmer flavors, you can easily ramp up the spice! Instead of just 1/4 teaspoon of nutmeg on top, try adding a tiny pinch of ground cardamom or even some allspice into the milk mixture while it’s heating up. If you’re a fan of complex spice blends, you might even explore recipes like my chai spice cookies and borrow a little nutmeg/cinnamon magic for your custard.
Another fun, easy variation is messing with the vanilla. Pure vanilla extract is traditional, but next time you make this homemade custard pie, try swapping half the vanilla for a splash of almond extract. It gives the vanilla such a lovely floral note that really complements the richness of the egg custard dessert! Or, if you have some lemon zest lying around, grating just half a teaspoon into the warm milk will give you the faintest hint of brightness—a subtle twist on a Southern custard pie that I adore.
The key is keeping it simple. We aren’t reinventing the wheel here; we’re just adding a little sparkle to your already perfect pie!
Serving Suggestions for Your Simple Dessert Pie
Once that beautiful, classic custard pie has chilled completely—and trust me, chilling is mandatory for the best texture—it’s time for the finishing touches! This pie is so simple, it really shines with just a couple of classic accompaniments. Seriously, you don’t want to hide that perfect, smooth surface, but a little something extra never hurts.
Most often, my family loves it with a giant dollop of freshly made, barely sweetened whipped cream right on top. The contrast between the cool, rich custard and the light, airy cream is just divine. Or, if you want a little pop of color and freshness, a small scattering of tart raspberries or blueberries cuts through that creamy sweetness beautifully. It’s all about simple elegance with this kind of comforting dessert.
If you are looking for warm spice pairings, you might enjoy looking at some of the flavors I use in my pumpkin spice latte recipe section—a tiny sprinkle of cinnamon on top of the whipped cream adds a lovely warmth that pairs perfectly with the nutmeg already in the filling.
Storage and Make Ahead Pie Instructions
One of the absolute best things about making this traditional pie, besides the taste, is how wonderfully it works as a make-ahead pie! This isn’t a dessert you want to rush serving, anyway. Since the creamy custard filling needs time to fully set up, planning ahead is actually built right into the recipe!
As I mentioned earlier, it needs a good four hours in the fridge, but honestly? If you let this baked custard dessert chill overnight, you will be rewarded with the absolute best texture for slicing. The custard firms up beautifully when it’s fully cold, leading to clean wedges—no drooping, no mess!
Once it’s completely cooled and set, cover the pie loosely with plastic wrap or foil. It keeps beautifully in the refrigerator for about three to four days. This makes it a lifesaver for busy weeks or when you need to prep for big events like Thanksgiving. It gets better as the flavors meld!
When I’m planning a big meal, I often have this chilling away while I focus on the main course. It’s reliable comfort food that frees up your oven space later. If you’re already thinking about seasonal flavors to pair with this, I sometimes enjoy mixing up some cozy flavors in my apple cider cocktails to serve alongside this simple dessert pie!
Frequently Asked Questions About Classic Custard Pie
I always get the same few questions when people try this recipe for the first time! It’s normal to have reservations when baking with eggs and milk, but I promise this homemade custard pie is totally dependable once you know the tricks. We want that perfect, smooth custard filling, and these answers should help you worry less and bake more!
Can I substitute the milk in this Easy Custard Pie?
That is a great question about substitutions! While the 2 2/3 cups of whole milk is what gives you the guaranteed richness for that classic texture, you certainly can experiment if you must. If you want an even richer, more decadent result, you could try swapping half the milk out for half-and-half. Be careful using skim milk or low-fat options though; they just don’t give you the same comforting melt-in-your-mouth experience we are aiming for in this old fashioned custard pie.
How do I know when my homemade custard pie is truly done?
This is the absolute key to preventing cracks in your creamy custard pie! When the baking time is almost up—around the 40-minute mark—gently give the pie pan a little nudge. If the entire center ripples like a swimming pool, it definitely needs more time. But if the edges are firm and only the small circle right in the center has a distinct, soft jiggle, then you pull it out immediately!
That slight residual heat, that leftover warmth from the oven, is going to finish setting that center while the whole thing cools down on the rack. If you bake it until it’s firm in the center inside the oven, it *will* crack when it cools. Trust the bounce!
Is this recipe suitable for meal planning or holiday prep?
Oh, absolutely! This is why this recipe is a staple in my kitchen for big events. This egg custard pie is fantastic for making ahead because it actually *needs* to chill overnight for the best texture and clean slicing. You can whip this up the day before Thanksgiving or Christmas, and it keeps perfectly covered in the fridge for up to four days.
It means one delicious comfort food dessert is already done and chilling while you focus on the roasting and main dishes. If you’re looking for another make-ahead holiday favorite, you might want to check out my tips over on the sweet potato pie page—it uses similar chilling logic!
Nutritional Estimates for Your Baked Custard Dessert
I always like to keep things real with you folks. While this classic custard pie is packed with comforting flavors—the eggs, the whole milk, the sugar—it is certainly a treat, not an every-day health food! The values below are just estimates based on standard ingredient usage for one slice. I used the data from the full recipe breakdown, but remember, if you use a store-bought crust or add tons of whipped cream on top, those numbers are going to shift a little, so take this as a wonderful guideline!
I know some folks try to cut calories by looking into things like weight loss programs or perhaps even considering options like keto meal plan delivery for other meals, but when it comes to a slice of this homemade goodness, sometimes you just need to enjoy the perfection!
For reference, here are the estimated numbers for one serving:
- Serving Size: 1 slice
- Calories: 280
- Sugar: 22g
- Sodium: 200mg
- Total Fat: 14g (with 6g Saturated Fat)
- Carbohydrates: 28g
- Protein: 9g
- Cholesterol: 110mg
This truly is a traditional pie recipe, and it tastes like tradition! If you’re looking for an incredible creamy dessert pie that satisfies that sweet craving, this is it. If you want to see how some other wonderful bakers approach texture in a similar dessert, you can take a peek over at this creamy custard pie recipe as well!
Share Your Perfect Custard Pie Creations
Now that you’ve baked up this beautiful, old-fashioned vanilla custard pie, I truly hope it turned out creamy and crack-free! Hearing from you all is the best part of running Bliss Batter. It reminds me that we’re all in the kitchen together, working toward that little moment of homemade bliss.
Did you manage to keep that center perfectly set? Did the flaky pie crust turn out amazing? Please, please let me know! Drop a rating below so other bakers know how reliable this classic custard pie recipe is. I love reading your success stories, especially when someone tells me they finally nailed that smooth custard filling without stressing!
If you took a gorgeous picture of your finished slice—maybe with a little whipped cream mountain on top of your simple dessert pie—I would be thrilled! Tag me on social media or feel free to reach out directly through my contact page. I’m always eager to see the wonderful results coming out of your kitchens.
Thank you so much for trusting this recipe. Happy baking, and I already can’t wait to see what delicious things you create next!
PrintOld-Fashioned Creamy Vanilla Egg Custard Pie with Buttery Flaky Crust

Make a classic, comforting custard pie with a smooth, creamy vanilla filling baked in a flaky, buttery crust. This recipe focuses on clear steps to prevent cracking and ensure a perfect texture every time you bake.
- Prep Time: 15 min
- Cook Time: 50 min
- Total Time: 65 min (plus chilling time)
- Yield: 8 servings 1x
- Category: Dessert
- Method: Baking
- Cuisine: American
- Diet: Vegetarian
Ingredients
- 1 (9-inch) unbaked pie crust (store-bought or homemade)
- 2 2/3 cups whole milk
- 1/2 cup granulated sugar
- 1 teaspoon pure vanilla extract
- 1/4 teaspoon salt
- 1/4 teaspoon ground nutmeg, plus extra for dusting
- 3 large eggs, lightly beaten
- 1 large egg yolk
Instructions
- Preheat your oven to 375°F (190°C). Place your unbaked pie crust into a 9-inch pie plate. Crimp the edges as desired.
- In a medium saucepan, combine the milk, sugar, vanilla extract, and salt. Heat over medium heat, stirring until the sugar dissolves and the milk is warm but not boiling. Remove from heat.
- In a separate bowl, whisk together the 3 whole eggs and the extra egg yolk until just combined.
- Temper the eggs: Slowly pour about one cup of the warm milk mixture into the eggs while whisking constantly. This prevents the eggs from scrambling.
- Pour the tempered egg mixture back into the saucepan with the remaining warm milk. Whisk gently until everything is fully combined.
- Strain the custard mixture through a fine-mesh sieve into a clean bowl or large measuring cup. This step removes any chalazae or small cooked bits, helping you achieve a smooth custard filling.
- Pour the strained custard carefully into the unbaked pie crust.
- Lightly sprinkle the top of the custard with the 1/4 teaspoon of ground nutmeg.
- Bake for 40 to 50 minutes. To prevent the crust edges from browning too quickly, cover them loosely with aluminum foil after about 30 minutes of baking.
- The pie is done when the edges of the custard are set, but the center still has a slight jiggle when gently shaken. Do not overbake, as this causes cracking.
- Remove the pie from the oven and let it cool completely on a wire rack. The center will finish setting as it cools.
- Chill the pie in the refrigerator for at least 4 hours, or preferably overnight, before slicing and serving. This helps the custard firm up for the best texture.
Notes
- For a truly flaky pie crust, keep your butter and water very cold when making it from scratch.
- If you are concerned about cracking, you can bake this pie in a water bath (bain-marie). Place the pie plate inside a larger roasting pan, then pour hot water into the roasting pan until it reaches halfway up the sides of the pie plate before placing it in the oven.
- This pie is excellent for meal planning and can be made a day ahead for holiday gatherings.
Nutrition
- Serving Size: 1 slice
- Calories: 280
- Sugar: 22
- Sodium: 200
- Fat: 14
- Saturated Fat: 6
- Unsaturated Fat: 8
- Trans Fat: 0.2
- Carbohydrates: 28
- Fiber: 1
- Protein: 9
- Cholesterol: 110