
Doesn’t that smell like the holidays? When the air gets crisp and you start thinking about cozy nights, nothing beats a truly decadent dessert, and this maple pecan cream pie absolutely nails that feeling. Forget everything you think you know about heavy, overly sweet pecan pies—this one is different! I’m thrilled to share this recipe because, just like everything else here at Bliss Batter, it’s been tested and perfected right here in my home kitchen. We’re talking about a luxurious, no-bake filling that sets up like velvet, surrounding tons of perfectly toasted pecans. If you’re ready to create something truly special that tastes like you spent all day on it, you’ve come to the right place. Ready for some amazing dessert recipes?
- Why This Rich Maple Pecan Cream Pie Recipe Works (E-E-A-T)
- Ingredients for Your Maple Pecan Cream Pie
- How to Toast Pecans for the Best Maple Pecan Cream Pie
- Step-by-Step Instructions for a Perfect Maple Pecan Cream Pie
- Tips for Success with Creamy Pie Recipes
- Variations on the Classic Maple Pecan Cream Pie
- Serving Suggestions for Your Decadent Nut Pies
- Storage and Reheating for Maple Pecan Cream Pie
- Frequently Asked Questions About This Maple Pecan Cream Pie
- Share Your Blissful Maple Pecan Cream Pie Creations
Why This Rich Maple Pecan Cream Pie Recipe Works (E-E-A-T)
When I was creating this recipe, my goal was simple: make a pie that tastes incredibly decadent but doesn’t require turning on the oven for the filling. That’s where the magic happens! This recipe is reliable because the structure comes entirely from simple, quality ingredients that set beautifully in the fridge. As the founder of Bliss Batter, I promise you that every recipe here is tested and perfected in a real home kitchen. You get that intense, nutty flavor without any risk of a gooey or grainy center.
We believe in using ingredients that shine, and that commitment to quality shines through in every slice. If you want to read more about how seriously I take flavor and testing, you can always pop over to my ‘About’ page!
Achieving the Perfect Creamy Pie Texture
The secret to this silky smooth texture is all about the base: heavy cream and sweetened condensed milk. They are our setting agents here, not eggs cooked over heat! When you whisk them together with the maple syrup, you create a dense, luscious environment. The most important word here is *patience*. You have to let this pie chill for a good six hours, or even better, overnight. If you try to rush the chilling process, you’ll end up with a soupy mess, and trust me, we’re aiming for sliceable perfection!
Balancing Sweetness in Your Maple Pecan Cream Pie
Maple syrup is wonderful, but if you grab the wrong kind, your pie can taste like breakfast topping mixed with nuts, and that’s not what we want in our maple pecan cream pie. You must use pure maple syrup—none of that pancake syrup stuff! I highly recommend the Grade A Dark or Very Dark syrup. These grades have a deeper, more complex molasses flavor that stands up beautifully against the richness of the pecans and the cream. It gives the whole dessert a sophisticated sweetness that traditional pies often lack.
Ingredients for Your Maple Pecan Cream Pie
Getting the right stuff is half the battle, especially when you’re relying on the quality of just a few ingredients to carry the flavor! Don’t skimp on your maple syrup; that’s my biggest plea. We need the good stuff for that beautiful depth. And please, use proper heavy cream—that’s what gives us that incredible mouthfeel. If you’re looking for other flavor inspiration after this, maybe check out my salted caramel latte recipe for a different kind of seasonal treat!
Buttery Pecan Crust Ideas
Since this pie relies on that ultra-rich filling, you want a crust that can hold its own! The recipe calls for a pre-baked 9-inch shell, which is perfect for keeping things fast. If you’re looking to make your own, I highly recommend a super simple shortbread style crust. You just press the dough into the pan and blind bake it until it’s golden brown and smells buttery. A slightly spiced graham cracker crust works wonderfully too, especially if you add just a tiny pinch of cinnamon to the crumbs before pressing it in. Whatever you choose, make sure it’s totally cool before the filling goes in, or you’ll melt your structure!
How to Toast Pecans for the Best Maple Pecan Cream Pie
Okay, this step seems small, but trust me—toasted pecans versus raw pecans in a dessert like our maple pecan cream pie is the difference between “pretty good” and “call the bakery to ask how they did that!” Toasting them wakes up all that beautiful, inherent nut oil, deepening their flavor so they really stand up to that sweet, creamy maple filling. It’s so easy, but you have to be vigilant!
First, spread your pecan halves and your chopped pieces out onto a single baking sheet. You want them in one layer so they cook evenly. Toss them into a preheated oven at 350 degrees F. Now, here’s where you can’t walk away! They only need about 6 to 8 minutes. Seriously, set a timer for six minutes, then check them. They go from perfect to slightly burnt in a heartbeat—I’ve learned that the hard way more times than I care to admit!
When they smell fragrant and look just barely golden, pull them out immediately. They’ll continue to toast a tiny bit even after they leave the heat. Let them cool completely on that pan before you go tossing them into your pie or mixing them with the filling. If you need other fun ways to use nuts, I have a great recipe for crockpot spiced nuts that might inspire you! Proper preparation ensures every bite of your maple pecan cream pie has that satisfying, toasty crunch you’re hoping for.
Step-by-Step Instructions for a Perfect Maple Pecan Cream Pie
Alright, let’s put this masterpiece together! Once your crust is ready—and I mean *totally* cool, not even slightly warm—we move on to the filling which comes together so fast you’ll barely believe it’s happening. Remember, we’re aiming for that smooth, rich texture, so moving methodically is key here. If you need a refresher on general cream pie assembly, I walk through the basics in my How to Make Cream Pie tutorial!
First things first: make sure that crust is sitting pretty and has had plenty of time to cool down after being baked. A warm crust equals a soupy pie, and we can’t have that!
Assembling the Homemade Maple Filling
Grab a medium bowl—don’t stress about using a stand mixer here; a good whisk gets the job done perfectly for this creamy pie recipe. You literally whisk the heavy cream, sweetened condensed milk, maple syrup, egg yolks, vanilla, and salt together. Just whisk gently but deliberately until everything is one smooth, pale amber color. No streaks! If you want an extra kick of warmth that pairs wonderfully with fall flavors, this is absolutely the time to stir in that tablespoon of bourbon—it just deepens the flavor profile beautifully.
Before you pour, make sure those toasted pecans are nestled perfectly in the bottom of your crust!
Chilling and Setting the Maple Pecan Cream Pie
Once the pecans are in place, slowly pour that glorious liquid mixture right over them. I like to arrange the nice pecan halves on the bottom first, then sprinkle the chopped bits evenly over the top layer. Now comes the hardest part: waiting! Cover the pie loosely with plastic wrap and slide it into the back of your fridge. You need a minimum of six hours, but honestly, overnight is where this maple pecan cream pie truly shines. It needs that long, undisturbed time to set up firmly so you get those professional-looking slices. When it’s ready, the top should look completely smooth and firm—perfect for garnishing!
Tips for Success with Creamy Pie Recipes
Even though this is a fantastic no-bake filling, we still run into little quirks when working with large amounts of dairy and sugar. The biggest thing I stress when teaching people about creamy pie recipes is controlling moisture and temperature. Since ours sets in the fridge, we don’t worry about heat causing a runny filling, but we do have to worry about temperature consistency!
My biggest tip here is really committing to that chill time. If a pie feels slightly soft, resist the urge to cut into it! Let it rest. A warm kitchen counter is the enemy of setting time, so make sure your fridge isn’t packed right next to a hot oven, or you might extend that waiting period unnecessarily.
Now, for those of you who like your pies to stand up stiffly when you slice—maybe you’re transporting this to a big holiday gathering—we can give the filling a tiny bit of extra backbone. This is a little baker’s secret I learned when I needed my layered desserts to travel well. If you want that extra insurance policy for firmness, you can add a teaspoon of unflavored gelatin. You have to dissolve it first in about two tablespoons of hot water until it’s completely clear, then whisk that liquid gelatin into your cold filling mixture *right before* you pour it into the shell. It helps lock everything in place. For more guidance on achieving stable textures, I’ve got loads of info in my sweet cream pie tutorial!
Variations on the Classic Maple Pecan Cream Pie
I love that this recipe feels classic, but it’s just begging for you to make it your own! While the core structure of the maple pecan cream pie is set, there are so many fun ways to adjust it for different needs or tastes. We already talked about bourbon earlier, but a splash of dark rum in the filling mix gives it this really cozy, deep warmth that’s fantastic for Christmas gatherings. You could also experiment with spices! A tiny pinch of ground nutmeg or just a whisper of cinnamon mixed with those pecans adds a layer of complexity reminiscent of other maple-flavored treats.
For anyone avoiding wheat, swapping out the crust is incredibly easy and doesn’t affect the filling one bit. It’s a simple switch!
Easy No Bake Pie Options
Since the filling itself is already a wonderful no-bake component, the crust is what usually ties it to the oven. If you want this to be truly hands-off, skip the shortbread shell idea and go straight for a pre-made graham cracker crust. They come ready-to-eat and are usually very sturdy! Alternatively, you can make a crust using crushed vanilla wafers or even gingersnaps mixed with melted butter and a touch of sugar, then press that mixture firmly into your pie plate and let it chill for about an hour before filling. It’s an incredibly easy way to make sure your entire dessert stays out of the oven!
Serving Suggestions for Your Decadent Nut Pies
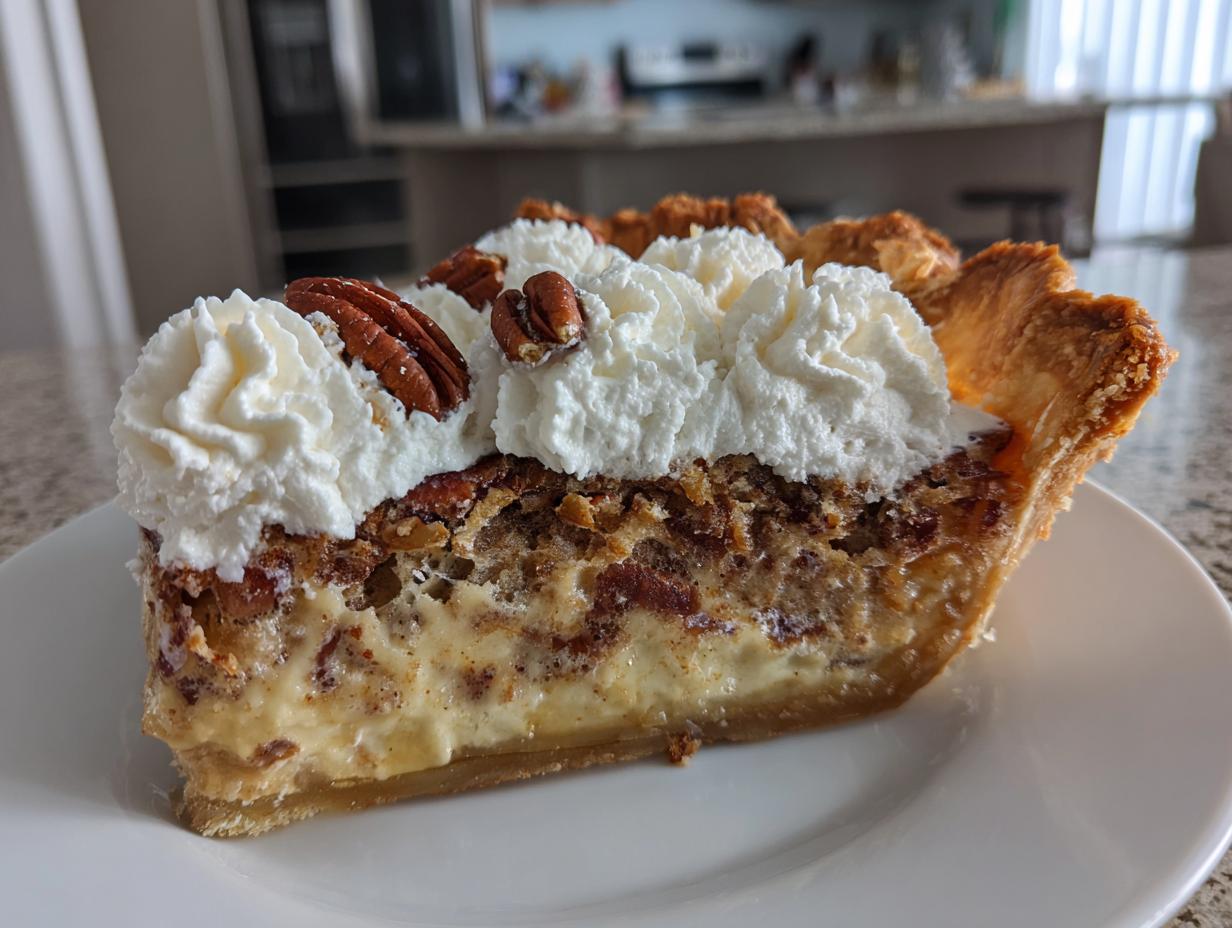
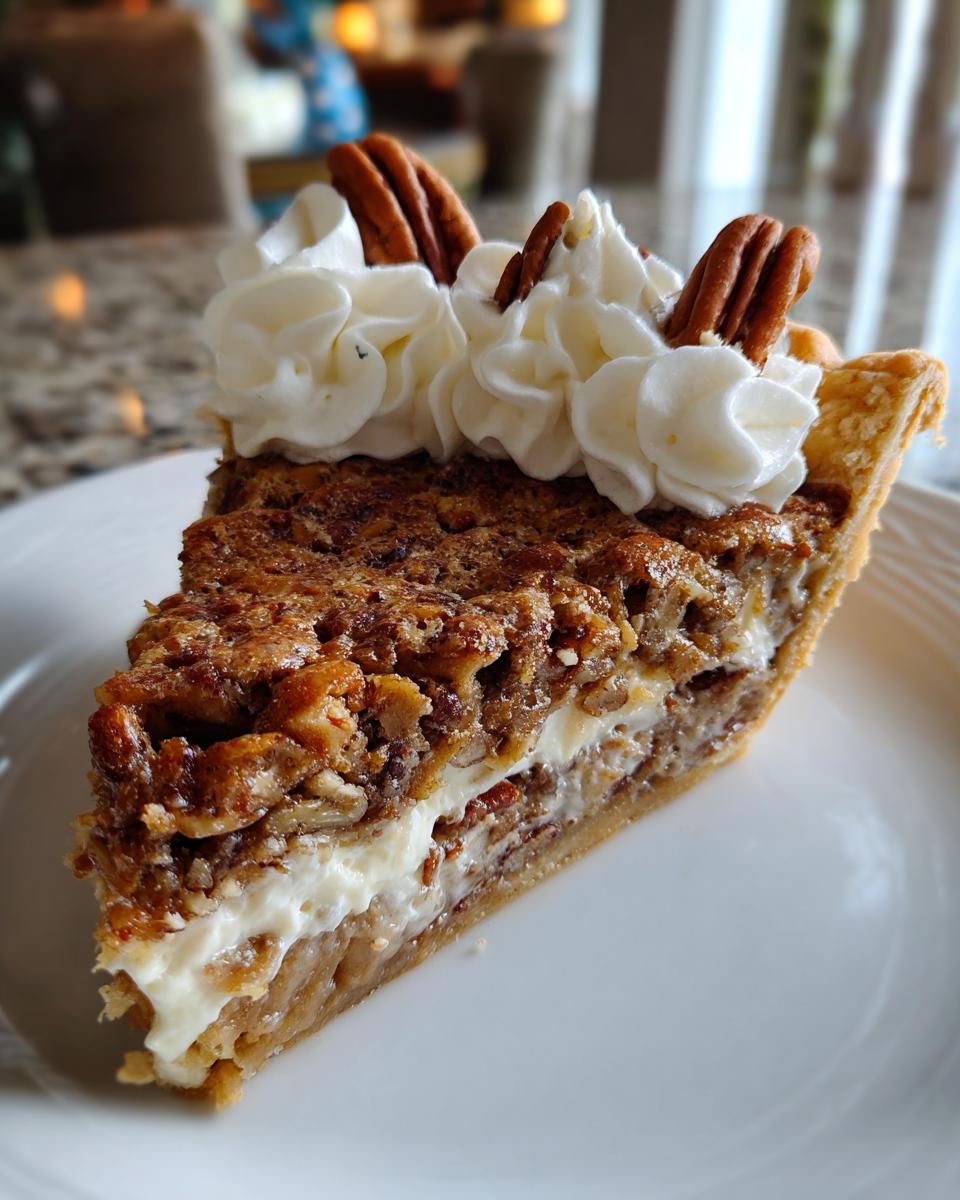
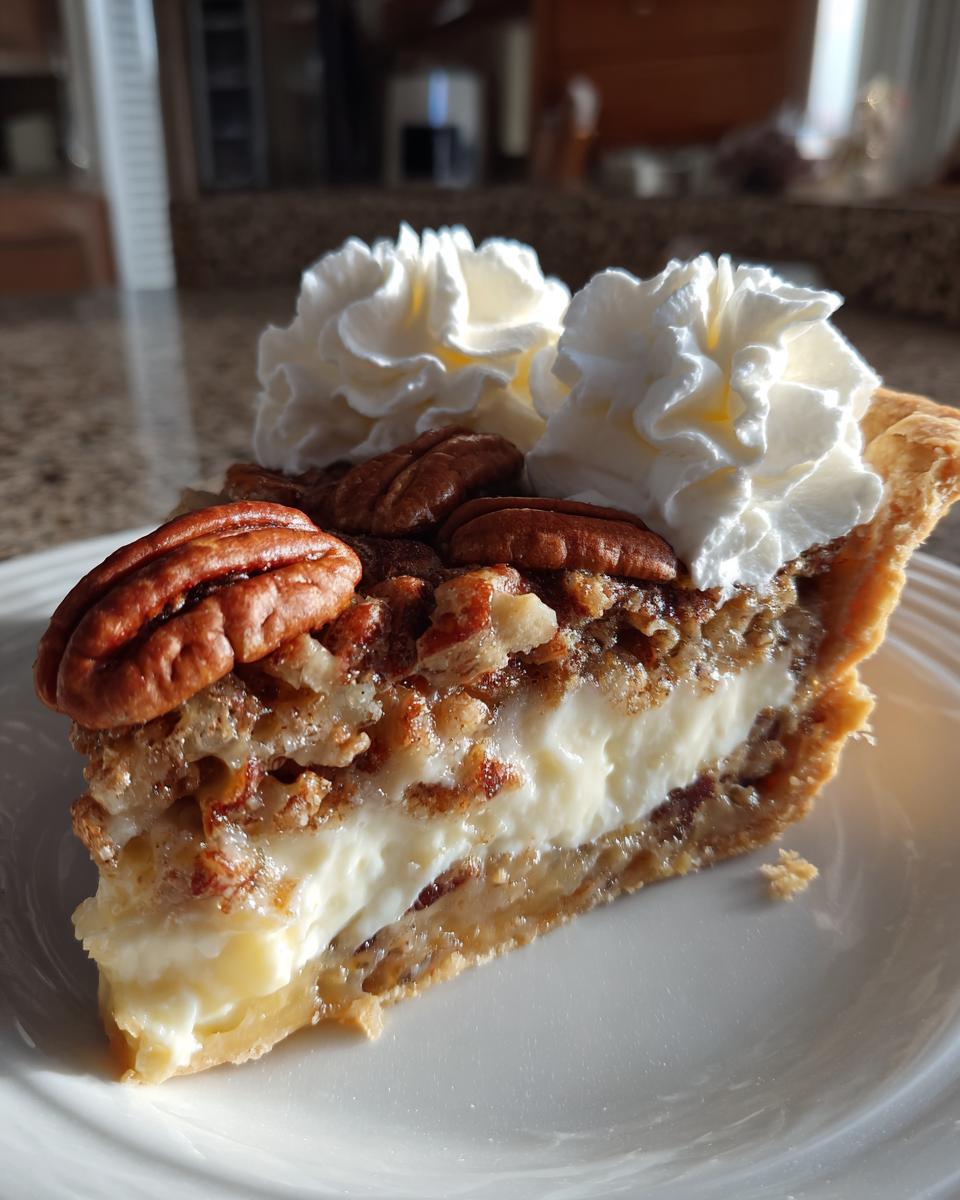
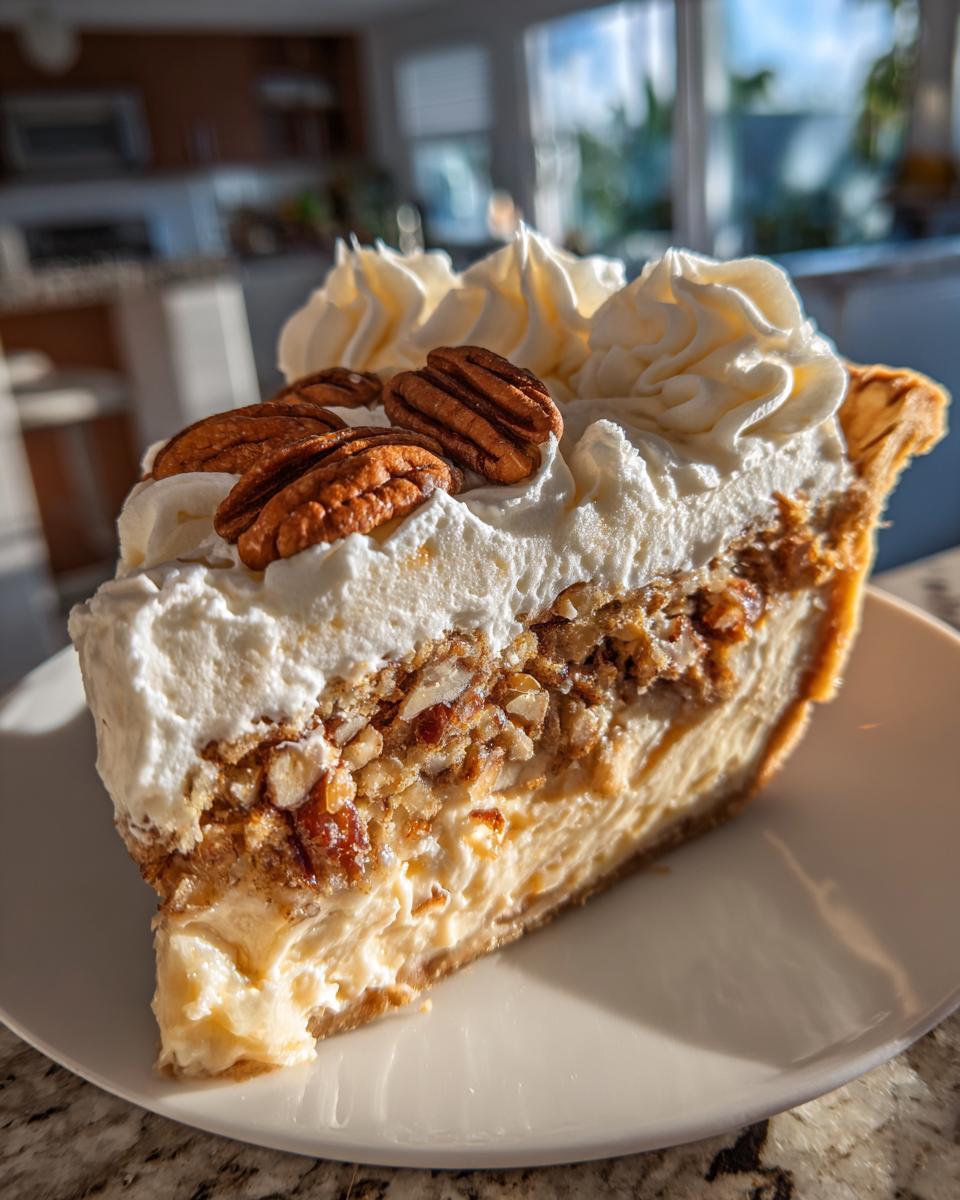
Now that you’ve waited patiently and your beautiful pie is perfectly set, it is time for the grand reveal! Presentation really matters, especially when you’re serving up something this rich. This is where we bring in that classic, show-stopping presentation you see in old-fashioned bakeries or along the great Southern coast. A pie this creamy deserves a beautiful crown.
First up is the garnish. I always make a beautiful, big cloud of freshly whipped cream to lay right on top. You can pipe swirls or just dollop it on with a big spoon—either way, it looks incredible against the dark amber filling and the toasted nuts peering through. Finish it off by sprinkling just an extra handful of your reserved toasted pecans right onto the whipped cream. It adds texture and lets everyone know exactly what kind of wonderful dessert they are about to eat!

The second, and I mean *critical*, tip for making this look professional is how you slice it. Since the filling is soft and creamy, a dull or room-temperature knife will just drag through the filling and make a mess. I always grab a sharp chef’s knife and dip the blade completely into a tall glass of steaming hot water. Wipe the blade dry immediately with a clean towel, then make one swift, clean cut down through the pie. That hot, clean edge slices right through the filling perfectly! Dip, wipe, slice, repeat for every piece. It ensures your slices look as perfect as the rest of your decadent nut pies.
Storage and Reheating for Maple Pecan Cream Pie
Because this is such a luscious, creamy pie, we want to treat it gently when storing it! The best place for your maple pecan cream pie is definitely the refrigerator. You need to keep it covered, either tightly with plastic wrap or under a dome, because those wonderful dairy ingredients can absorb smells from other things in the fridge. It tastes best when eaten within three or four days. Please, please, resist the urge to reheat this! Warming up a cream filling will totally destroy the structure we worked so hard to set up during that long chill time.
Frequently Asked Questions About This Maple Pecan Cream Pie
It’s totally normal to have questions when diving into a new, rich recipe like this! Don’t worry about a thing—that’s why I included this little FAQ section below. If you have a question about making this one of your go-to rich dessert recipes, the answer is probably right here. For even more help, you can always bounce over to explore my other rich dessert recipes!
Can I make the filling ahead of time?
You absolutely can, and honestly, I highly recommend it! Since this homemade maple filling requires a minimum of six hours to set perfectly firm, making it the day before you plan to serve it is the best strategy. Prepare the crust, toast the nuts, mix the filling, pour it over the nuts, and put the whole assembly straight into the fridge. When you wake up the next day, your pie will be perfectly set and ready for its whipped cream crown. Trying to rush this process is the number one mistake people make!
What is the best substitute for heavy cream?
That’s a great question, especially for folks looking to skip dairy! If you need to swap out the heavy cream, the absolute closest substitute for texture in these creamy pie recipes is full-fat canned coconut cream—the thick, solid part you scoop off the top of a chilled can. When whipped or mixed in, it mimics the richness of dairy cream quite well. Just know that your pie will have the *slightest* hint of coconut flavor, which actually pairs surprisingly well with maple and pecan, but the structure should hold up beautifully!
Is this considered one of the best pecan pie alternatives?
Oh, without a doubt! If you love that classic fall flavor profile—maple and toasted nuts—but you just can’t get behind the traditional gooey, baked texture of a standard pecan pie, then yes! This maple pecan cream pie is definitely one of the best pecan pie alternatives out there. It offers all that deep, autumnal flavor but in a much lighter, cooler, and smoother package. It’s elegant, simple, and definitely a crowd-pleaser when you don’t want to fire up the oven!
Share Your Blissful Maple Pecan Cream Pie Creations
I truly hope you loved making and eating this pie! Seriously, when you get that perfect thick slice onto a plate, be sure to give it a quick five-star rating right there on the recipe card. Your feedback helps other bakers feel confident jumping into new recipes, and it means the world to me!
But the best part? Seeing your creations! When you pull that perfectly set, creamy pie out of the fridge, I want to see it! Tag me on social media when you serve up your slices. Knowing that my recipes are working their way into your celebrations and cozy family moments is why I started Bliss Batter in the first place. You might even inspire my next holiday bake!
If you have any questions while you’re trying it out, or just want to share a fun twist you tried—like maybe adding a little orange zest to the whipped cream—reach out! You can always get in touch with me directly through the contact page. Happy baking, friends!
PrintRich Maple Pecan Cream Pie with Buttery Crust

Create a decadent, creamy maple pecan pie featuring a homemade buttery crust. This recipe balances sweet maple flavor with toasted pecans for a satisfying dessert.
- Prep Time: 20 min
- Cook Time: 8 min
- Total Time: 8 hours 28 min
- Yield: 8 servings 1x
- Category: Dessert
- Method: No Bake Filling
- Cuisine: American
- Diet: Vegetarian
Ingredients
- 1 9-inch pre-baked pie crust (or use a recipe for a buttery pecan crust)
- 1 cup heavy cream
- 1 (14 ounce) can sweetened condensed milk
- 1/2 cup pure maple syrup (Grade A Dark or Very Dark recommended)
- 3 large egg yolks
- 1 teaspoon vanilla extract
- 1/4 teaspoon salt
- 1 cup pecan halves, toasted
- 1/2 cup chopped pecans, toasted
- For Garnish: Whipped cream and extra toasted pecans
Instructions
- Prepare your pie crust. If you are making a homemade crust, bake it until golden brown and let it cool completely.
- Toast the pecans: Spread the pecan halves and chopped pieces on a baking sheet. Bake at 350 degrees F for 6 to 8 minutes until fragrant. Watch them closely to prevent burning. Let them cool.
- Make the filling base: In a medium bowl, whisk together the heavy cream, sweetened condensed milk, maple syrup, egg yolks, vanilla extract, and salt until fully combined and smooth.
- Arrange the pecans: Place the toasted pecan halves evenly across the bottom of the cooled pie crust. Sprinkle the chopped pecans over the halves.
- Pour the filling: Slowly pour the maple mixture over the pecans in the crust.
- Chill the pie: Cover the pie loosely with plastic wrap. Refrigerate for at least 6 hours, or preferably overnight, until the filling is completely set and firm. Do not rush this chilling time.
- Serve: Before serving, top the pie with swirls of fresh whipped cream and a few extra toasted pecans for decoration. Slice with a sharp knife dipped in hot water.
Notes
- For a richer flavor, substitute 1 tablespoon of the maple syrup with 1 tablespoon of good quality bourbon or dark rum in the filling mixture.
- If you want a slightly firmer filling without baking, you can add 1 teaspoon of unflavored gelatin dissolved in 2 tablespoons of hot water to the filling mixture before chilling.
- To achieve the best texture, use pure maple syrup, not pancake syrup. The quality of the syrup directly impacts the final taste.
- This pie looks best when the whipped cream is piped or carefully spooned on top just before serving.
Nutrition
- Serving Size: 1 slice
- Calories: 450
- Sugar: 45
- Sodium: 180
- Fat: 28
- Saturated Fat: 10
- Unsaturated Fat: 18
- Trans Fat: 0
- Carbohydrates: 48
- Fiber: 2
- Protein: 8
- Cholesterol: 95