
Forget everything you thought about artisanal baking being some mysterious, impossible craft! I know that feeling—you see those stunning loaves online and think, “There’s no way I can manage that perfect, shatteringly crisp crust and those beautiful open air pockets.” Well, I’m here to change your mind. This guide is the absolute clearest path I could design for your very first perfect sourdough bread loaf, designed to build your confidence from the very first mix. We honor the tradition of incredible flavor here at Bliss Batter, but my mission, just like Claire’s philosophy, is making sure complex baking feels joyfully accessible. Trust me, achieving bakery-quality bread at home is totally within reach!
- Why This Beginner Sourdough Loaf Recipe Works
- Essential Ingredients for Your Sourdough Bread
- Preparing Your Dough: Mixing and Autolyse for Perfect Sourdough Bread
- Building Strength: Stretch and Folds for Your Homemade Sourdough Loaf
- Shaping and Cold Proofing Your Artisan Bread at Home
- Baking Techniques for Crusty Sourdough Baking Tips
- Troubleshooting Common Beginner Sourdough Issues
- Storage and Enjoying Your Sourdough Bread
- Frequently Asked Questions About Sourdough Bread
Why This Beginner Sourdough Loaf Recipe Works
I get it; sometimes sourdough instructions look like advanced chemistry homework. That’s why I focused like a laser on making this recipe the simplest starting point for your artisan bread at home journey. We take out the guesswork so you can just focus on the experience of mixing and waiting. When you trust the process, the bread just happens!
Key Benefits of Our Sourdough Bread
- Uses standard, easy-to-find bread flour—no specialty mills needed here!
- We give you clear time markers for the autolyse and stretch and folds so you know exactly when to move forward.
- Thanks to that long, cold proof, you’re guaranteed to achieve that classic, complex tangy flavor every single time.
- The process is broken down so you build strength into the dough without needing any fancy kneading techniques.
Essential Ingredients for Your Sourdough Bread
Okay, friend, here we talk ingredients, and this is where precision counts! Sourdough bread teaches us that quality in equals quality out, especially when we are relying on natural yeast. Don’t worry if that sounds intimidating; it just means treating these few items with respect. Accuracy is key here, so please try to use a scale, even if you usually work without one. It makes all the difference when measuring flour for your Sourdough bread.
Ingredient Notes and Substitutions
You need bread flour. Full stop. That higher protein content is what allows the dough to capture all those lovely gasses and hold that amazing structure. Also, the absolute most important thing: your starter must be active. That means it should have been fed recently and should have at least doubled in size—bubbly, airy, and ready to work!
- Active Sourdough Starter (100g): Needs to be ready to go, not sluggish!
- Bread Flour (500g): Essential for structure; don’t swap for all-purpose if you can avoid it.
- Water (375g): Warm, not hot, around 85°F is perfect to encourage the yeast.
- Salt (10g): Fine sea salt works best as it dissolves easily during the mixing stage.
Preparing Your Dough: Mixing and Autolyse for Perfect Sourdough Bread
Alright, this is where our hands meet the dough! First, we gently introduce our active starter to the warm water. Just whisk them together until the mixture gets a little foamy—it’s like waking up the yeast. Next, dump in all 500 grams of your bread flour right on top. Don’t worry about mixing perfectly; just use your hands to smash it together until you see no dry patches of flour left. It’s going to look rough and shaggy, and that’s exactly how it should be!
Now comes the magic step we call autolyse. Cover that shaggy mess up and walk away for 30 minutes. Seriously, walk away! Baking is about patience, and I always remember Claire talking about how baking is therapy compared to a hectic corporate schedule. This rest allows the flour to fully hydrate before we introduce hardship (the salt). When you come back, that dough will already feel softer and more relaxed. The autolyse period is crucial because it lets the gluten start developing naturally without any hard work from us, setting up the beautiful, light structure needed for great Sourdough bread.
Building Strength: Stretch and Folds for Your Homemade Sourdough Loaf
Okay, the autolyse worked its magic, and now we introduce the salt. Don’t just dump it on top—that’ll just make the dough fight you! Sprinkle that fine salt right over the dough. Now, wet your hands just a tiny bit; this stops the dough from sticking to you. Dimple the salt in gently, then squeeze and fold the dough over itself for about a minute until you can’t really see the salt anymore. It’s important to get that salt incorporated early, but gently!
Now we start building the strength for that amazing open crumb in your homemade sourdough loaf. Rest the dough for 30 minutes after the salt goes in. Then, it’s time for our first set of stretch and folds! Reach under one side, pull that dough up nice and slow, and fold it right over the top toward the center. Turn your bowl 90 degrees and do it again. Do this four times total. It’s a little awkward at first, but you’ll get the rhythm!
We repeat that exact sequence—30 minutes of rest, followed by a set of four folds—for the next two hours. That means four sets total! By the end, that dough should feel dramatically smoother, tighter, and much less sticky than when you started. It’s honestly so satisfying to feel the structure develop right there in the bowl.
Recognizing Bulk Fermentation Completion
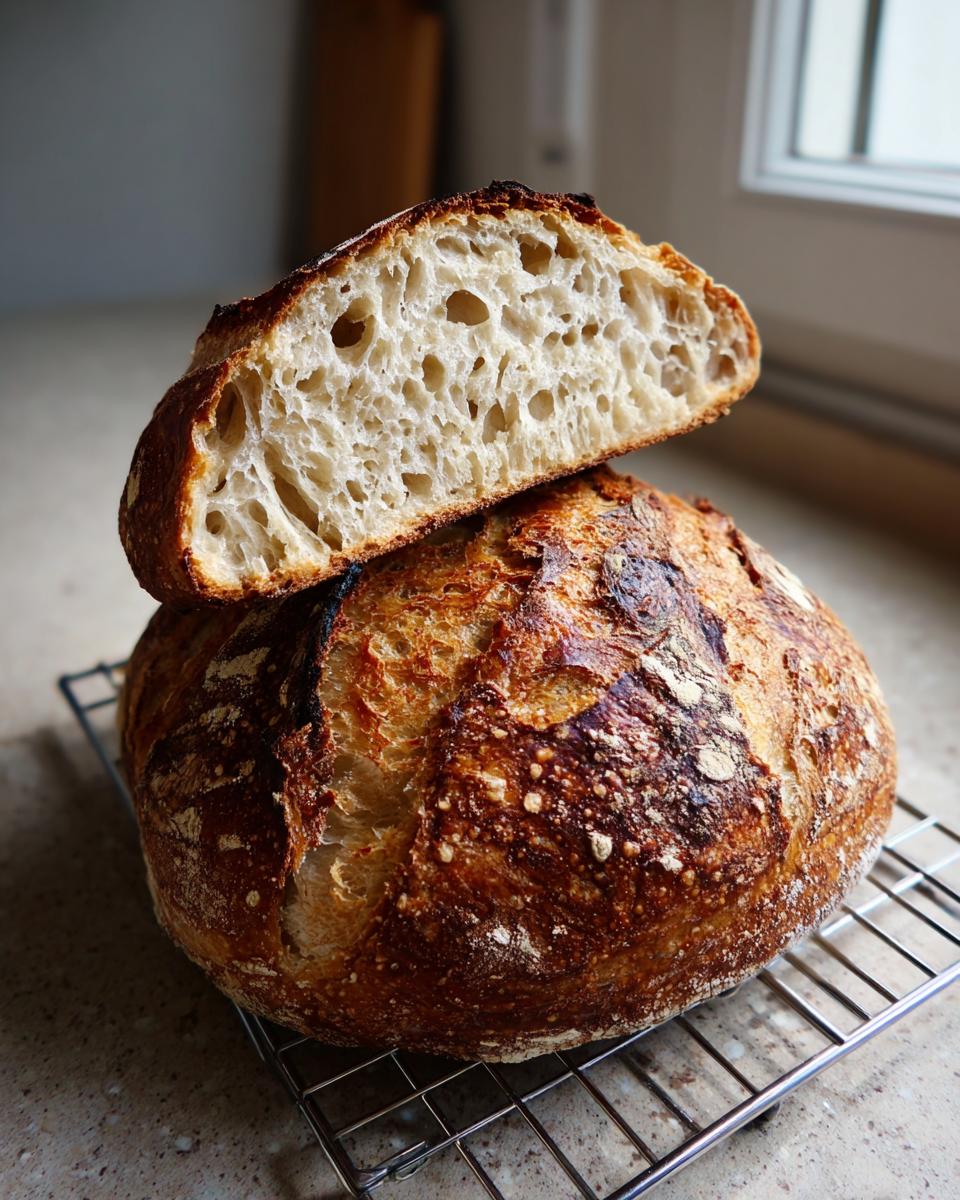
Once those folds are done, we cover it back up and let it just sit there and do its thing in a warm spot. This phase, bulk fermentation, is where all the sour flavor really starts developing for your Sourdough bread. You are looking for a visual cue—don’t just watch the clock! When the dough has increased in volume by about 30% to 50%—and I mean visibly taller—and you can see little bubbles breaking the surface, it’s ready. If your kitchen is warm, it might take two hours; if it’s chilly, plan for three or four. Knowing when to stop this phase is the biggest secret to making sure your Sourdough bread doesn’t end up flat!
Shaping and Cold Proofing Your Artisan Bread at Home
When bulk fermentation is done, the moment for shaping arrives! This step uses all that careful gluten development we built during the folds to create surface tension, which is what gives our loaf its height when we bake it. Gently, gently—tip that bubbly dough out onto a surface that’s just lightly dusted with flour. Don’t deflate it; we want to keep all those gorgeous gases inside!
Now, shape it into a tight round, which bakers call a boule. Use your bench scraper like a little elbow to help you pull the dough toward you, creating tension on the top surface. Once it’s tight and smooth, it’s time for the resting place—the banneton. Dust your proofing basket generously with flour (rice flour works like a charm if you have it) and gently flip the dough in, seam-side up. That seam is what you’ll score later!
Cover that basket snugly and get it into the refrigerator. This long, cold proof—we’re aiming for 12 to 18 hours—is non-negotiable for truly wonderful artisan bread at home. While it sleeps overnight, those little yeasts and bacteria are working hard, developing the deep, complex tanginess that makes real, naturally leavened Sourdough bread taste like it came straight from a European bakery!
Baking Techniques for Crusty Sourdough Baking Tips
This is the payoff stage! After all that waiting and nurturing, we need intense heat and steam to get those incredible crusty sourdough baking tips results. You absolutely must preheat your oven to 500°F—and I mean *really* preheat it. Put your Dutch oven inside while it’s cold and let everything get screaming hot for a minimum of 45 minutes. If your oven isn’t ready, your crust won’t be either.
When you’re ready to bake, carefully remove that super-hot Dutch oven. I always use a piece of parchment paper as a sling to gently lower the cold dough in from the basket. This saves your fingers from serious burns, trust me! Before dropping it in, take your sharp scoring blade—I use a razor blade—and quickly make one decisive cut across the top of the loaf. This score controls where the bread expands, giving you that beautiful “ear” and open bloom.
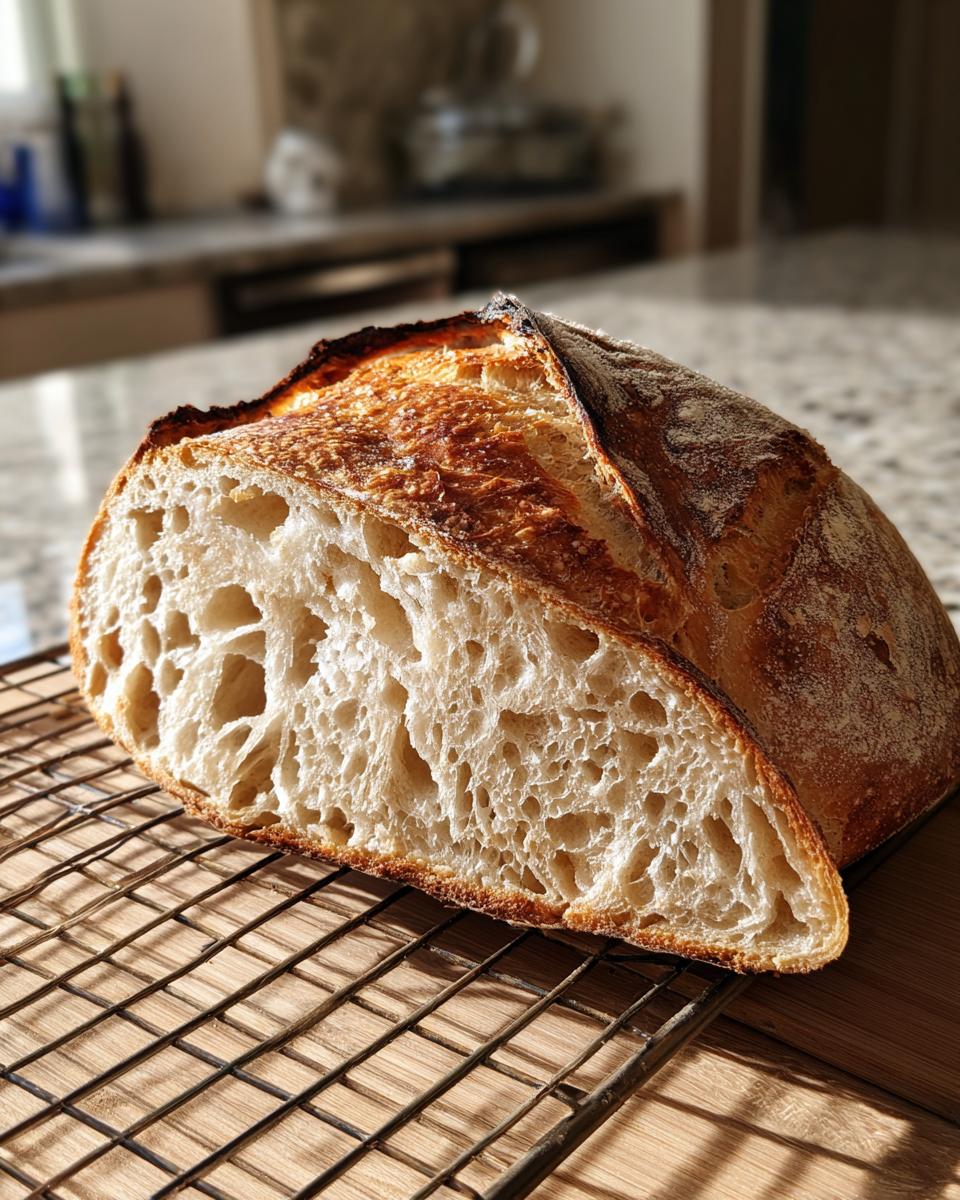
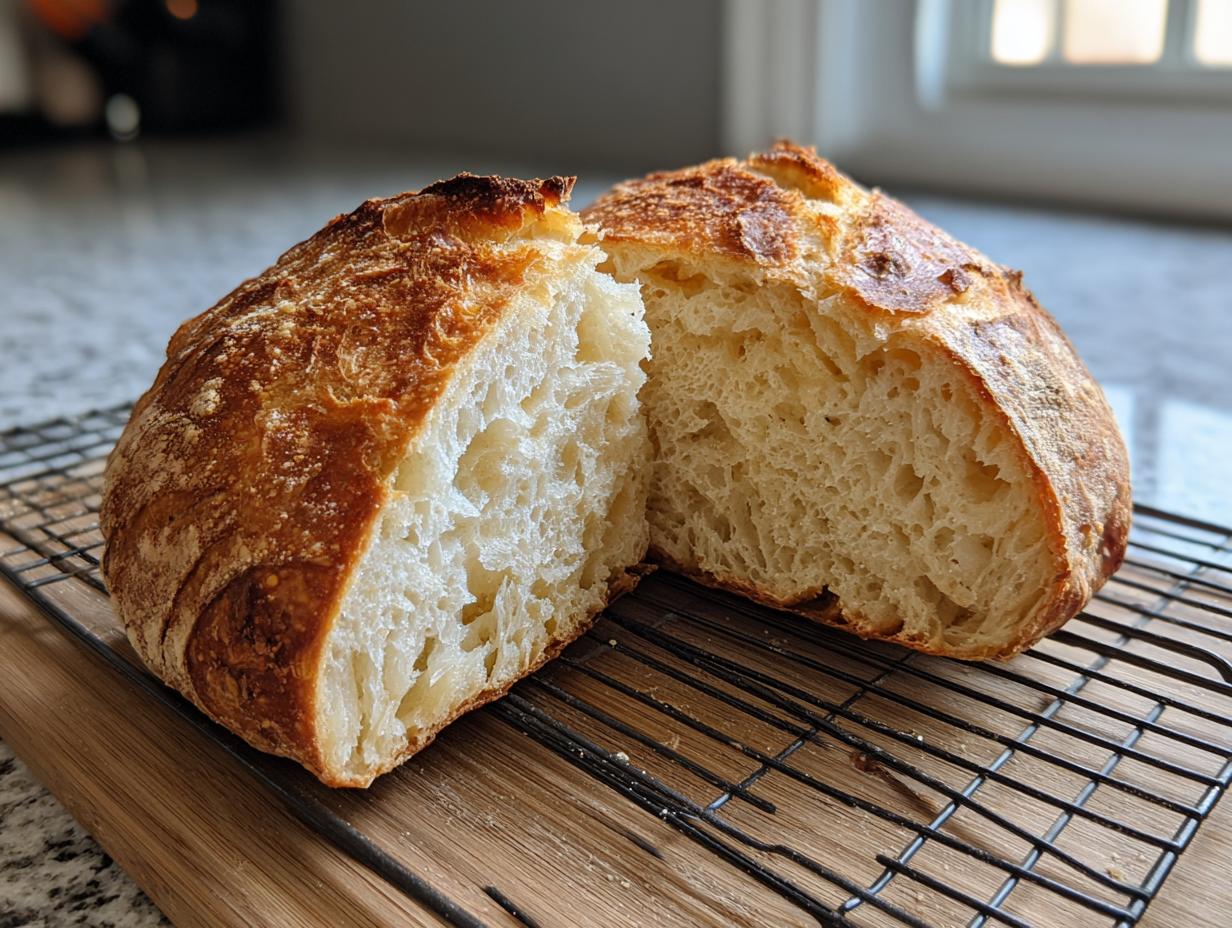
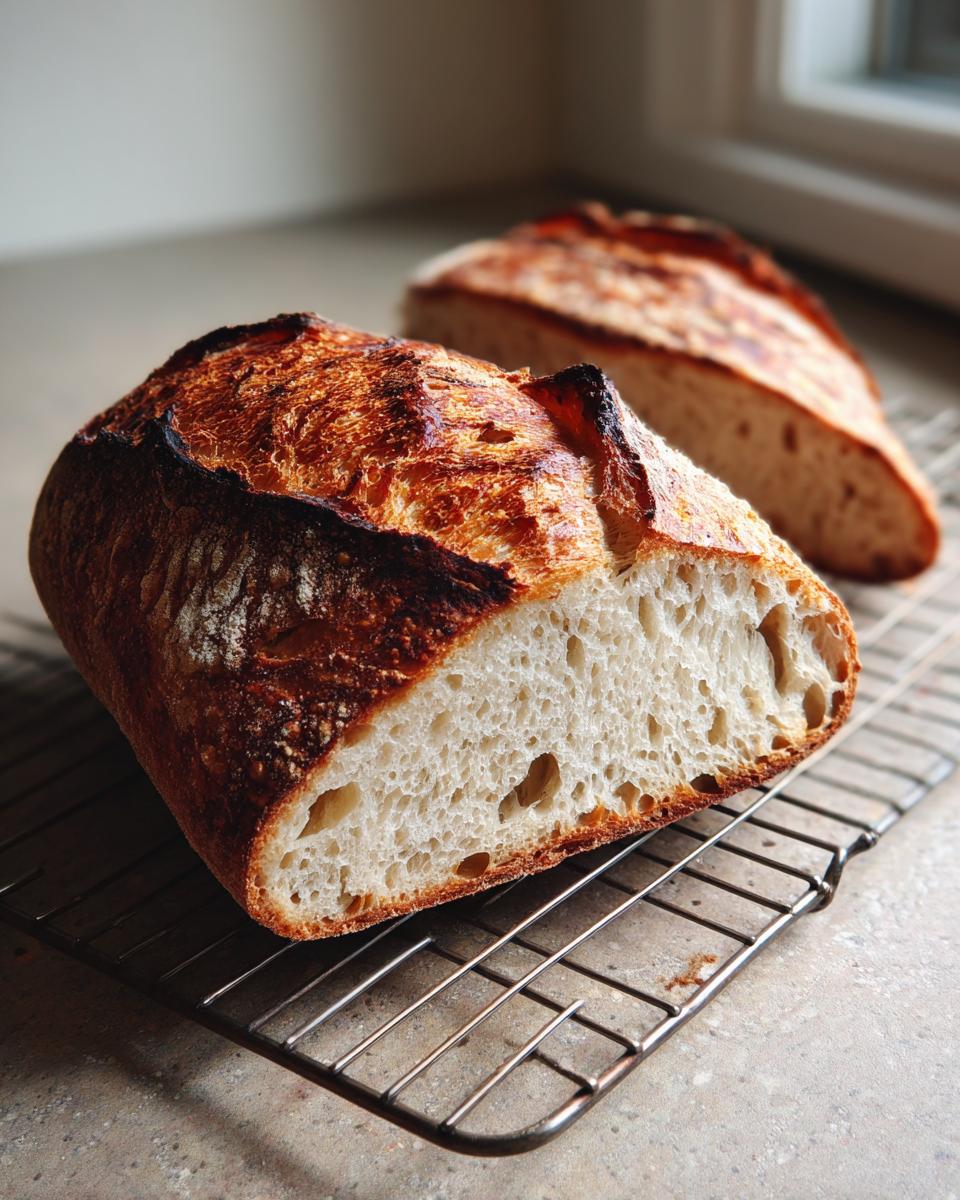
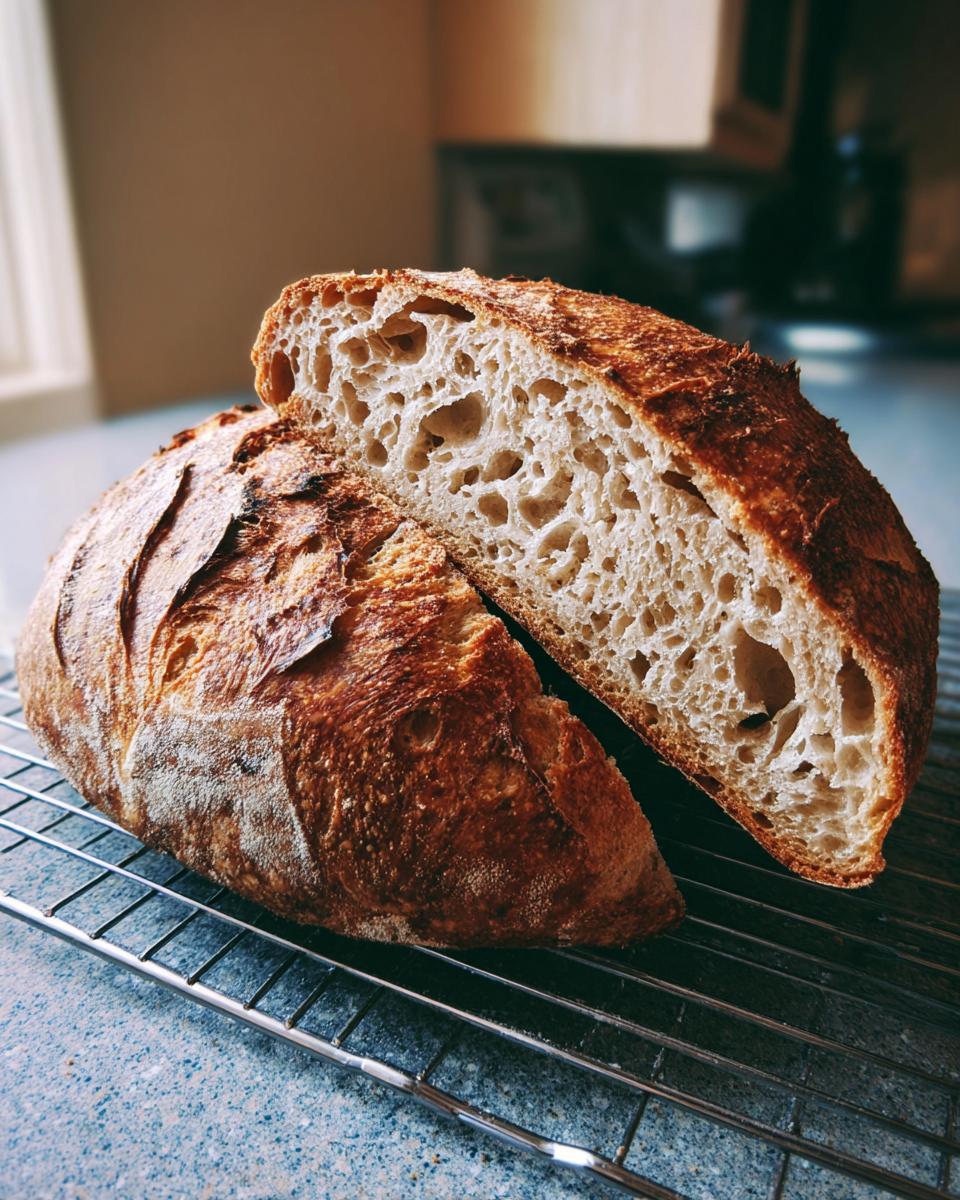
Bake it lid-on for the first 20 minutes at 500°F. This traps all the steam the dough releases, which keeps the crust soft enough to expand fully. That’s what gives you the volume we all dream of in our Sourdough bread! Once those 20 minutes are up, pull off the lid. Drop the temperature immediately down to 450°F. Keep baking uncovered for another 20 to 25 minutes until that crust turns a deep, satisfying mahogany color. It should sound hollow when you tap the bottom!
Troubleshooting Common Beginner Sourdough Issues
Even when you follow every step perfectly, sometimes that first loaf of Sourdough bread doesn’t turn out exactly how you pictured! Please don’t get discouraged; this is part of the learning curve. When a loaf comes out flat, or the dough felt impossible to handle, it almost always boils down to one of two things we can fix easily next time. Remember how I said baking is about finding peace? Don’t let a sticky dough ruin your day—just learn from it!
Why My Beginner Sourdough Instructions Didn’t Work
Nine times out of ten, a flat loaf means your starter wasn’t strong enough to lift the dough. If your starter wasn’t truly bubbly and active before you mixed it, it won’t have the power needed for that beautiful oven spring! Also, double-check your proofing time. If you stop the bulk fermentation too soon, the yeast hasn’t done enough work, leading to poor structure. On the flip side, over-proofing (letting it go too long) also causes flatness because the gluten network eventually collapses. When starting out with beginner sourdough instructions starter, it’s always better to slightly under-proof than over-proof!
Storage and Enjoying Your Sourdough Bread
Listen to me on this one, because I know the temptation is real: You MUST let your Sourdough bread cool completely before you slice it! If you cut it fresh out of the oven, all that glorious internal steam will escape too fast, and you’ll end up with a gummy, sticky crumb inside. That crunch you worked so hard for will be ruined!
I always let mine cool for at least two hours on a wire rack—it’s torture, but it’s worth it. For storage, keep it on the counter, cut-side down, wrapped loosely in a tea towel for the best texture day-to-day. If you won’t eat it all within two days, slice it and freeze it! It reheats wonderfully in the oven. It’s perfect toasted for breakfast or, my favorite, piled high with cheese for a killer grilled cheese sandwich. Happy eating!
Frequently Asked Questions About Sourdough Bread
I know jumping into Sourdough bread brings up a ton of questions, so let’s tackle the ones I hear most often from folks just starting out on their artisan bread at home adventure. Don’t sweat the small stuff; once you get the routine down, it’s just like any other recipe!
Can I skip the long cold proof for my Sourdough bread?
You technically *can*, yes! If you are in a huge hurry, you could bake this loaf right after shaping, but honestly, why would you want to? The long, cold proof—that 12 to 18 hours in the fridge—is where that gorgeous, complex tanginess develops. Plus, cold dough holds its shape so much better, making it way easier to handle and score beautifully before baking. Skipping it means you miss out on the best flavor and the best structure!
What is the best flour for a beginner sourdough loaf?
Hands down, the best flour for mastering your beginner sourdough instructions starter recipe is strong bread flour. It has the highest protein percentage, which means it can develop the strong gluten structure needed to hold all those bubbles. If you absolutely cannot find bread flour easily, look for a high-protein all-purpose flour. Just know that your loaf might not get quite the same height or chewiness that true bread flour provides. Stick to bread flour for your main ingredient!
How long does the starter need to be active before I use it?
You want your starter to be fed and fully active, which usually means it has doubled, or even tripled, in size within 4 to 8 hours of feeding, depending on your kitchen temperature. If it’s just starting to bubble but hasn’t reached its peak yet, don’t use it! A weak starter means a weak rise. My rule of thumb is if I feed it in the morning, I won’t bake that same day unless it’s showing huge activity by early afternoon. Always prioritize a peppy starter for successful Sourdough bread!
PrintBeginner Sourdough Loaf with Active Starter
Make a flavorful, crusty artisan sourdough bread loaf at home using your active starter. This recipe guides you through the steps for a successful bake.
- Prep Time: 30 min
- Cook Time: 45 min
- Total Time: 13 hours 45 min
- Yield: 1 loaf 1x
- Category: Bread
- Method: Baking
- Cuisine: American
- Diet: Vegetarian
Ingredients
- 100g active sourdough starter (fed 4–8 hours prior)
- 375g warm water (about 85°F)
- 500g bread flour
- 10g fine sea salt
Instructions
- Mix the starter and warm water in a large bowl until mostly combined.
- Add the bread flour and mix by hand until no dry flour remains. Cover the bowl and let it rest for 30 minutes (autolyse).
- Sprinkle the salt over the dough. Wet your hands slightly and dimple the salt into the dough. Squeeze and fold the dough over itself for about one minute to incorporate the salt.
- Cover the bowl and let it rest for 30 minutes.
- Perform the first set of stretch and folds: reach under one side of the dough, stretch it up, and fold it over the top. Rotate the bowl 90 degrees and repeat three more times (four folds total).
- Repeat the stretch and fold process every 30 minutes for the next 2 hours (four sets total). The dough should become smoother and stronger.
- After the final set of folds, let the dough rest, covered, at room temperature until it has increased in volume by about 30-50% and shows some bubbles (this can take 2-4 hours depending on your kitchen temperature).
- Gently turn the dough out onto a lightly floured surface. Shape the dough into a tight round (boule) using a bench scraper to help you pull the dough toward you.
- Place the shaped dough, seam-side up, into a well-floured proofing basket (banneton).
- Cover the basket with plastic wrap or a bag and place it in the refrigerator for a cold proof for 12 to 18 hours.
- Preheat your oven to 500°F (260°C) with a Dutch oven inside for at least 45 minutes.
- Carefully remove the hot Dutch oven. Gently turn the cold dough out of the basket onto a piece of parchment paper. Score the top of the loaf with a sharp blade.
- Using the parchment paper as a sling, carefully lower the dough into the hot Dutch oven. Cover with the lid.
- Bake for 20 minutes with the lid on.
- Remove the lid, reduce the oven temperature to 450°F (230°C), and continue baking for another 20-25 minutes until the crust is deep golden brown.
- Remove the bread from the Dutch oven and cool completely on a wire rack before slicing.
Notes
- For best results, use a digital scale to measure ingredients accurately.
- If you are new to sourdough, consider using a simple meal planning approach for your weekly baking schedule to keep track of feeding times.
- The cold proof in the refrigerator develops the complex, tangy flavor you want in your artisan bread at home.
Nutrition
- Serving Size: 1 slice
- Calories: 250
- Sugar: 0.5
- Sodium: 450
- Fat: 1
- Saturated Fat: 0.2
- Unsaturated Fat: 0.8
- Trans Fat: 0
- Carbohydrates: 52
- Fiber: 2
- Protein: 9
- Cholesterol: 0