
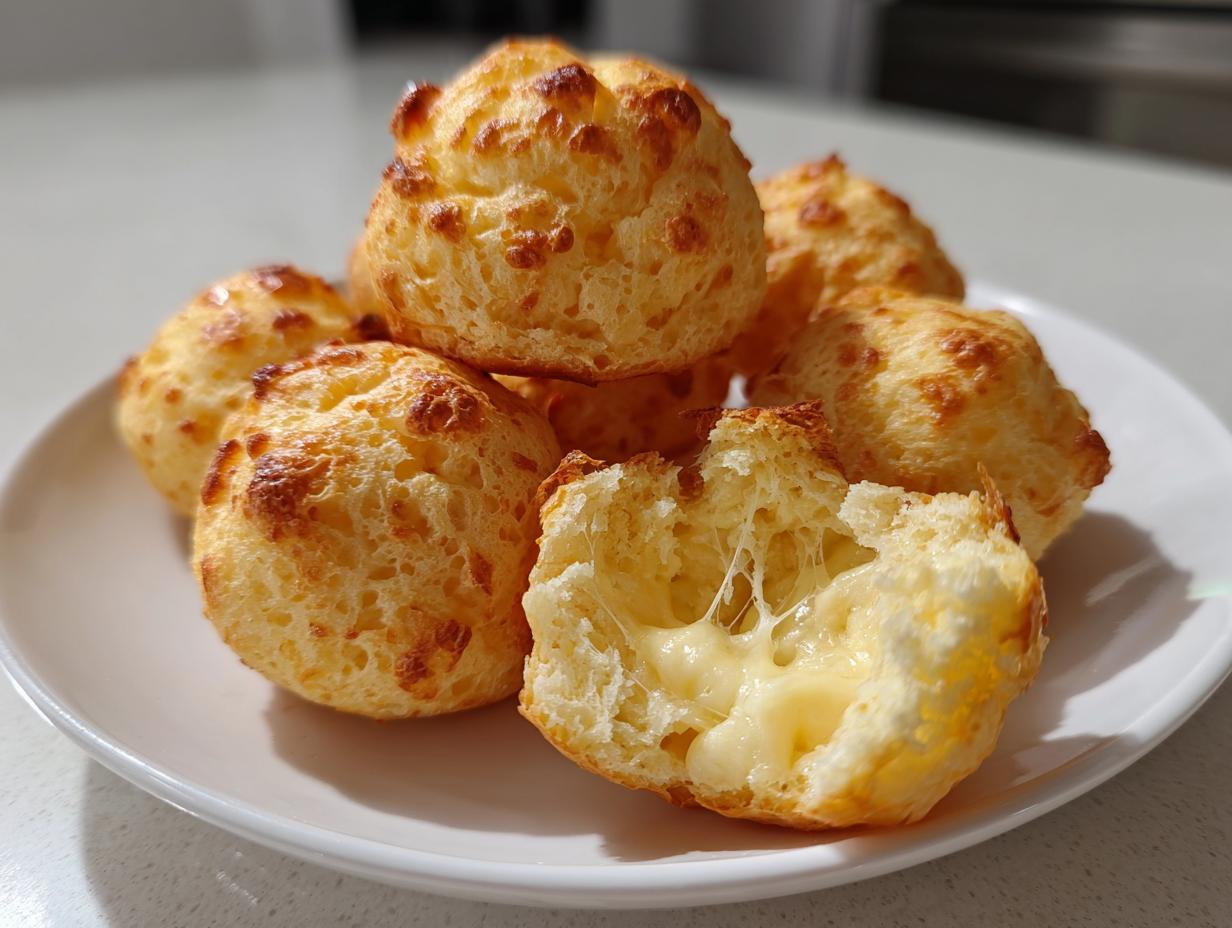
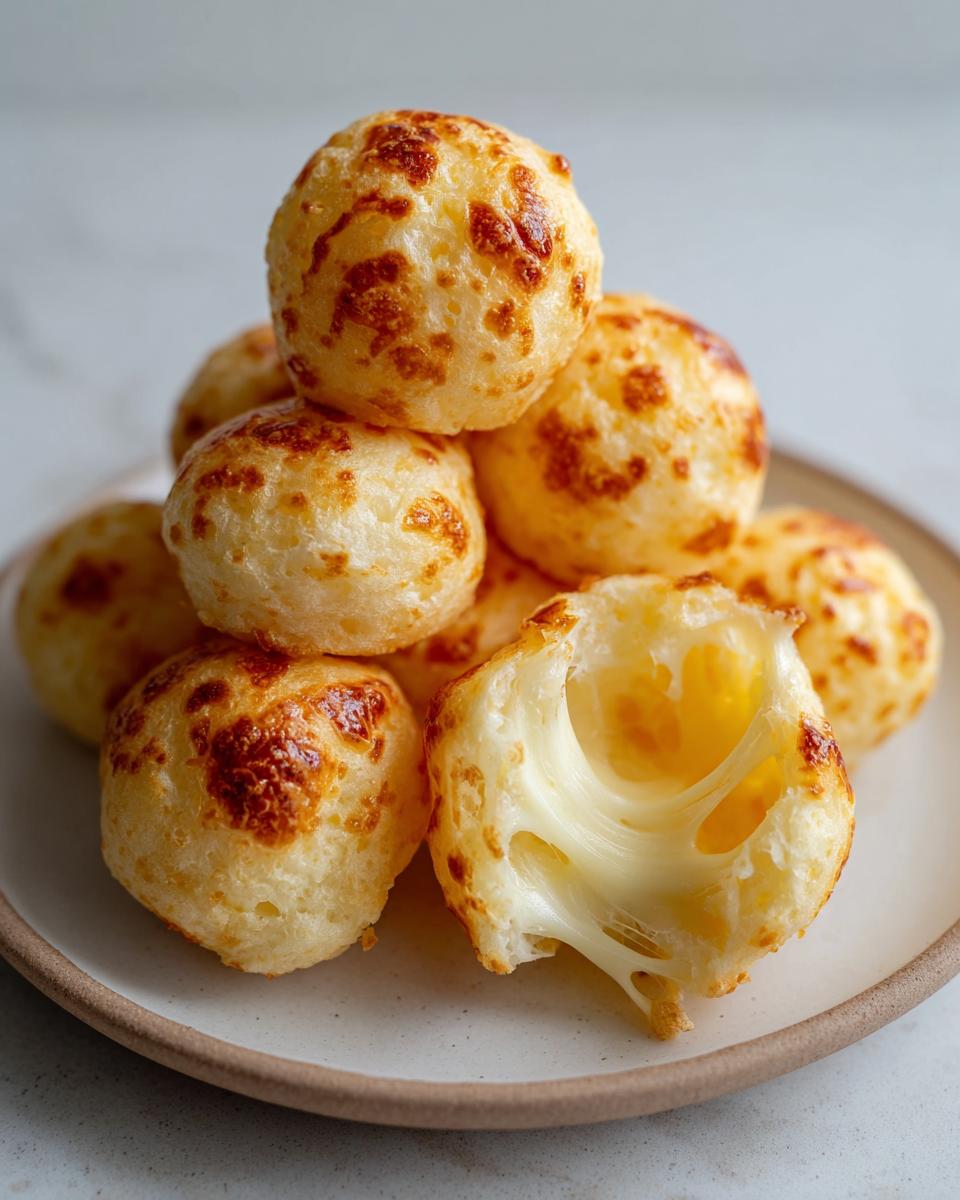
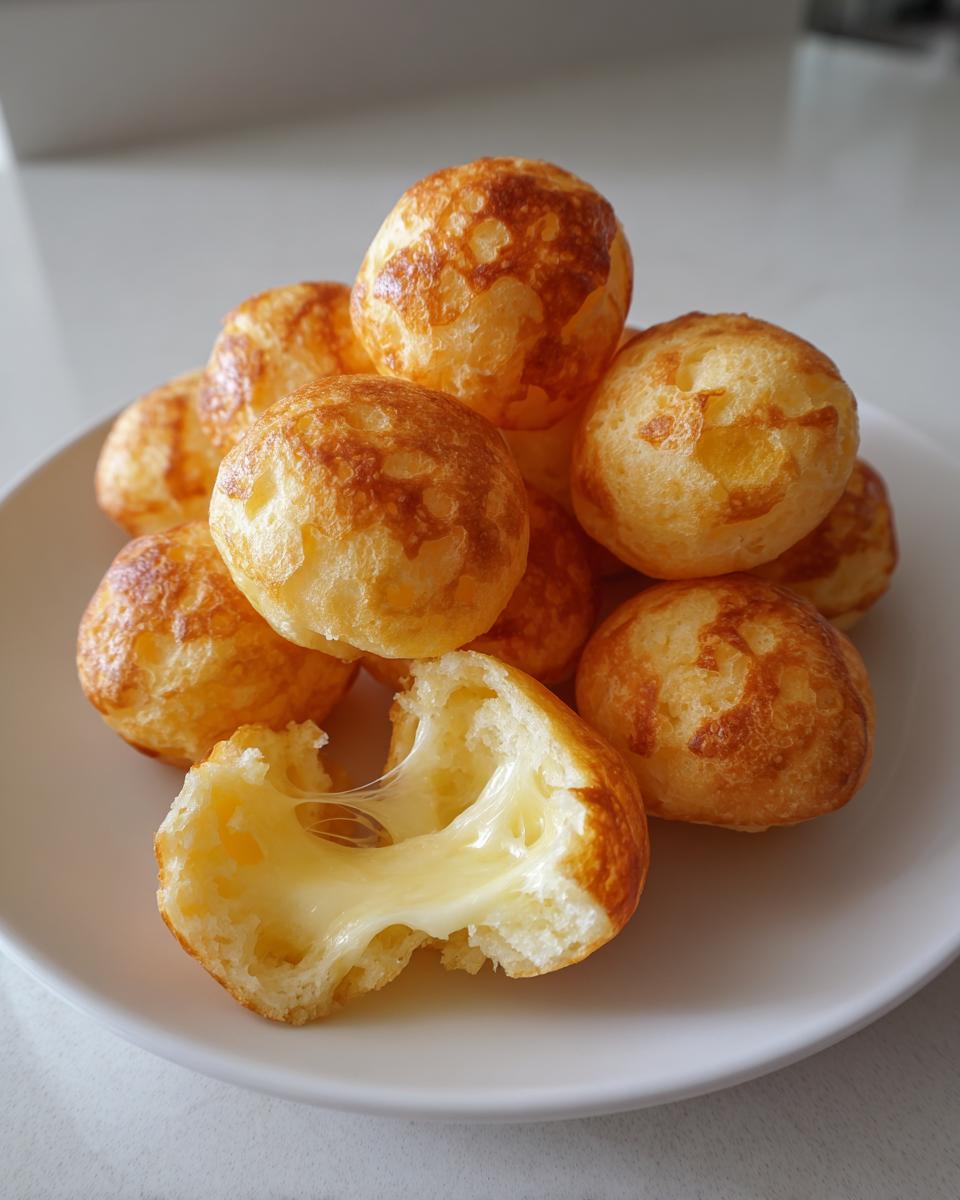
If you’re anything like me, the scent of melted cheese instantly transports you to a happy place. That’s exactly the magic woven into Pão de Queijo, or as we call them here, authentic brazilian cheese bread puffs. These little bites are pure comfort, and I’m showing you my absolute favorite, easiest method for making them right at home. Forget complicated steps; this recipe is designed for the everyday baker who wants that perfect contrast: a shatteringly crisp exterior hugging the softest, wonderfully chewy, cheesy center.
When my life was super hectic years ago, as I share over on the About Us page, I found solace in baking things that felt inherently joyful and simple. This Pao de Queijo recipe is one of those finds. It’s naturally gluten-free, requires minimal effort, and reminds me that the best flavors often come from the most humble ingredients. I promise, once you bite into one of these, you’ll understand why they’re such a staple!
- Why This Authentic Brazilian Cheese Bread Recipe Works
- Ingredients for Homemade Pao de Queijo
- How to Make Brazilian Cheese Bread: Step-by-Step Instructions
- Tips for Success with Your Pao de Queijo Recipe
- Make-Ahead & Freezer Tips for Party Bread Puffs
- Serving Suggestions for Brazilian Snack Ideas
- Storage and Reheating Instructions for Cheesy Gluten Free Snacks
- Frequently Asked Questions About Pao de Queijo Recipe
- Nutritional Estimate for Bite Sized Cheesy Bread
Why This Authentic Brazilian Cheese Bread Recipe Works
I know you’re looking for that signature pull—that gooey, elastic center that makes real Pao de Queijo so addictive. I’ve tweaked and tested this until I knew it was rock solid, even for beginners. What makes these cheesy gluten free snacks so incredibly right is just a few crucial details that honor the authentic method.
- It’s naturally gluten free, relying entirely on tapioca starch.
- The method of heating the liquids first provides superior texture.
- It uses a blend of cheeses for both flavor and the necessary stretch.
Achieving the Perfect Chewy Cheese Bites Texture
The secret sauce, pun intended, is the tapioca flour. Unlike wheat flour, which creates gluten and makes bread chewy in a bready way, tapioca flour gelatinizes when scalded with hot liquid. This step—pouring boiling milk and oil right over the flour—is the key to creating that incredible, almost bouncy, elastic center bread we all crave. Don’t skip heating that liquid up!
Naturally Gluten Free Bread Recipes
If you need a fabulous gluten free bread recipe that doesn’t taste like a compromise, this is it! Because we are using tapioca flour—which is starch extracted from the cassava root—it is naturally free of wheat. This ingredient is non-negotiable for achieving that classic brazilian cheese bread texture. It’s one of the best savory cheese snacks you’ll ever make, period.
Ingredients for Homemade Pao de Queijo
To make about 20 of these amazing little party bread puffs, you just need a short list of simple items. The quality of your cheese here really makes or breaks these cheesy gluten free snacks, so focus on flavor! Remember to use good cheese, like you would for any great sandwich.
- 1 cup whole milk
- 1/2 cup vegetable oil
- 1 teaspoon salt
- 2 cups tapioca flour (sweet or sour)
- 2 large eggs
- 1 cup shredded Parmesan cheese
- 1/2 cup shredded mozzarella cheese
Ingredient Notes and Substitutions for Brazilian Cheese Bread
Let’s talk about that flour, because this is where people get confused! You can use either sweet or sour tapioca flour. Sour tapioca flour gives a slightly more traditional, tangy taste to your brazilian cheese bread, while sweet is a bit milder. Either one works beautifully for that gluten-free base.
For the cheese, please don’t skimp! The Parmesan is there for that sharp, salty flavor kick—that’s the real flavor hero. But the mozzarella? That’s your insurance policy for stretch! You need that mozzarella mixed in so you get that wonderfully satisfying, gooey pull when you break the hot puff in half.
How to Make Brazilian Cheese Bread: Step-by-Step Instructions
Okay, this is where the real magic happens, and trust me, it’s so simple you’ll wonder why you ever bought these from a bakery! We start by telling the oven to get ready—preheat to 375°F (190°C) and grab a baking sheet. We want these little party bread puffs ready fast. I usually prep my dough while the oven warms up so I can get them baking quickly, which is key for enjoying these quick cheese bread bites right out of the oven.
Scalding the Tapioca Flour for Elastic Center Bread
Grab a saucepan and heat up your milk, vegetable oil, and salt until it just starts to boil—don’t let it go too long, just right to the edge! Immediately, pour that hot liquid right over the 2 cups of tapioca flour waiting in your big bowl. You need to stir this like you mean it, using a sturdy wooden spoon, until it pulls together into a very thick, sticky paste. Seriously, it looks odd, but that’s exactly what we want! Let that mixture rest for about 10 minutes so it cools down enough for the next step.
Forming and Baking Your Brazilian Cheese Bread Puffs
Once it’s not scorchingly hot, mix in your eggs, one at a time, followed by all that delicious Parmesan and mozzarella. The dough will feel loose—that’s normal! Now, lightly oil your hands (this stops the dough from sticking horribly) and scoop out small bits, roughly the size of a tablespoon each, rolling them gently into those signature balls. Place them about an inch apart on your sheet.
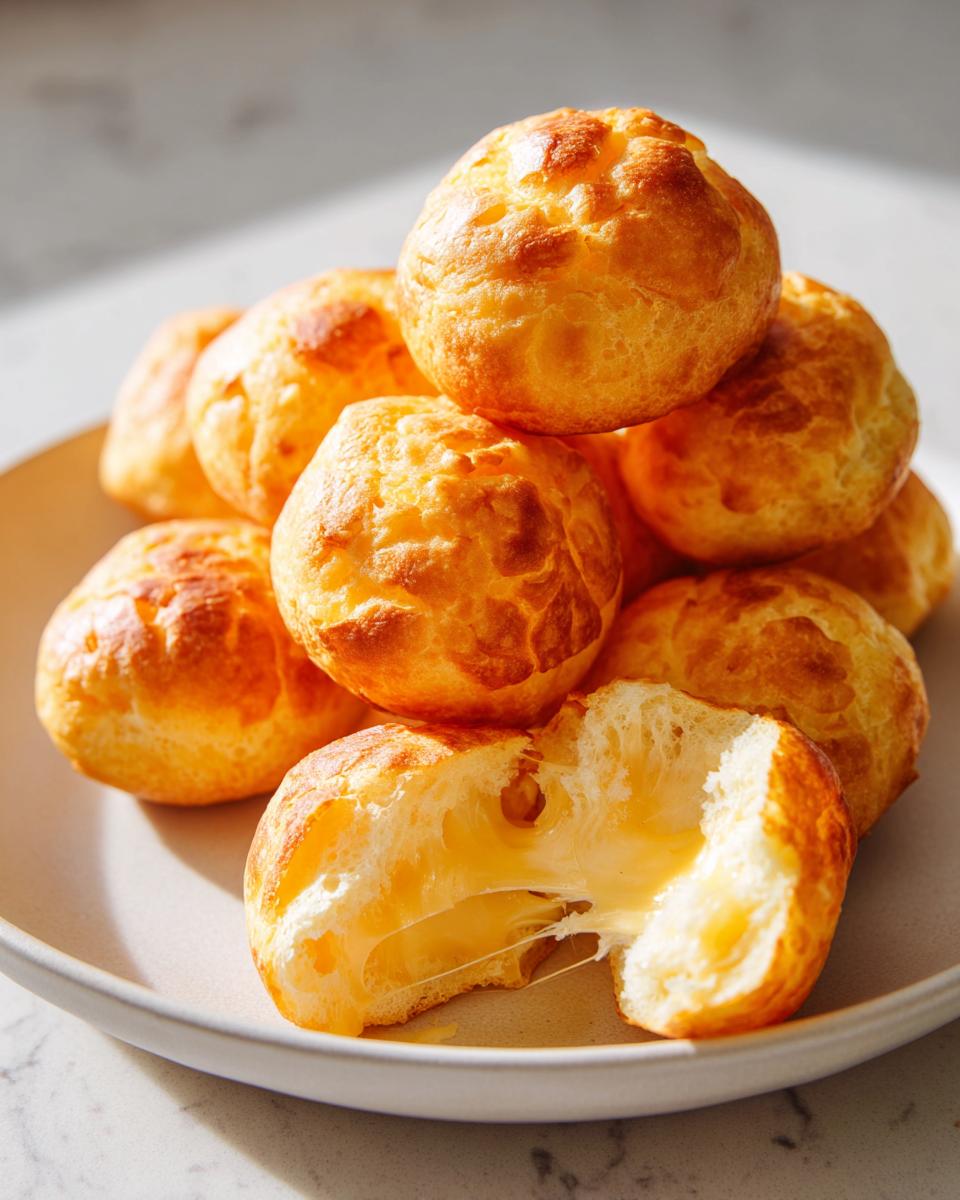
Pop them in the oven for 20 to 25 minutes. You are looking for them to puff up nicely and get just lightly golden brown on top. If you want the best texture for your homemade Pao de Queijo, you absolutely must slice into one while it’s crazy hot!
Tips for Success with Your Pao de Queijo Recipe
Even though this recipe is super straightforward, I have a few tricks up my sleeve—things I learned from recipe testing—that elevate these from good to *wow*. Remember how I stressed using both cheeses? That combination is vital for nailing that perfect crust and the wonderful inner stretch. Don’t forget to keep tasting your cheeses before you shred them; you want that nice salty punch!
Making Copycat Texas de Brazil Cheese Bread at Home
I often get asked how to make this taste exactly like the amazing cheesy bread you get at that famous steakhouse. Well, you’re already using the right base! To lean into that rich, restaurant style, I just bump up the saltiness slightly. Try adding a tiny extra pinch of salt to the milk mixture, or use a slightly sharper Parmesan.
The key is doubling down on that savory factor. If you want that ultra-rich mouthfeel, maybe next time swap the vegetable oil for a really good, neutral-flavored light olive oil—it gives the texture a little boost. Enjoy mastering your homemade garlic butter snacks!
Make-Ahead & Freezer Tips for Party Bread Puffs
Honestly, the best thing about this brazilian cheese bread recipe is that you don’t have to make them all at once! I always try to double the batch because these freeze like a dream. If you’re planning a party or just want a quick, hot snack for breakfast the next day without all the mixing, this is your secret weapon.
So, here is my simple method for baking later. Once you’ve mixed your dough and rolled out your little balls, lay them out on a baking sheet—make sure they aren’t touching! Pop that whole sheet right into the freezer. Once those cheesy puffs are completely solid, you can transfer them into a large, sturdy freezer bag. They’ll keep beautifully for months this way.
When you’re ready to bake, don’t thaw them! This is important for retaining that classic Pão de Queijo structure. You bake them directly from frozen. Just add about 5 to 7 extra minutes onto the regular baking time. I love having these on hand—it’s like having instant, glorious, warm appetizer goodness ready to go. Whip up a batch of crockpot BBQ meatballs, and you’ve got an entire party spread waiting!
Serving Suggestions for Brazilian Snack Ideas
These little puffs are so versatile, it’s almost silly! Sure, they are the star of any appetizer spread—especially when company pops over unexpectedly—but I also love them for so much more. They aren’t just for parties, you know! Since they are naturally gluten free and so delightfully savory, they cross over beautifully into breakfast territory.
In Brazil, these little gems are often enjoyed alongside a strong cup of coffee in the mid-afternoon. Think of them as the perfect savory counterpoint to something sweet! I love pairing them with my homemade salted caramel latte for a perfect cozy morning moment. Who needs toast when you have these?

But let’s talk dinner, too. If you’re making a lighter meal, these bite sized cheesy bread puffs make a fantastic side dish. They are amazing dipped into a hearty soup. Seriously, tear one open and use it to scoop up some creamy classic tomato soup. The texture contrast is just heavenly. Because they are so quick to bake when you have the dough ready, they fit right into any busy schedule.
Storage and Reheating Instructions for Cheesy Gluten Free Snacks
Once your Pao de Queijo cools down—and I know this is the hardest part, waiting for them to cool—you need to store them correctly if you aren’t eating them immediately. I always recommend eating them warm for that unbeatable texture, but life happens!
For short-term storage, just a day or two, place the cooled puffs in a truly airtight container at room temperature. Don’t put them in the fridge! That cold, dry air will suck out what little moisture they have left and make them tough before their time. You want to keep them cozy at room temperature.
Now, when it comes time to reheat your cheesy gluten free snacks, we have to be careful. The microwave is your enemy here; it makes them turn rubbery instantly. Trust me on this one; I learned the hard way!
Restoring Crispness to Cooled Pão de Queijo
The best way to bring back that shatteringly crisp shell is using dry heat. Pop them into a regular oven or, even better, a toaster oven set to about 350°F (175°C). You only need about 5 to 8 minutes.
I find that a toaster oven works faster and crisps the outside up beautifully without overcooking the inside. They come out tasting nearly freshly baked—that contrast between the warm, stretchy cheese inside and the crisp exterior comes right back. This method works perfectly whether you’re reheating two puffs or a whole batch.
Frequently Asked Questions About Pao de Queijo Recipe
I know when you start diving into a new recipe, especially one that relies on a unique ingredient like tapioca flour, you’re going to have questions! I’ve gathered the ones I get asked most often about making Pao de Queijo. We want you to feel totally confident rolling these out for your next snack session!
Can I use regular wheat flour instead of tapioca flour for this brazilian cheese bread?
Oh, honey, that’s the number one question! The short answer is really no, you shouldn’t swap it out if you want the real deal. Wheat flour has gluten, which is what makes traditional bread soft and structured. Tapioca flour bread is special precisely because it *lacks* gluten. If you use regular flour, you’ll end up with a dense, heavy, tough little roll—not the light, airy, wonderfully chewy pockets that define authentic brazilian cheese bread. Stick to the tapioca; I promise it’s worth tracking down!
What is the best cheese to use for authentic Pão de Queijo?
Great question about building that flavor profile! For the very best result, you need a combination. As I mentioned earlier, the Parmesan brings that crucial salty, nutty complexity that makes these so addictive. The Mozzarella is just there to ensure maximum cheese stretch when you pull them apart.
If you want to get super authentic, traditional recipes often call for *Queijo Minas*—a specific Brazilian cheese. If you can find a good, firm, slightly salty cheese that crumbles well, you can use that in place of the Parmesan, but for most home kitchens in the US, the Parmesan/Mozzarella blend is your ticket to deliciousness!
Why didn’t my brazilian cheese bread puff up?
Don’t let this stop you from trying again! Usually, when my puffs come out flat, it’s down to one of two things we discussed earlier in the steps for how to make brazilian cheese bread. First, make sure your milk/oil mixture was truly boiling hot when you poured it over the flour—that scalding action is what creates the steam that lifts the bread!
Second, check your oven temperature. If the oven isn’t fully preheated to 375°F (190°C), the exterior sets before the starch has a chance to puff up in the heat. If you’re having trouble, make sure your oven thermometer is accurate, or give them just a few extra minutes in the heat until they look light and golden. You’ll nail it next time!
If you’re looking for other quick baking ideas for busy nights, check out my guide on easy weeknight dinners!
Nutritional Estimate for Bite Sized Cheesy Bread
Okay, so while these bite sized cheesy bread puffs are heavenly, they aren’t exactly lettuce wraps, right? I always try to be upfront about what’s in my baking, and I want to keep things easy for you here. Since we are using whole milk, oil, and good amounts of real cheese, they definitely have some richness to them!
Below is a rough nutritional estimate based on the specific ingredients listed in the recipe. Please remember, this is just a guide! If you swap out the oil for applesauce (which I wouldn’t recommend for this recipe, honestly!), the numbers change. But for what we made—that perfect, authentic batch—here is what you can expect per single puff:
- Serving Size: 1 puff
- Calories: 105
- Fat: 6g (including 3g Saturated Fat)
- Carbohydrates: 11g
- Protein: 3g
- Sugar: 0.5g (That’s barely anything! All natural sweetness from the milk/cheese!)
- Sodium: 150mg
See? Not bad at all for something this addictive! They make a surprisingly acceptable addition to a lighter meal or an excellent component of a hearty breakfast spread. Just enjoy them warm, fresh from the oven, maybe with a second cup of coffee!
PrintAuthentic Pão de Queijo: Easy Gluten-Free Brazilian Cheese Bread

Create the perfect Pão de Queijo, the classic Brazilian cheese bread. This recipe delivers a crispy exterior and a wonderfully chewy, cheesy center. It is naturally gluten-free and simple to make for breakfast or as an appetizer.
- Prep Time: 15 min
- Cook Time: 25 min
- Total Time: 40 min
- Yield: About 20 small puffs 1x
- Category: Snack
- Method: Baking
- Cuisine: Brazilian
- Diet: Gluten Free
Ingredients
- 1 cup whole milk
- 1/2 cup vegetable oil
- 1 teaspoon salt
- 2 cups tapioca flour (sour or sweet)
- 2 large eggs
- 1 cup shredded Parmesan cheese
- 1/2 cup shredded mozzarella cheese
Instructions
- Preheat your oven to 375°F (190°C). Lightly grease a baking sheet or line it with parchment paper.
- In a medium saucepan, combine the milk, oil, and salt. Heat this mixture over medium heat until it just begins to boil. Remove from heat immediately.
- In a large bowl, place the tapioca flour. Pour the hot milk mixture over the flour. Stir vigorously with a wooden spoon until the mixture is well combined and forms a thick, sticky paste. Let this cool for about 10 minutes.
- Add the eggs to the cooled tapioca mixture one at a time, mixing well after each addition until fully incorporated. The dough will look loose.
- Stir in the Parmesan cheese and mozzarella cheese until they are evenly distributed throughout the dough.
- Using lightly oiled hands, scoop out portions of the dough (about 1.5 tablespoons each) and roll them into small balls. Place the balls about 1 inch apart on the prepared baking sheet.
- Bake for 20 to 25 minutes, or until the cheese bread puffs up and the exterior is lightly golden brown.
- Serve warm to enjoy the best chewy texture.
Notes
- For the best texture, use a combination of cheeses. Parmesan adds flavor, and mozzarella helps with the stretch.
- If you want a copycat version similar to Texas de Brazil cheese bread, ensure your cheese blend is rich and salty.
- This dough can be made ahead of time. Roll the balls and freeze them on a tray. Once frozen, transfer them to a freezer bag. Bake directly from frozen, adding 5 to 7 minutes to the baking time.
Nutrition
- Serving Size: 1 puff
- Calories: 105
- Sugar: 0.5
- Sodium: 150
- Fat: 6
- Saturated Fat: 3
- Unsaturated Fat: 3
- Trans Fat: 0
- Carbohydrates: 11
- Fiber: 0.2
- Protein: 3
- Cholesterol: 25