
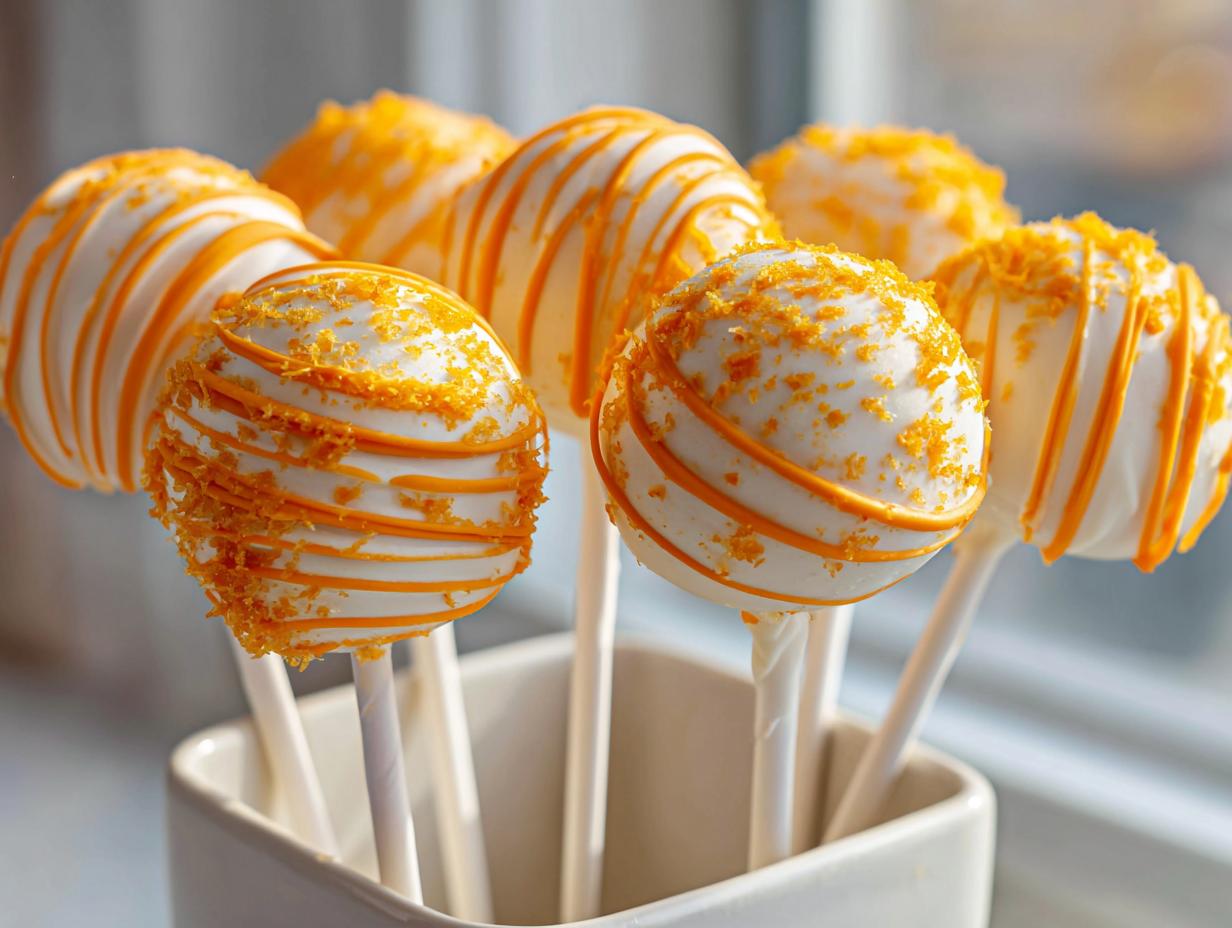
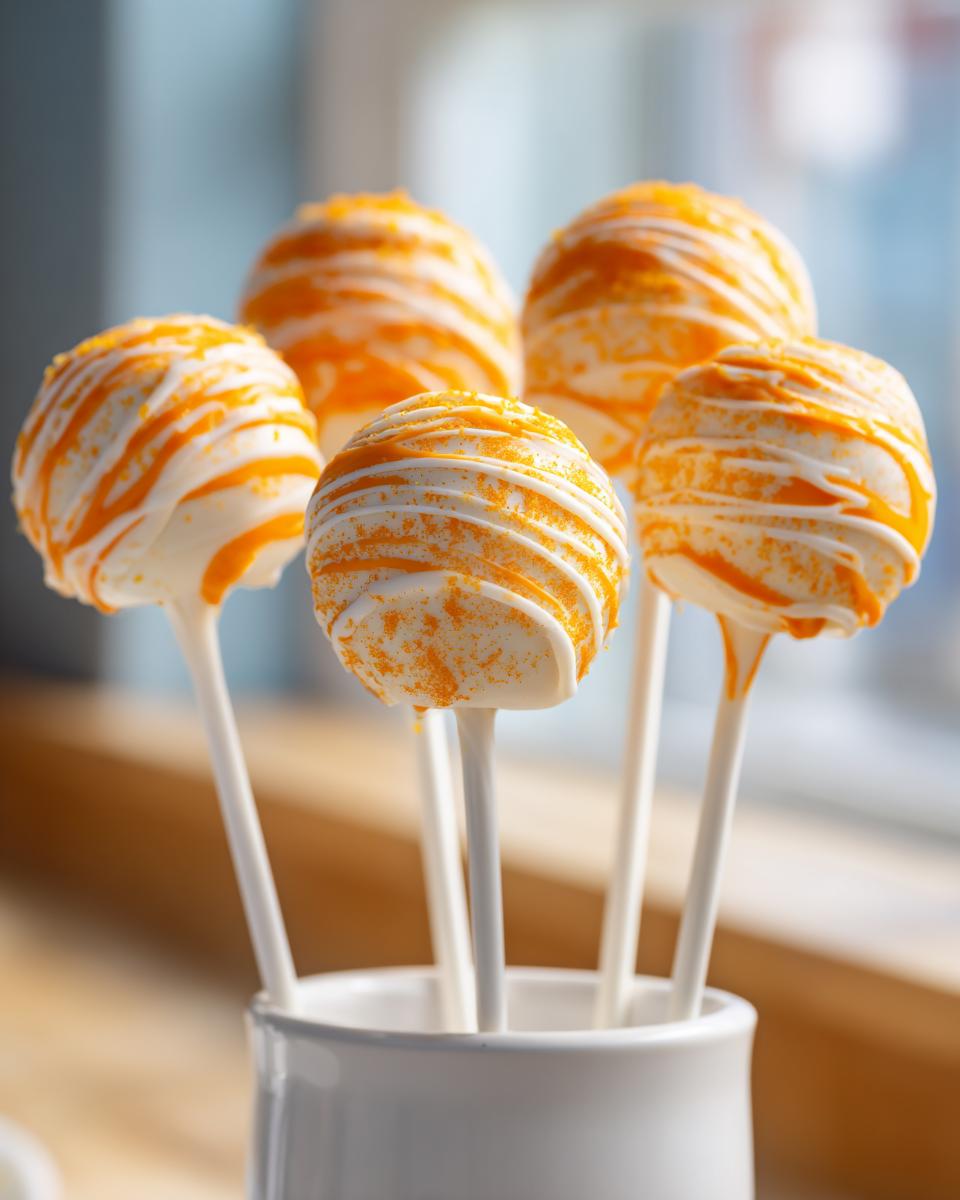
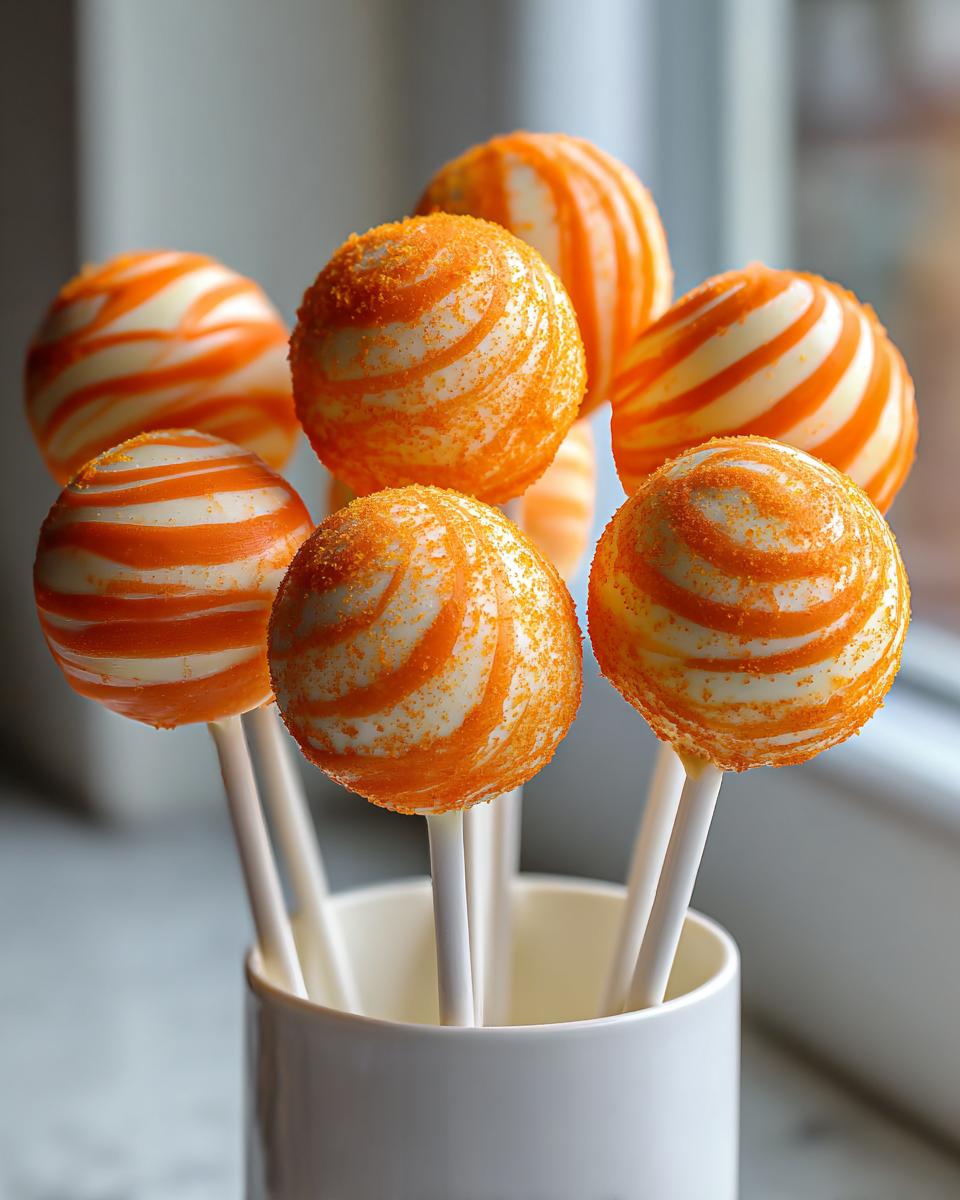
Oh, summer memories! Does anything just instantly transport you back to being a kid on a hot porch swing like that perfect, melt-in-your-mouth creamsicle? That blend of bright, zesty orange and creamy vanilla is pure nostalgia in a bite. I worked so hard to capture that magic, and I finally did it—these homemade creamsicle cake pops are exactly what you need when you’re craving that classic flavor! I used to love sneaking the frozen orange layer right off the stick when I was little. Now, I get to make a slightly more sophisticated, yet just as joyful, version right here in my kitchen for all of you.
Trust me when I say that once you master these, they will become your go-to treat whenever you need a burst of sunshine. You can find out a little more about my baking philosophy over on the About Page, but for now, let’s get mixing!
- Why You Will Love These Creamsicle Cake Pops
- Gathering Ingredients for Perfect Creamsicle Cake Pops
- Step-by-Step Instructions: Making Homemade Orange Vanilla Cake Pops
- Tips for Success with Citrus Flavored Cake Pop Coating Ideas
- Variations: Creating Vanilla Orange Swirl Cake Truffles
- Serving Suggestions for Creamsicle Cake Pops
- Storage and Keeping Your Creamsicle Cake Pops Fresh
- Frequently Asked Questions About Making Creamsicle Dessert Bites
- Estimated Nutritional Breakdown for Creamsicle Cake Pops
- Share Your Bright and Refreshing Cake Pops Creations
Why You Will Love These Creamsicle Cake Pops
These aren’t just any cake pops; these are sunshine treats ready for your next party! I promise you’ll adore making and sharing these for so many reasons:
- They capture that true, spot-on orange and vanilla flavor you remember from childhood—so incredibly bright!
- The process is surprisingly straightforward, even the part where you do the dipping. It’s easier than rolling cookie dough, I swear!
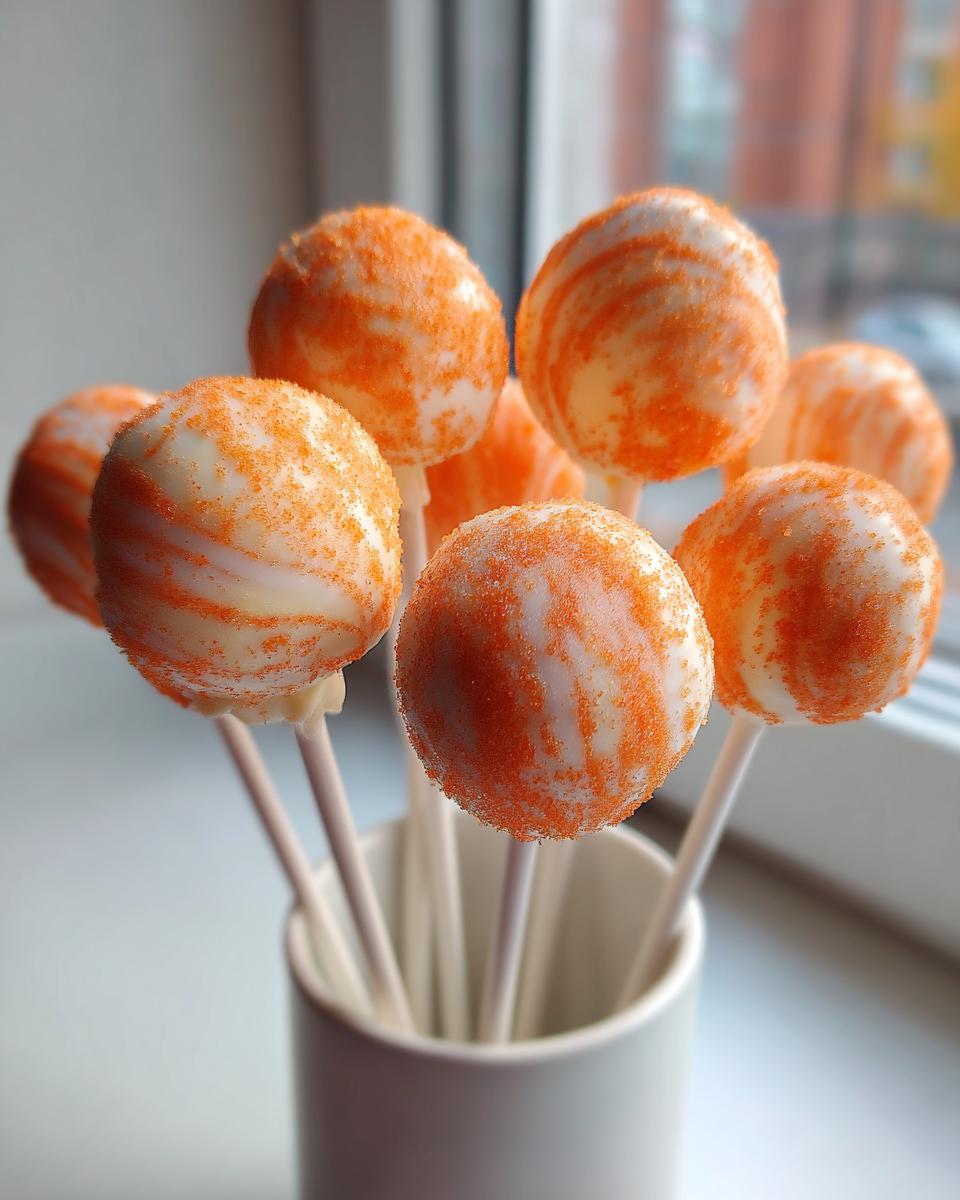
- The final look is stunning, especially if you follow the instructions for deep orange coating on your creamsicle cake pops.
- They hold up beautifully at room temperature, making them the best party dessert option.
Gathering Ingredients for Perfect Creamsicle Cake Pops
For any recipe to sing—and trust me, we want these pops to belt out an aria of citrus goodness!—you have to start with the right building blocks. I’ve tested countless combinations to land on this perfect ratio of orange tang to creamy vanilla softness. When you use fresh zest, it makes all the difference in the world, delivering that authentic, bright hit we’re looking for. You’ll need to pull everything together before we even think about turning on the oven!
Cake Base and Flavoring Components
This is where we infuse that core orange flavor right into the cake itself. Don’t skimp on the fresh zest; that is non-negotiable for the best flavor!
- 1 box (15.25 oz) white cake mix
- Ingredients required by cake mix box (usually eggs, oil, water) – but we swap the water!
- 1/2 cup vanilla frosting (your binding agent!)
- 1 teaspoon pure vanilla extract
- 1 tablespoon fresh orange zest (yes, tablespoon!)
- 1/4 cup fresh orange juice (this replaces the water in your mix)
Coating and Dipping Essentials for Your Creamsicle Cake Pops
The coating is crucial—it gives you that classic, smooth finish and seals in the moisture. You decide how orange you want to go here!
- 1 bag (12 oz) white candy melts
- 1/2 teaspoon vegetable oil (optional, but it’s my little secret for perfect flow)
- Orange food coloring gel (optional, for that signature sunny hue)
- Cake pop sticks
Step-by-Step Instructions: Making Homemade Orange Vanilla Cake Pops
Okay, this is the fun part where we turn batter into beautiful, ready-to-dip spheres! If you follow what I learned through trial and error, we can nail this Orange Vanilla Cake Pops Tutorial perfectly on the first try. Remember, cooling is your best friend during this whole process—that’s the secret handshake for professional-looking results!
Baking and Crumbing the Cake Base
First things first, we need cake! Prepare your white cake mix exactly as the box says, but here’s our first little trick: use the fresh orange juice instead of the water it calls for. That juice soaks right into the cake, giving it a beautiful citrus undertone even before we add the zest later. Bake that baby up in your 9×13 pan as directed. Once it’s done, you absolutely must let it cool completely. I mean it—touch it. If it’s even slightly warm, the frosting will melt, and you’ll end up with soup instead of dough. Once it’s totally cool, just crumble it up finely into a big bowl. Toss out any of those dark, crusty edges; we only want the soft, bright middle!
Forming and Chilling the Creamsicle Cake Pops Dough
Now for the magic binder! Throw in your vanilla frosting, that teaspoon of vanilla extract, and all that gorgeous fresh orange zest we prepared. Mix it all up with your hands or a sturdy spoon until it truly looks like cookie dough—it should hold together when you squeeze a piece. If it seems too crumbly, add just a tiny secret drizzle more of whatever liquid was left over from juicing your oranges. Roll these beauties into uniform 1-inch balls and line them up on parchment paper. Stick the sheet into the fridge for at least 30 minutes. This chilling step is essential; cold cake balls won’t soak up the hot melted coating, which prevents cracking later!
Melting and Coloring the Bright Orange Candy Melt Coating
While those cake balls are getting frosty, let’s deal with the coating. Melt your white candy melts slowly, just as the bag tells you. Stir them often! If they start looking a little tight or thick—which happens faster than you can say “creamsicle”—add just half a teaspoon of vegetable oil. That oil thins them out beautifully without messing up the setting quality. If you’re going for that intense, sunny orange color, now is the time to drop in a few dabs of orange food coloring gel. Gel coloring is way better than liquid because it won’t mess with the consistency! Mix it until you have one smooth, beautiful orange bath ready. You can always find more great tips on coatings over at my main dessert index!
The Dipping Technique for Flawless Creamsicle Cake Pops
Time to dip! Heat up the oven just a tiny bit or use a warm paper towel to slightly warm the very tip of your cake pop stick. Dip the tip just an inch into the orange coating and then stick that into a chilled cake ball, making sure to go about halfway down. Pop the whole tray back into the fridge for about 10 minutes. This sets the stick like cement! Once the stick is solid, take your pop, dip it deep into the melted coating, and rotate it so it’s totally covered. Then, gently tap the stick edge against the side of your melting bowl—just a couple of light taps—to shake off any huge drips. Stick it upright in your drying block and let it set fully before you even *think* about touching it!
Tips for Success with Citrus Flavored Cake Pop Coating Ideas
I’ve broken a lot of coatings in my day, so I want to save you the frustration! When dealing with any of these Citrus Flavored Cake Pop Coating Ideas, remember two golden rules: keep ’em cold and don’t rush the dip. If your cake balls are starting to get warm—maybe you’ve been rolling them out for a big batch—they will start to absorb the heat from the melted candy, and *snap*! That coating is going to crack everywhere as it cools down.
Always return those shaped balls to the fridge until they are rock solid before you even dip the stick in. Also, I mentioned using fresh zest, but I want to stress that for the actual coating, don’t substitute the candy melts for real white chocolate unless you know exactly how to temper it. Candy melts are designed to be dreamy and easy for this exact application. If you want a slightly smoother texture for your coating, remember that tiny bit of vegetable oil goes a long way in keeping things flowing perfectly smooth.
Variations: Creating Vanilla Orange Swirl Cake Truffles
While I absolutely love that vibrant, uniform orange color for the classic creamsicle look, sometimes I get restless and want to make things extra fancy! If you’re making a big batch, changing up the look keeps things interesting. We can create stunning Vanilla Orange Swirl Cake Truffles using the exact same base flavor combination. This takes just one extra step, and people always gasp when they see the effect!
To get that gorgeous swirl, you need to let the first layer of orange coating set up completely—I usually give it 15 minutes on the counter or 5 minutes in the fridge. Once that orange shell is firm, melt a small batch of plain white candy melts. After you’ve dipped your pop back into the warm orange coating again (just a quick dip to make it slightly wet again!), immediately drizzle that white candy over the top in thin, messy lines, or maybe dip the pop halfway into the white coating just for a second. Work fast! If you want more ideas on mixing up flavors, check out my guide on easy cake pop flavor combinations.
For an even simpler visual change, skip coloring the white candy melts altogether. If you use the orange-zest cake base (which is already bright) and dip the whole thing in plain white candy melts, you get this lovely, subtle cream dream effect instead of a bright orange one. It tastes just the same, but it looks more like a dreamy orange sherbet! Alternatively, you can buy orange-flavored candy melts instead of using the white ones and coloring them—that gives the coating its own little flavor boost, too!
Serving Suggestions for Creamsicle Cake Pops
When you’ve created something this bright and refreshing, you have to serve it up right! These aren’t just for dessert plates, honestly. Because the flavor profile is that perfect balance of sweet vanilla and tangy citrus, they pair surprisingly well with breakfast or brunch spreads. I love setting a platter out on a lazy Sunday morning, right next to my coffee carafe—it’s instantly festive!
If you are planning a big celebration, especially once the weather gets warm, you need to think beyond just presentation. These are fantastic centerpiece items for your next round of Summer Dessert Recipes Cake Pops! Forget a huge, heavy pie; these little bites pack all the flavor without weighing everyone down.
Here are a few ways I love to serve my finished pops:
- Coffee Companion: They are the perfect little sweet treat alongside a strong cup of coffee or a bold iced latte. The slight bitter note of the coffee really makes the sweet vanilla pop.
- Brunch Bars: Set them up as the star on a breakfast bar featuring lighter fare like fresh fruit platters or mini scones. You can find more ideas for that morning spread on my Breakfast & Brunch Recipes Index.
- Themed Tables: Because of their iconic colors, they look amazing on a tiered stand paired with yellow or vibrant orange candies or even little bowls of gummy fish.
- Grab-and-Go Goodies: For parties where people are milling about, popping these on a styrofoam block decorated with fake grass or bright paper flowers makes for the easiest, most elegant self-serve station!
Storage and Keeping Your Creamsicle Cake Pops Fresh
Now that you’ve gone through all the work to make these perfect, bright beauties, we need to talk about keeping them fresh! You want them tasting zesty and creamy, not dry and sad, right? Luckily, because we used frosting as our binder—and didn’t bake them twice—these cake pops actually hold their moisture really well. My general rule of thumb is aiming for this:
For the very best texture, I always recommend keeping your finished creamsicle cake pops at room temperature, provided your kitchen isn’t scorching hot. They hold up beautifully for about three days this way because the outer candy shell acts like a little cocoon, locking everything in. They are so much softer and melt-in-your-mouth better when they aren’t ice cold!
However, if you’re making a massive batch for a warm-weather gathering, they will last longer if refrigerated. If you go the cold route, just remember the major rule: humidity is the enemy! When you take cold cake pops out into a warm room, condensation forms instantly on that pretty candy shell, making it sweat and look messy. Oops!
To avoid that sticky situation, never take them straight from the fridge to the party table. Instead, pull them out about an hour before you plan to serve them, keeping them covered loosely. This slow warming allows the condensation to happen *under* the covering rather than right onto the pops themselves. If you only keep them at room temperature, they’ll easily last three to four days, stored in a sealed container so they don’t dry out.
I’ve even tried freezing them successfully for short stints! Wrap each pop individually tightly in plastic wrap, then put them all in a sealed freezer bag to protect them from freezer burn. They last about a month this way, but you still need that slow thawing time at room temperature before unwrapping them. Never rush homemade treats!
Frequently Asked Questions About Making Creamsicle Dessert Bites
When you’re diving into a new recipe, especially for something as signature-tasting as these pops, I totally get it—you’re going to have questions! I’ve tried to answer the things readers usually ask me right after sharing my recipe for creamsicle cake pops. My goal here at Bliss Batter is always to make sure you succeed on your first try!
Can I skip baking the cake and use store-bought cake for these creamsicle cake pops?
Oh, absolutely you can! I designed this recipe to be as accessible as possible, and if you need to save time, using a good quality store-bought white or vanilla cake works just fine. If you do this, just add your orange zest and then mix in a teaspoon of orange extract *with* your vanilla frosting instead of relying only on the fresh juice substitution. The only caveat I have is that store-bought crumb cakes can sometimes be a little too moist already. If your dough seems overly wet when you try to roll it, just crumble the store-bought cake out onto a baking sheet and pop it in a 250°F oven for about five minutes to dry it out just a touch before adding the frosting. That little bit of gentle heat makes all the difference!
Why are my cake pop coatings cracking after they set?
Ugh, cracking coatings are the worst, aren’t they? It is almost always temperature shock. Think about it: you have a super cold cake ball (which is what we want for dipping!) and you dip it into hot, melted coating smooth as silk. As the coating hits the instant cold, it shrinks down too fast and pops right open! To prevent this common issue, make sure your cake balls are chilled, but not frozen—they should be refrigerator-cold, not ice-cold.
Also, check your environment! If it’s a very humid or warm day, the candy coating will set too slowly and struggle to harden evenly, leading to fissures. If you have a very warm kitchen, try dipping near an air conditioner vent, or dip in small batches and immediately return the unused pops to the fridge. This helps maintain that perfect temperature differential for a smooth set. If you love tackling new party treats, don’t forget to check out my guide on appetizers and party snacks!
What is the best way to get a strong orange flavor in my Homemade Orange Cream Pops Recipe?
If you want that bright, authentic punch that makes these Homemade Orange Cream Pops Recipe truly special, you have to focus on the zest! Extracts are fine, but fresh zest—the bright outer peel—contains the essential oils that give you that immediate, sharp orange aroma and flavor. I use a full tablespoon in the base recipe and swear by it. Another trick I mentioned in the coating section is using orange candy melts instead of coloring the white ones; those orange-flavored melts carry a much stronger citrus note right in the shell itself.
If you want to go absolutely next level, you can infuse your vanilla frosting slightly before mixing. Just microwave your vanilla frosting for 15 seconds until it is looser, stir in a tiny pinch of zest, let it cool back down just slightly so it’s firm but not hard, and *then* mix it into the crumbs. That locks in that zesty aroma beautifully!
We have so many fun recipes that are perfect for parties—take a look at my full index for more ideas!
Estimated Nutritional Breakdown for Creamsicle Cake Pops
Now, I know we aren’t baking these because they are low-calorie, right? We’re baking them because they taste like happiness! But for those of you who are curious about what’s inside these little flavor bombs, I ran the numbers on a typical serving size based on this recipe. Remember, because we are using a box cake mix and relying on the frosting as our binder, these numbers are an estimate, but they give you a great ballpark idea of what you are enjoying!
I always encourage my readers to focus on creating joy in the kitchen; the nutrition is secondary when you are making something this special for a celebration or an afternoon treat. Think of these less like a standard dessert and more like a wonderful little moment of pure bliss!
Disclaimer: Please remember these figures are based on standard ingredient calculations for the recipe above and are only estimates. Your exact values might vary depending on the brand of cake mix or candy melts you choose to use.
- Serving Size: 1 pop
- Calories: 180
- Sugar: 18g
- Sodium: 110mg
- Fat: 10g
- Saturated Fat: 6g
- Unsaturated Fat: 4g
- Trans Fat: 0g
- Carbohydrates: 22g
- Fiber: 0g
- Protein: 2g
- Cholesterol: 15mg
See? Not too bad for something that tastes exactly like biting into a frozen dream! Enjoy every single bite!
Share Your Bright and Refreshing Cake Pops Creations
Whew! We did it! You now have the blueprint for the most dazzling and nostalgic creamsicle cake pops, ready to impress everyone you know. I truly hope that mixing the zest and vanilla brought you as much joy as it brings me every single time I make a batch.
Baking is so much better when we can share the journey, so please don’t keep your sunshine creations to yourself! When you finish dipping and admiring those perfectly rounded, bright orange pops, I would absolutely love it if you came back here and left a star rating. That feedback helps other bakers gain the confidence to try this recipe, and honestly, hearing about your success makes my whole week!
And you know I live for the photos! If you snap a picture of your gorgeous pops—maybe they are sitting next to a glass of lemonade or being enjoyed by a very happy kid—please tag me on Instagram or Facebook! Seeing your beautiful interpretation of this classic flavor is the fuel that keeps me dreaming up the next great recipe. You can always reach out directly if you have any questions or just want to share a baking victory via the Contact Page. Happy baking, my friend—I can’t wait to see what you whip up!
PrintHomemade Creamsicle Cake Pops with Orange Zest Infusion

Create bright, flavorful cake pops that taste just like a classic creamsicle using simple ingredients and a straightforward dipping method.
- Prep Time: 45 min
- Cook Time: 30 min
- Total Time: 75 min
- Yield: 24 pops 1x
- Category: Dessert
- Method: No Bake (after cake preparation)
- Cuisine: American
- Diet: Vegetarian
Ingredients
- 1 box (15.25 oz) white cake mix
- Ingredients required by cake mix box (usually eggs, oil, water)
- 1/2 cup vanilla frosting
- 1 teaspoon pure vanilla extract
- 1 tablespoon fresh orange zest
- 1/4 cup fresh orange juice
- 1 bag (12 oz) white candy melts
- 1/2 teaspoon vegetable oil (optional, for thinning coating)
- Orange food coloring gel (optional, for deeper color)
- Cake pop sticks
Instructions
- Prepare the white cake according to the package directions, substituting the required water with the fresh orange juice for added flavor.
- Bake the cake in a 9×13 inch pan. Let the cake cool completely.
- Crumble the cooled cake into fine crumbs in a large bowl. Discard any browned edges.
- Add the vanilla frosting, vanilla extract, and orange zest to the cake crumbs. Mix well until a dough forms that holds its shape when squeezed.
- Roll the mixture into uniform 1-inch balls. Place the balls on a parchment-lined baking sheet.
- Chill the cake balls in the refrigerator for at least 30 minutes until firm.
- Melt the white candy melts according to package directions, stirring until smooth. If the coating is too thick, stir in the vegetable oil or a few drops of shortening.
- If you desire a true creamsicle color, add a few drops of orange food coloring gel to the melted coating and mix until the color is uniform.
- Dip the tip of a cake pop stick into the melted coating and insert it about halfway into a chilled cake ball. This helps secure the stick. Return the sheet to the refrigerator for 10 minutes to set the stick.
- Hold the stick and dip the entire cake ball into the melted coating, rotating it to cover completely. Gently tap the stick against the side of the bowl to remove excess coating.
- Place the dipped cake pop upright in a styrofoam block or stand to dry completely.
- For a swirl effect, allow the first layer of orange coating to set. Melt a small amount of plain white candy melts. Dip the pop again into the orange coating, then immediately drizzle or swirl with the white coating before it sets.
Notes
- For the best flavor, use fresh orange zest rather than bottled extract.
- If your cake balls are too soft when dipping, chill them longer. Cold cake balls prevent the coating from cracking as they warm up.
- If you want a brighter orange color without affecting the flavor, use orange candy melts instead of white melts with added coloring.
Nutrition
- Serving Size: 1 pop
- Calories: 180
- Sugar: 18
- Sodium: 110
- Fat: 10
- Saturated Fat: 6
- Unsaturated Fat: 4
- Trans Fat: 0
- Carbohydrates: 22
- Fiber: 0
- Protein: 2
- Cholesterol: 15