
Doesn’t that smell just transport you? I swear, nothing beats the aroma of fresh baked bread filling your kitchen. For ages, I thought getting that authentic, bakery-style french bread—you know, the kind with the shatteringly crisp outside and that perfectly soft, airy interior—was only possible if you stayed up all night tending a sourdough starter. Well, I’m here to tell you that’s just not true anymore! As Claire Sterling here from Bliss Batter, my whole goal is making intimidating recipes foolproof for you. This amazing recipe for homemade french bread is tested and perfected to get you those incredible loaves in under two hours total. Get ready to say goodbye to the grocery store aisle!
- Why This Is Your New Favorite Easy French Bread Recipe
- The Ingredients Needed for Perfect Homemade French Bread
- Step-by-Step Instructions for Quick and Crusty French Bread
- Expert Tips for Achieving the Ultimate Crusty French Bread
- Ingredient Notes and Substitutions for this Simple French Bread Guide
- Serving Suggestions for Your Fresh Baked Bread
- Storage and Reheating Instructions for French Bread
- Frequently Asked Questions About Beginner Bread Baking
- Nutritional Estimates for Homemade French Bread Recipe
- Share Your Crusty Loaf Success
Why This Is Your New Favorite Easy French Bread Recipe
I know you’re looking for that magic combination of speed and quality, and trust me, this recipe delivers. We dump the all-day fermentation process and still get those amazing textures. It’s the best way to get fresh baked bread on your table fast!
- Under Two Hours Total Time: Seriously, from start to enjoying that crusty outer layer, you’re looking at less than two hours. Perfect for weeknight dinners!
- Perfect Texture Combo: We nail the balance between that satisfyingly CRACKLY crust and the pillowy, soft interior every single time.
- Beginner Friendly: If you’ve never baked bread before, this is your starting line. The steps are clear, and the required handling time is low. If you love simple baking, you must check out my easy artisan bread recipe next!
The Ingredients Needed for Perfect Homemade French Bread
Because this recipe is faster than some of those super-long artisan bakes, we need to make sure our yeast is happy and that we have the right structure builders in place. Don’t worry, I promise you have almost everything sitting in your pantry right now! The measurements are crucial here, especially when we are aiming for that specific soft, fluffy homemade bread texture.
Here’s what you need to gather up for your two gorgeous loaves:
- 1 packet active dry yeast (that’s about 2 1/4 teaspoons)
- 1 teaspoon granulated sugar (this just feeds the yeast, don’t skip it!)
- 1 1/2 cups warm water—and listen closely, this needs to be between 105°F to 115°F. Too hot and you kill the yeast; too cold and they just sleep!
- 3 1/2 cups all-purpose flour, plus a little extra for dusting our surface.
- 2 teaspoons salt
- 1 tablespoon olive oil
- 1 egg white, beaten really well with 1 teaspoon water (this is our secret for that perfect golden sheen on the crust—you can find my tried-and-true instructions for my buttermilk biscuits recipe which uses a similar wash idea!).
Step-by-Step Instructions for Quick and Crusty French Bread
Okay, now for the fun part! Baking bread seems scary, but trust me, if you follow these steps for our french bread, you’ll be pulling out beautiful, golden loaves before you know it. Remember, timing is everything, especially when we need that gorgeous crust. If you love seeing how simple baking can be, you should look at my guide for easy challah bread recipe next!
Activating Yeast and Mixing the French Bread Dough
First things first: wake up that yeast! Dissolve your teaspoon of sugar right into that warm water (remember that perfect temp?). Sprinkle the yeast on top and just let it sit there for about five to ten minutes. You are looking for a nice, thick layer of foam on top; that’s the visual cue that your yeast is alive and ready to get to work! Once it’s foamy, toss in the flour, salt, and olive oil. Stir it all up with a big wooden spoon until it turns into what I call ‘shaggy dough’—just meaning it’s starting to come together but it’s still rough.
Kneading and First Rise for Fluffy Homemade Bread
Dump that messy dough out onto a counter dusted lightly with flour. Now, you get to work those muscles! Knead that dough for a solid 6 to 8 minutes. You want it to feel smooth and elastic—here’s my trick for knowing when it’s right: Poke it with your finger; if it springs back slowly, you’ve developed enough gluten for a fluffy homemade bread interior! Now, just oil up a clean bowl, pop your dough inside, cover it up, and forget about it for a full 60 to 75 minutes until it’s totally doubled up. Easy peasy! For another simple dough guide, you can see my tips over on my homemade english muffins recipe page.
Shaping and Final Proofing Your French Bread Loaves
Once doubled, gently deflate the dough—no need to beat the air out, just lightly press it down. Divide that mass right in half. This recipe makes two loaves, which is my favorite because they fit perfectly in the oven together! Roll each half into a long cylinder, about 12 to 14 inches long, keeping the roll tight for structure. Place them on a parchment-lined baking sheet with some space between them. While they rest for their final 20 minutes, get your oven blazing hot to 400°F! This is also the time to prepare your secret weapon for crust: put a shallow metal pan on the bottom rack.
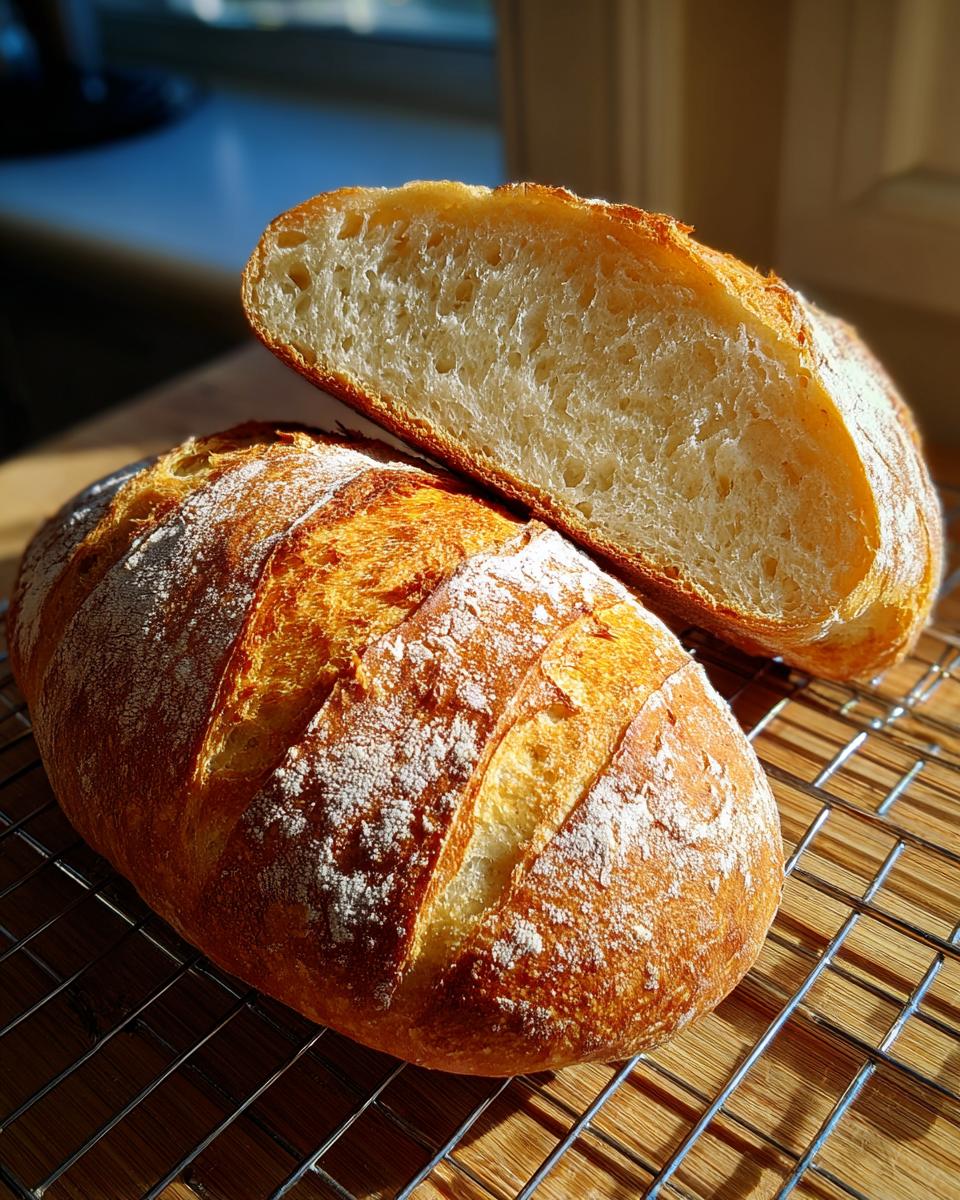
Scoring and Baking for a Bakery Style Bread at Home
Right before you slide them in, brush the tops of your loaves with that egg white wash you mixed up earlier. This is what gives you that deep, gorgeous color. Then, grab your sharpest knife—a razor blade works best if you have one—and score the top of each loaf with three or four quick diagonal slashes. This lets the bread expand nicely. Now, carefully pour 1 cup of very hot water into that pan on the bottom rack—this creates essential steam for that bakery style bread at home! Bake for 25 to 30 minutes. If you tap the bottom and it sounds hollow, you’ve got perfect crusty french bread! We also have a great easy challah bread recipe if you want to try something braided next.
Expert Tips for Achieving the Ultimate Crusty French Bread
We talked about the steam pan, but if you really want to trick everyone into thinking you bought these loaves from a fancy French bakery, you need to maximize that humidity right at the start! When you slide that bread in at the 400°F setting, immediately spray the inside walls of the oven with water two or three times. Be quick about it so you don’t lose too much heat, but that burst of moisture is gold for that initial crust formation.
Now, what if you’re making this for little ones who hate the crackly hard stuff? That’s okay! If you prefer a softer crust—which is still delicious, just a different vibe—skip the hot water steam trick entirely. Instead, place a pan full of ice cubes on the bottom rack when you preheat the oven. The melting ice cubes create a humid environment slower than the boiling water, resulting in a softer exterior. Don’t forget to check out my recipe for pumpkin beer bread if you want an even more rustic bake later on!
Ingredient Notes and Substitutions for this Simple French Bread Guide
Whenever I put out a recipe that promises bakery style bread at home, the first thing people ask is, “Can I swap THIS for THAT?” And that’s fair! We’re aiming for speed here, so making sure we use the right stuff is key. For this crusty french bread recipe, we are sticking to all-purpose flour. It’s the standard for a reason; it gives us that perfect balance of structure and chewiness we need for a quick bake. Don’t go reaching for bread flour unless you want a super-dense loaf!
The other area where people get nervous is the yeast. Remember taking that first step where we waited for foam? Please don’t skip that! That foam is your go-ahead signaling that your yeast is alive and hungry. If you don’t see foam, your water was either too hot or the yeast is old, and if that happens, stop everything and start over with fresh yeast. It’s worth the 10 minutes to make sure the whole batch doesn’t end up dense!
Now for substitutions!
- On the Fat: I use olive oil because it adds a lovely subtle flavor, but if you’re out, melted butter works wonderfully as a 1:1 sub. The texture will be almost identical for this easy french bread.
- The Egg Wash Alternative: That egg white wash gives you that famous shiny, crackly top. If you have an egg allergy or just hate washing an extra bowl, you can totally skip it. Just spritz the tops with plain water right before baking. You’ll lose some of that deep golden color, but you’ll still get a beautiful loaf. You might also want to check out my fluffy apple pancakes recipe for another quick morning win!
Serving Suggestions for Your Fresh Baked Bread
Since this simple french bread recipe yields two gorgeous loaves, you definitely need a plan for eating it all before it goes stale! Truthfully, the absolute best way to enjoy this fresh baked bread is when it’s still slightly warm.
Tear off a piece and dip it right into a savory bowl of soup! It’s amazing paired with my recipe for classic tomato soup recipe—that crispy crust soaks up the tomato base perfectly. It also holds up beautifully to hearty bowls like my lentil soup recipe.
If you manage to save one loaf for the next day, slice it thick and make the most incredible French Bread sandwiches. Honestly, anything you’d normally use grocery store French bread for, this homemade version is a thousand times better!
Storage and Reheating Instructions for French Bread
Now for the hard part: trying not to eat both loaves in one sitting! When you finally manage to put any leftovers away—and I highly recommend storing the loaf whole, not sliced—you need a battle plan. The biggest enemy of that beautiful crust you just worked so hard to create is plastic wrap or, even worse, the refrigerator.
Seriously, please do not put your wonderful crusty french bread in the fridge! Refrigeration makes the crumb go stale almost instantly. Instead, once the loaves are completely cool, wrap them loosely in a clean kitchen towel and keep them on the counter. They should stay good like this for about a day before the crust starts to soften significantly.
If you have a loaf that’s a day old and lost some of its sparkle, don’t throw it out! We can bring that crust back to life easily. This trick works wonders for refreshing any homemade french bread recipe leftovers.
Preheat your oven to about 350°F. Unwrap the bread and place it directly on the oven rack—no need for a pan. Bake it for just 5 to 7 minutes. That quick blast of dry heat re-crisps the exterior, and the inside softens right up again! It smells like you just pulled it out of the oven all over again. And speaking of wonderful smells, if you want to turn those leftovers into something spectacular, you absolutely must check out my recipe for garlic bread recipe homemade buttery toast. It’s the perfect way to revive a slightly older loaf!
Frequently Asked Questions About Beginner Bread Baking
It’s totally normal to have questions when you try a new bread recipe, especially when you’re stepping into the world of beginner bread baking! I get so many messages asking about how to troubleshoot that crust or how to handle the yeast. That’s why I love these quick bread recipes—they give you fast feedback so you can adjust next time. Here are the three questions I hear most often about mastering this homemade french bread recipe!
Can I make this a no-knead french bread recipe?
Oh, I totally get the desire to skip the kneading! That’s the beauty of traditional no-knead recipes, right? Here’s the thing: this specific recipe is designed to be quick—we are aiming for a finished loaf in under two hours. To get that sturdy dough structure and that lovely airy interior in such a short time frame without the yeast having days to work, we really do need that 6 to 8 minutes of kneading. If you went no-knead with these quick rise times, you’d end up with a much denser, flatter loaf, which isn’t quite the classic french bread we’re after here. If you’ve got a few days to spare, you can certainly try it, but for this fast result, we have to knead!
Why did my french bread not get a crackly crust?
This is usually a humidity issue, hands down. That crackly, shatteringly crisp crust is the absolute hallmark of artisan baking, and it comes 90% from steam right at the start of the bake. If your crust ended up looking more soft or pale, it means the oven wasn’t moist enough when the bread went in. Did you remember that shallow pan on the bottom rack? Make sure you pour that very hot water in right before you shut the door! That burst of steam keeps the outside of the dough supple just long enough for the loaf to spring up fully before setting the crust. If you leave that step out, you’re just baking bread, not creating that awesome crispness.
How can I make this into a french baguette recipe?
That’s a fantastic idea! We purposely shaped these into standard loaves to fit on a standard baking sheet easily, but shifting to a baguette shape is simple. After you divide the dough in half, instead of rolling it 12 to 14 inches long, aim for something longer and much thinner—maybe 18 to 20 inches long if your pan will allow it. Keep rolling gently to maintain that taut surface tension, which helps it hold its shape. Because baguettes are thinner, you might notice they bake a touch faster, maybe shaving off 3 or 4 minutes from the total bake time. Keep an eye on that deep golden brown color! If you enjoy exploring other styles, you can check out my easy challah bread recipe for a completely different shape and texture experience.
Nutritional Estimates for Homemade French Bread Recipe
Okay, let’s talk fuel! Baking from scratch always feels healthier because you know exactly what went into the dough, but it’s still nice to have a general idea of what you’re enjoying. Remember, baking is an art, and using a little more or less flour, or a different brand of yeast, can change these numbers slightly! These estimates are based on our recipe yielding 2 loaves, with the nutritional breakdown calculated for one slice, which is about 1/10th of a loaf. So, if you cut big slices, your numbers will be higher—but totally worth it!
Always treat these numbers as a general guide. Here is the breakdown based on our testing:
- Serving Size: 1 slice (approx 1/10 loaf)
- Calories: 155
- Sugar: 0.5g
- Sodium: 280mg
- Fat: 1.2g
- Saturated Fat: 0.2g
- Unsaturated Fat: 1.0g
- Trans Fat: 0.0g
- Carbohydrates: 32g
- Fiber: 1.5g
- Protein: 5g
- Cholesterol: 0mg
See? For homemade crusty french bread, that’s pretty darn respectable! It’s just flour, water, yeast, and a tiny bit of fat. That low cholesterol number is because we aren’t loading it up with tons of butter like a pastry dough. Enjoy every single slice!
Share Your Crusty Loaf Success
I truly hope you’ve enjoyed the process of making your very own easy french bread! There is such a specific kind of pride that comes from pulling a beautiful, golden, crackly loaf out of your own oven, isn’t there? It feels like cheating because it’s so simple, yet the results look magazine-worthy.
Now that you’ve perfected that dough structure, I would absolutely love to hear how it went down in your kitchen! Did that crust really shatter when you sliced into it? Were the kids fighting over the heel piece?
Please take a second to leave a rating right below the recipe card—five stars is always amazing, but honest feedback helps other bakers who are nervous about trying their first loaf of homemade french bread recipe succeed on their first go. Drop a comment down below and tell me what you served it with! Did you use it for dipping, or did you manage to keep any left over for sandwiches the next day?
I’m Claire, and seeing your success stories is truly the best part of running Bliss Batter! If you want to read more about my baking journey and why I share these simple, happy recipes, peek over at my About Page. Happy Baking!
PrintEasy Homemade French Bread: Crusty Outside, Fluffy Inside in Under 2 Hours
Discover the simple secrets to making bakery-style French bread at home. This beginner-friendly recipe delivers a loaf with a crackly crust and a soft, airy interior, ready in less than two hours.
- Prep Time: 20 min
- Cook Time: 30 min
- Total Time: 1 hour 50 min
- Yield: 2 loaves 1x
- Category: Bread
- Method: Baking
- Cuisine: French
- Diet: Vegetarian
Ingredients
- 1 packet active dry yeast (about 2 1/4 teaspoons)
- 1 teaspoon granulated sugar
- 1 1/2 cups warm water (105°F to 115°F)
- 3 1/2 cups all-purpose flour, plus more for dusting
- 2 teaspoons salt
- 1 tablespoon olive oil
- 1 egg white, beaten with 1 teaspoon water (for egg wash)
Instructions
- Activate the yeast: In a large bowl, dissolve the sugar in the warm water. Sprinkle the yeast over the top and let it sit for 5 to 10 minutes until foamy. This shows your yeast is active.
- Mix the dough: Add the flour, salt, and olive oil to the yeast mixture. Mix with a wooden spoon until a shaggy dough forms.
- Knead the dough: Turn the dough out onto a lightly floured surface. Knead for 6 to 8 minutes until the dough is smooth and elastic. It should spring back slightly when poked.
- First rise: Lightly grease a clean bowl with oil. Place the dough in the bowl, turning to coat. Cover the bowl with plastic wrap or a clean kitchen towel. Let the dough rise in a warm spot for 60 to 75 minutes, or until doubled in size.
- Shape the loaves: Gently punch down the risen dough. Divide it in half. On a lightly floured surface, shape each half into a long, even loaf, about 12 to 14 inches long. For a classic look, gently roll the dough into a tight cylinder.
- Second rise: Place the shaped loaves on a baking sheet lined with parchment paper, leaving space between them. Cover loosely with plastic wrap or a towel. Let them rest for 20 minutes. Preheat your oven to 400°F (200°C) during this time. Place a shallow pan on the bottom rack to hold water for steam.
- Score and bake: Just before baking, brush the tops of the loaves lightly with the egg white wash. Use a sharp knife or razor blade to make three or four diagonal slashes (scores) across the top of each loaf.
- Create steam and bake: Carefully pour 1 cup of hot water into the preheated shallow pan on the bottom rack to create steam. Immediately place the baking sheet with the bread into the oven. Bake for 25 to 30 minutes, or until the crust is deep golden brown and the bottom sounds hollow when tapped.
- Cool: Transfer the finished French bread loaves to a wire rack to cool completely before slicing.
Notes
- For an extra crusty exterior, spray the inside walls of the oven with water twice during the first 10 minutes of baking.
- If you prefer a softer crust, skip the egg wash and simply place a pan of ice cubes on the bottom rack instead of hot water.
- This recipe makes two loaves, perfect for serving with soup or making sandwiches.
Nutrition
- Serving Size: 1 slice (approx 1/10 loaf)
- Calories: 155
- Sugar: 0.5
- Sodium: 280
- Fat: 1.2
- Saturated Fat: 0.2
- Unsaturated Fat: 1.0
- Trans Fat: 0.0
- Carbohydrates: 32
- Fiber: 1.5
- Protein: 5
- Cholesterol: 0