
I know your struggle! You want that wonderful tang and the gut-friendly benefits of true sourdough, but every loaf you try comes out so dense and chewy in the middle you might as well use it as a doorstop. Right? Well, take a deep breath and let go of the dense myths. My mission here at Bliss Batter, as Claire Sterling, is to turn those intimidating bakes into simple, repeatable joys. You can read all about my journey into demystifying baking over at our About Page! This recipe is the answer: our Super Soft, Fluffy Sourdough Sandwich Bread. It’s tender, it’s light, and yes, it slices perfectly every single time. You are going to be so proud of this one!
- Why This is the Best Sourdough Sandwich Bread for Everyday Use
- Ingredients for Your Fluffy Sourdough Loaf
- Step-by-Step Guide to Perfect Sourdough Sandwich Bread
- Tips for Success with Your Beginner Sourdough Bread
- Ingredient Notes and Substitutions for Sourdough Sandwich Bread
- Making Your Homemade Sandwich Bread Sourdough Ahead of Time
- Serving Suggestions for Your Soft Sourdough Sandwich Bread
- Storage and Reheating Instructions for Sourdough Sandwich Bread
- Frequently Asked Questions About Soft Sourdough Bread
Why This is the Best Sourdough Sandwich Bread for Everyday Use
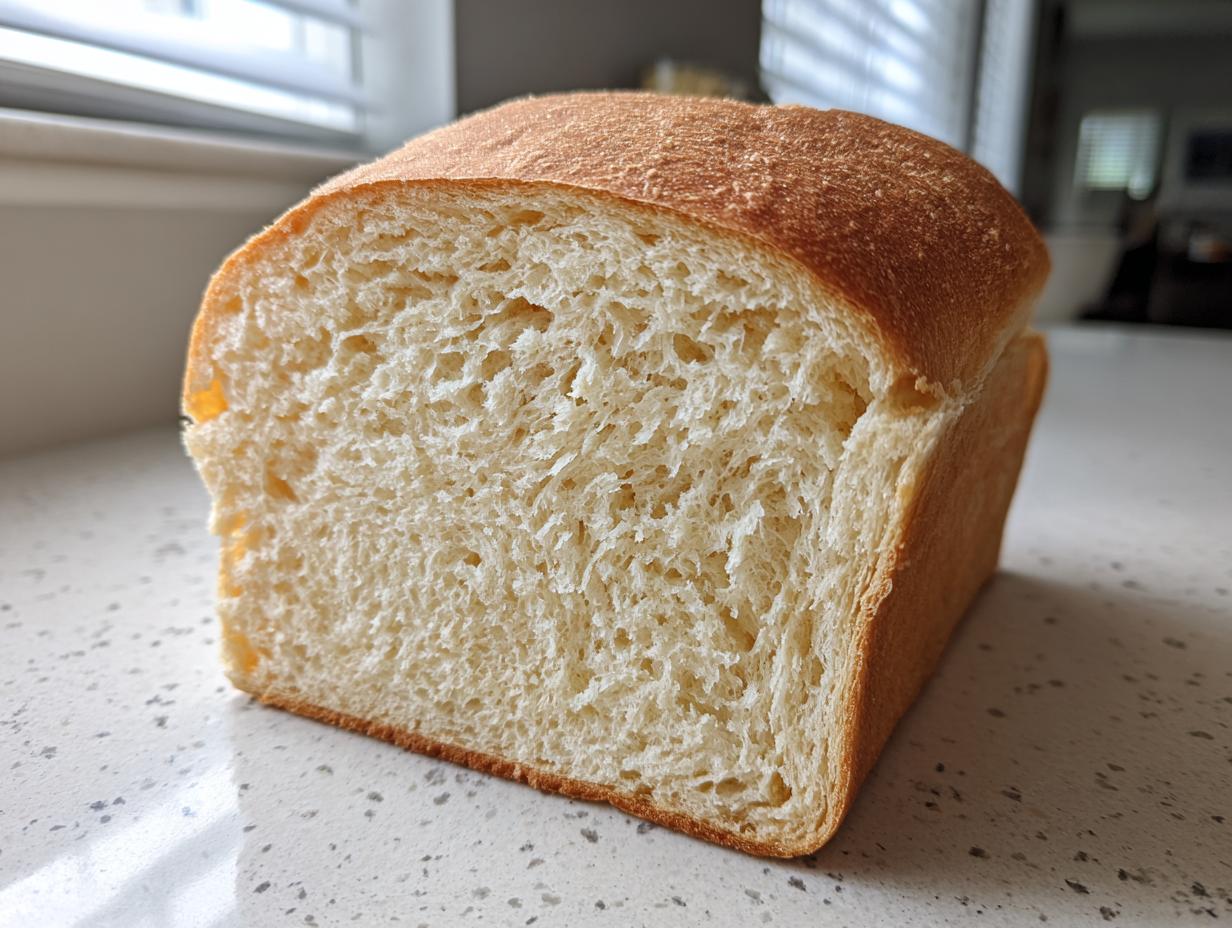
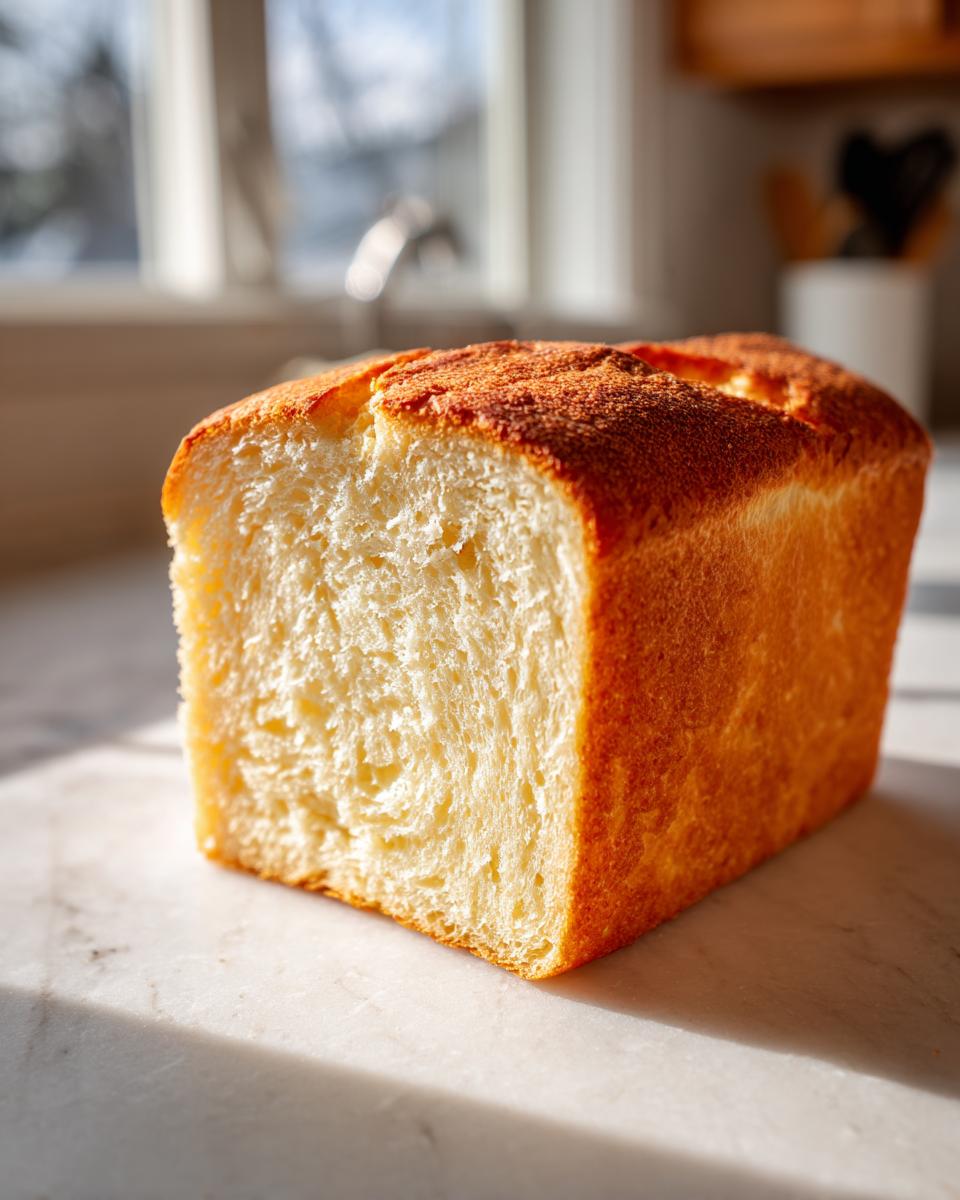
Okay, let’s talk about why this particular sourdough sandwich bread recipe beats those rustic, crackly boules when you just need a great PB&J. The number one hurdle people face is getting a truly Soft Sourdough Bread that doesn’t tear when you slice it. We ditch the commercial yeast here, so we rely entirely on that lively starter, which is fantastic for flavor, but we need structure without the chewiness.
That’s why we skip aggressive kneading entirely. Instead, we use gentle stretch and folds. This method builds just enough internal scaffolding for a beautiful rise, but it keeps the crumb super open and accommodating. Trust me, this makes for unbelievably Sliceable Sourdough. You won’t get those giant, uneven holes you find in artisan loaves here—we’re aiming for consistent, soft layers perfect for stacking! If you love gentle shaping techniques, check out my guide on easy artisan bread recipes for more practice!
Achieving a Buttery Sourdough Crumb Without Yeast
The secret weapon for transforming this from a standard loaf into something truly special is simple: butter! We mix in softened, beautiful unsalted butter right before the final shaping. This fat does wonders, coating the flour particles and resulting in that incredibly buttery sourdough crumb that melts in your mouth. It’s what keeps the bread soft long after it cools, distinguishing it completely from leaner, rustic sourdoughs. Adding butter this way ensures you get that lovely, high crumb quality needed for the best sourdough for toasting, all while staying 100% yeasted-free!
Ingredients for Your Fluffy Sourdough Loaf
Okay, here’s the line-up for this gorgeous, tender bake! Remember, since we aren’t using any commercial yeast, the quality of your starter is everything here. We need that good rise power. I’ve kept the ingredient list super tight to focus only on what creates that perfect, stackable slice. Everything should be measured precisely for the best results!
- 100g active sourdough starter (fed and bubbly—make sure it’s happy!)
- 350g warm water
- 500g unbleached all-purpose flour
- 10g fine sea salt
- 30g unsalted butter, softened
Step-by-Step Guide to Perfect Sourdough Sandwich Bread
Now we get down to the fun part! Baking this sourdough sandwich bread is more about patience and gentle encouragement than it is about brute strength. We are building structure slowly, which is how we avoid that overly tough crumb. Layout your timeline, grab your bowl, and let’s mix up some magic! If you want to see how I get my starter ridiculously bubbly for these no-yeast bakes, check out my guide on achieving amazing sourdough success.
Mixing and Building Structure for Your Sourdough Sandwich Bread
First, just combine the active starter and warm water until they’re acquainted. Then dump in your flour and salt. Mix it by hand until it looks shaggy—seriously, stop mixing when it looks awful! Cover it for 30 minutes for the autolyse. This lets the flour soak up the water without needing any effort from you. Next, we start the gentle stretch and folds (Steps 4 & 5). You’re just stretching one side up and folding it over the center, rotating three more times. We do this three times total, resting 30 minutes between each set. This builds the strength without bruising the dough—which keeps it soft enough to be your new best sourdough for toasting!
Incorporating Butter and Shaping the Tender Sourdough Loaf
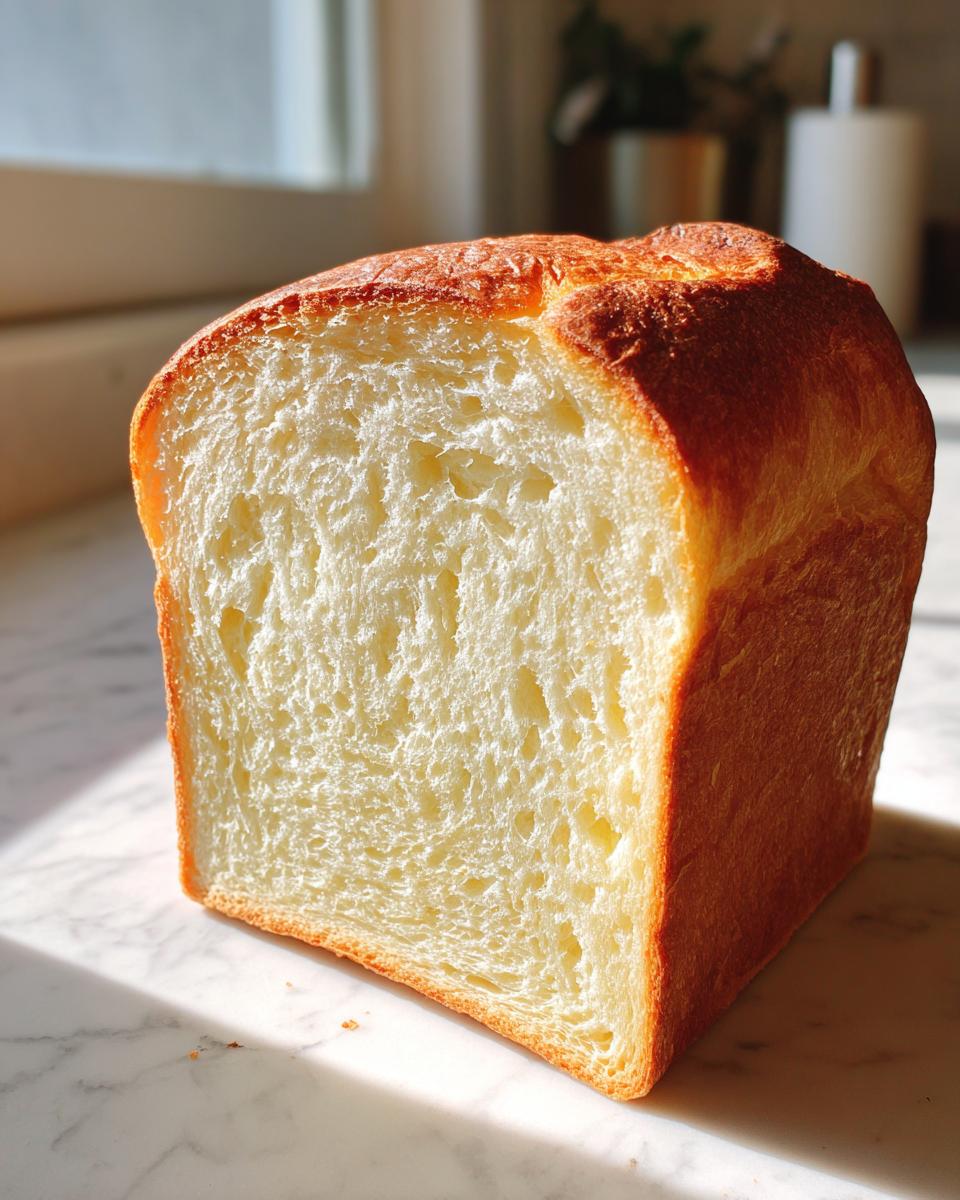
Once you’ve done those folds, it’s time for the richness! Gently work that softened butter into the dough by folding it until it disappears—it might feel a little weird at first, but keep folding until it’s fully absorbed and the dough smooths out just a little bit (Step 6). Now, shape it carefully into a tight log and place it seam-side down into your well-greased 9×5 inch loaf pan. Cover it up. You’re looking for about a 50% to 75% rise during the final proof. When you gently poke the dough (the poke test!), the indent should slowly spring back but still leave a tiny dent behind. That’s the sign for your tender sourdough loaf!
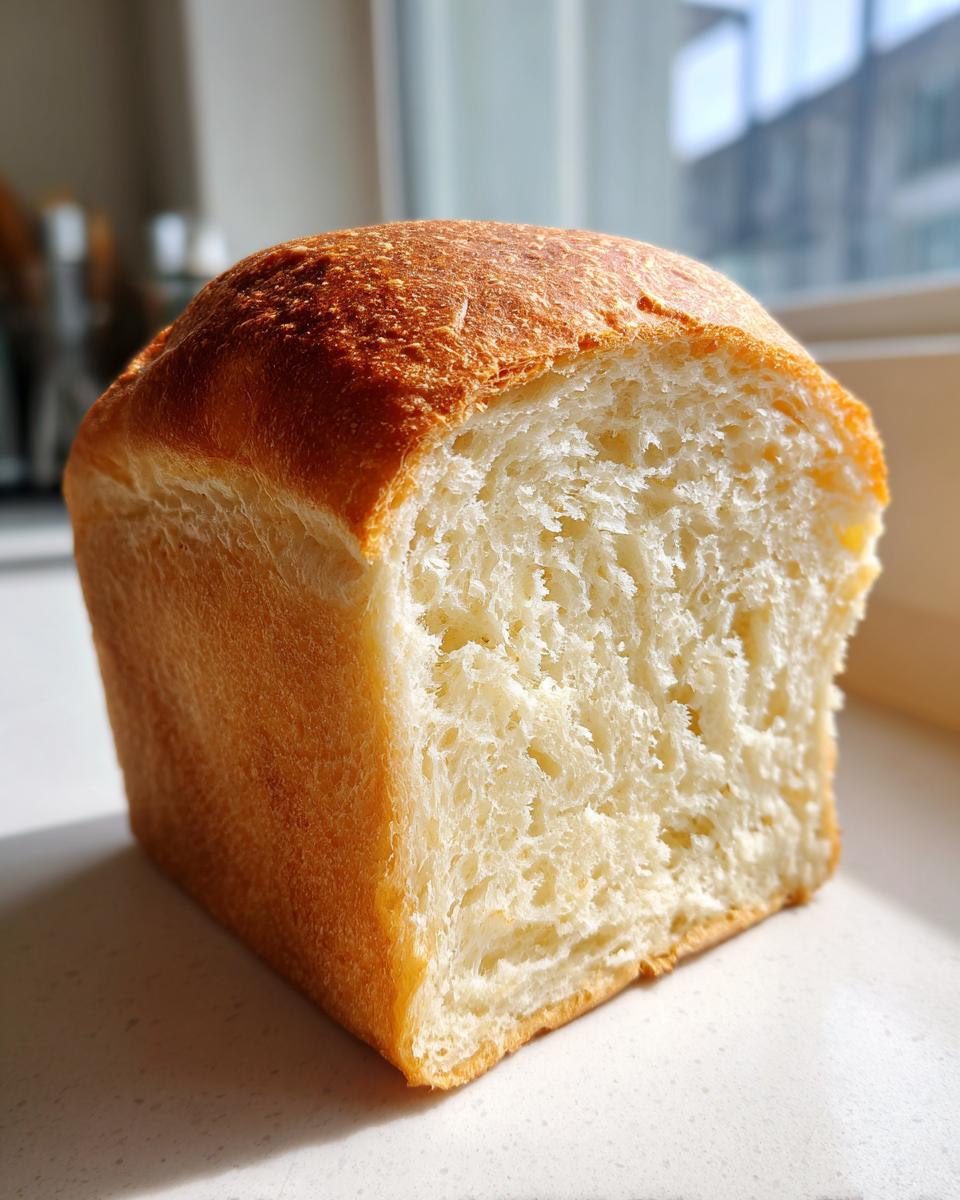
Baking and Cooling the Sliceable Sourdough
Get that oven screaming hot at 450 degrees F, then immediately drop it down to 375 degrees F once you put the pan in. We bake hot initially to get a nice oven spring! After 30 minutes, drop the temp again to 350 degrees F and bake until the center hits about 205 degrees F. This step is critical for food safety and texture! As soon as it’s out, pop it out of the pan immediately onto a wire rack. Please, please wait until it is completely cool—I mean room temperature! If you slice it warm, you compromise that internal structure, and you’ll end up with crumbs everywhere. Patience ensures you get that beautiful, sliceable sourdough!
Tips for Success with Your Beginner Sourdough Bread
Listen, I know that when you’re diving into sourdough baking for beginners, every little detail feels like a huge hurdle, but honestly, success here boils down to two things: starter life and patience with cooling. First off, that starter—it needs to be active and bubbly, peaking right before you mix it in. If it’s sluggish, your no yeast sourdough bread just won’t have the power to rise nicely in the pan.
My second big piece of gentle advice is about slicing. I see so many beautiful loaves ruined in the last five minutes! You absolutely must let this loaf cool completely on a wire rack. If you try to slice it while it’s still warm, the tender, moist structure collapses, and you get all those crumbs you were trying to avoid. Don’t run off to make your sandwich until it’s totally cooled down. If you’re looking for more general confidence builders, you can always check out what I share about my own kitchen philosophy over on my ‘About’ page!
Ingredient Notes and Substitutions for Sourdough Sandwich Bread
I want to make sure this recipe is totally foolproof for you, especially since you’re relying on your starter for all the lift! Since this is a no yeast sourdough bread recipe, you absolutely do not need to add any packets of commercial yeast. Toss that idea right out the window!
The flour choice matters a touch here for getting that fluffy outcome. I specified all-purpose flour because it helps keep the texture light, but if you have bread flour on hand, you can substitute it cup-for-cup. Bread flour has more protein, which will give you a slightly stronger structure, so be extra gentle during those stretch and folds.
And don’t skip the butter! That soft, unsalted butter is our secret ingredient for guaranteeing a truly soft texture. It adds richness and prevents the crumb from hardening up quickly, making this loaf the best sourdough for toasting the next day.
Making Your Homemade Sandwich Bread Sourdough Ahead of Time
Sometimes life just gets busy, right? You mix up this beautiful homemade sandwich bread sourdough dough, shape it perfectly, and then—oops!—dinner starts, or maybe you just need a break. The fantastic news is that this recipe is fantastic for making ahead via a cold proofing method!
After you shape the dough into the loaf pan (Step 7), instead of letting it proof on the counter for hours, just cover that pan snugly and pop it right into the refrigerator. We aren’t baking it until the next morning, or even the day after! This chilling period does two wonderful things. First, it slows the internal fermentation way down, giving you a really lovely, developed tang, which enhances that True Sourdough Sandwich Loaf flavor. Second, chilling the dough makes it much firmer, which actually helps it hold its shape beautifully before baking!
When you’re ready, just pull it out, preheat the oven, and follow the baking instructions starting at Step 9. It’s a game-changer for weekend baking schedules! If you enjoy planning ahead in your baking, you might want to check out my easy challah bread recipe for another make-ahead favorite!
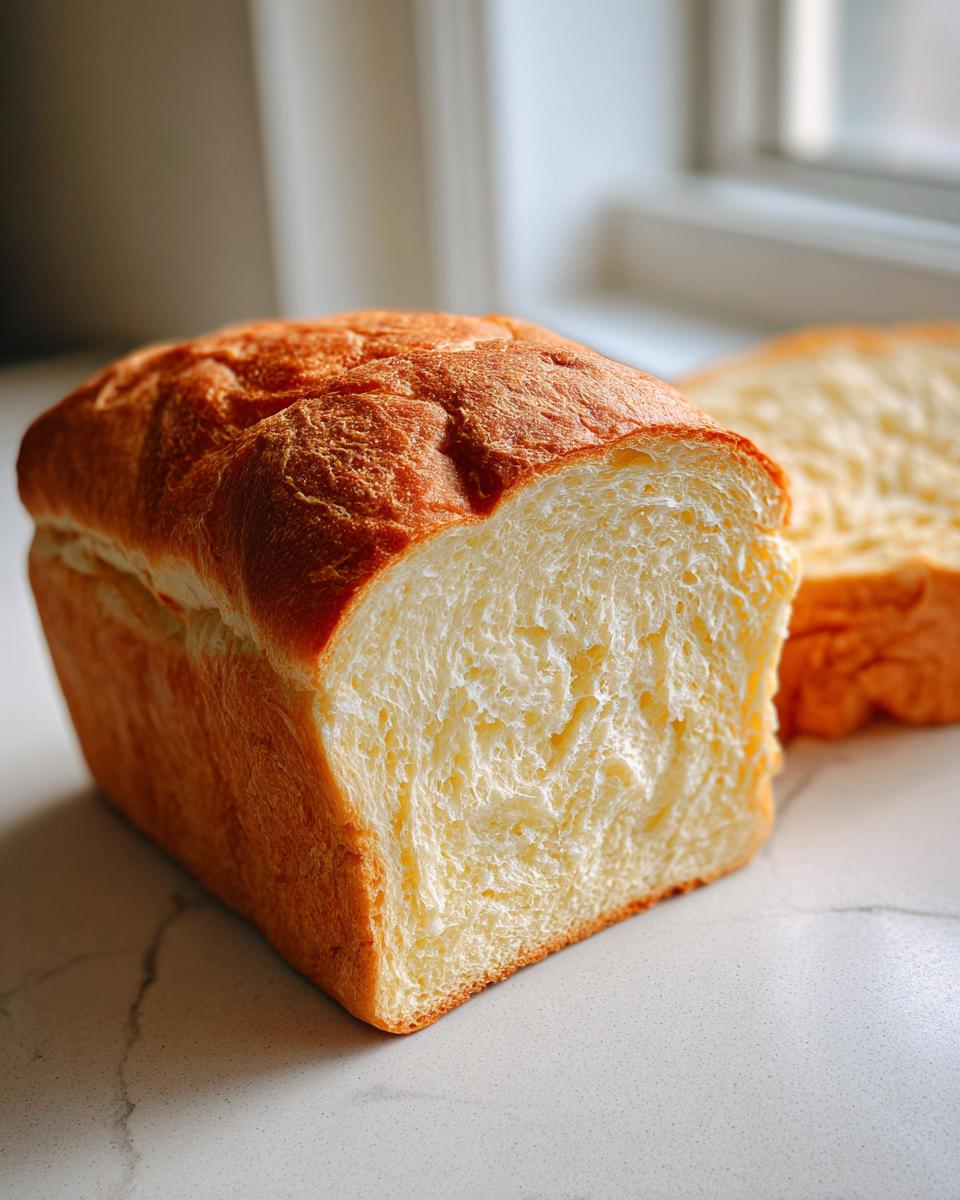
Serving Suggestions for Your Soft Sourdough Sandwich Bread
I mean, what’s the point of baking the best sourdough for toasting if you don’t immediately put something delicious between two slices? This bread is gentle enough for a picky kid’s lunchbox, but rich enough for a grown-up dinner side. Obviously, it makes the most beautiful grilled cheese sandwiches—seriously, try pairing a slice with my grilled cheese sandwich recipe!
And because the crumb is so tender, it soaks up soup perfectly. Don’t hesitate to use it for dipping into a bowl of classic tomato soup recipe. That slight sourdough tang cuts through the richness of the soup just beautifully. Sometimes I think I like using this loaf for dipping even more than for making actual sandwiches!
Storage and Reheating Instructions for Sourdough Sandwich Bread
Getting that perfect soft sourdough bread texture to last past day one is key! Since this loaf has a bit of butter in it, it tends to stay softer longer than lean sourdoughs, but you still need to treat it right. For the very best texture, I always let mine cool completely, then I wrap it loosely in linen or paper towels before placing it in a repurposed bread bag or a large zip-top bag.
Avoid putting it in the fridge! Cold air is the enemy of soft bread, making it stale faster. If you know you won’t finish the loaf in three or four days, slice the rest and pop those slices into the freezer immediately. When you want a piece, just pop a slice straight into the toaster—it comes out perfectly crisp and delicious every time!
Frequently Asked Questions About Soft Sourdough Bread
I’ve gathered up the questions I get asked most often when people are trying this recipe for the first time! Baking can feel tricky sometimes, but knowing the little details really makes the difference between a good loaf and a great loaf. If any of these don’t cover what you’re wondering, feel free to pop over to my post on easy weeknight dinners and leave a comment there—I read every single one!
Can I use sourdough discard in this sourdough sandwich bread recipe?
That’s a great question! Because this recipe relies on a strong rise without any added yeast, I really recommend using an *active*, bubbly starter that has been recently fed and peaked. Discard doesn’t have the same lifting power right off the bat. If you must use discard, you’ll need to feed it first until it’s active, or you risk a very flat, dense loaf.
Why is my sourdough loaf dense instead of fluffy?
Density is usually one of two things when you’re aiming for a fluffy sourdough loaf. Ninety percent of the time, it means your starter wasn’t quite strong enough on the day you mixed the dough. The other common culprit is rushing the final proof. Since this is a no yeast sourdough bread, it needs those hours to develop gas and rise slowly. If you cut that proofing time short, the structure can’t support itself when baking!
How long does the ‘Same Day Sourdough Method’ actually take?
When I call this a same-day loaf, I mean you bake it the same day you start it, but you definitely aren’t done in an hour! You have about 30 minutes of active mixing and folding time spread out. However, you need several hours of inactive rest time—that’s the magic! Depending on your kitchen temperature, you are looking at 6 to 8 hours total for the whole process, including the mixing, folding rests, and the final proof before it hits the oven.
PrintSuper Soft Sourdough Sandwich Bread: The Fluffy Loaf You Can Slice Easily

Create a truly soft and fluffy sourdough sandwich bread loaf that is perfect for toasting and everyday sandwiches. This beginner-friendly recipe focuses on gentle handling to achieve a tender, sliceable crumb without adding commercial yeast.
- Prep Time: 30 min
- Cook Time: 50 min
- Total Time: 6 hours 50 min
- Yield: 1 loaf 1x
- Category: Bread
- Method: Baking
- Cuisine: American
- Diet: Vegetarian
Ingredients
- 100g active sourdough starter (fed and bubbly)
- 350g warm water
- 500g unbleached all-purpose flour
- 10g fine sea salt
- 30g unsalted butter, softened
Instructions
- In a large bowl, mix the active sourdough starter and warm water until combined.
- Add the flour and salt to the wet ingredients. Mix by hand until just combined into a shaggy mass. Do not overmix.
- Cover the bowl and let the dough rest for 30 minutes (autolyse).
- Perform the first set of stretch and folds. Gently stretch one side of the dough up and fold it over the center. Rotate the bowl 90 degrees and repeat three more times. Cover and rest for 30 minutes.
- Repeat the stretch and fold process two more times, with 30-minute rests between each set. This builds structure without kneading.
- After the final rest, gently incorporate the softened butter into the dough by folding it in until it is fully absorbed.
- Shape the dough into a tight log suitable for a standard 9×5 inch loaf pan. Place the dough, seam-side down, into a lightly greased loaf pan.
- Cover the pan loosely with plastic wrap or a damp towel. Allow the dough to proof at room temperature until it has increased in volume by about 50-75% and passes the poke test (about 3-5 hours, depending on your kitchen temperature).
- Preheat your oven to 450 degrees Fahrenheit (232 Celsius) with a rack positioned in the lower third of the oven.
- Place the loaf pan in the preheated oven and immediately reduce the temperature to 375 degrees Fahrenheit (190 Celsius).
- Bake for 30 minutes. Reduce the oven temperature to 350 degrees Fahrenheit (175 Celsius) and continue baking for another 15-20 minutes, or until the internal temperature reaches 205-210 degrees Fahrenheit (96-99 Celsius).
- Remove the bread from the pan immediately and cool completely on a wire rack before slicing. This step is critical for a non-crumbly texture.
Notes
- Using active, bubbly starter is key to achieving a good rise without commercial yeast.
- For the softest crumb, allow the bread to cool completely, ideally for 4 hours, before slicing.
- If you prefer a slightly tangier flavor, allow the dough to cold proof in the refrigerator overnight after the final shaping.
Nutrition
- Serving Size: 1 slice
- Calories: 250
- Sugar: 1
- Sodium: 350
- Fat: 4
- Saturated Fat: 2
- Unsaturated Fat: 2
- Trans Fat: 0
- Carbohydrates: 48
- Fiber: 2
- Protein: 8
- Cholesterol: 10