
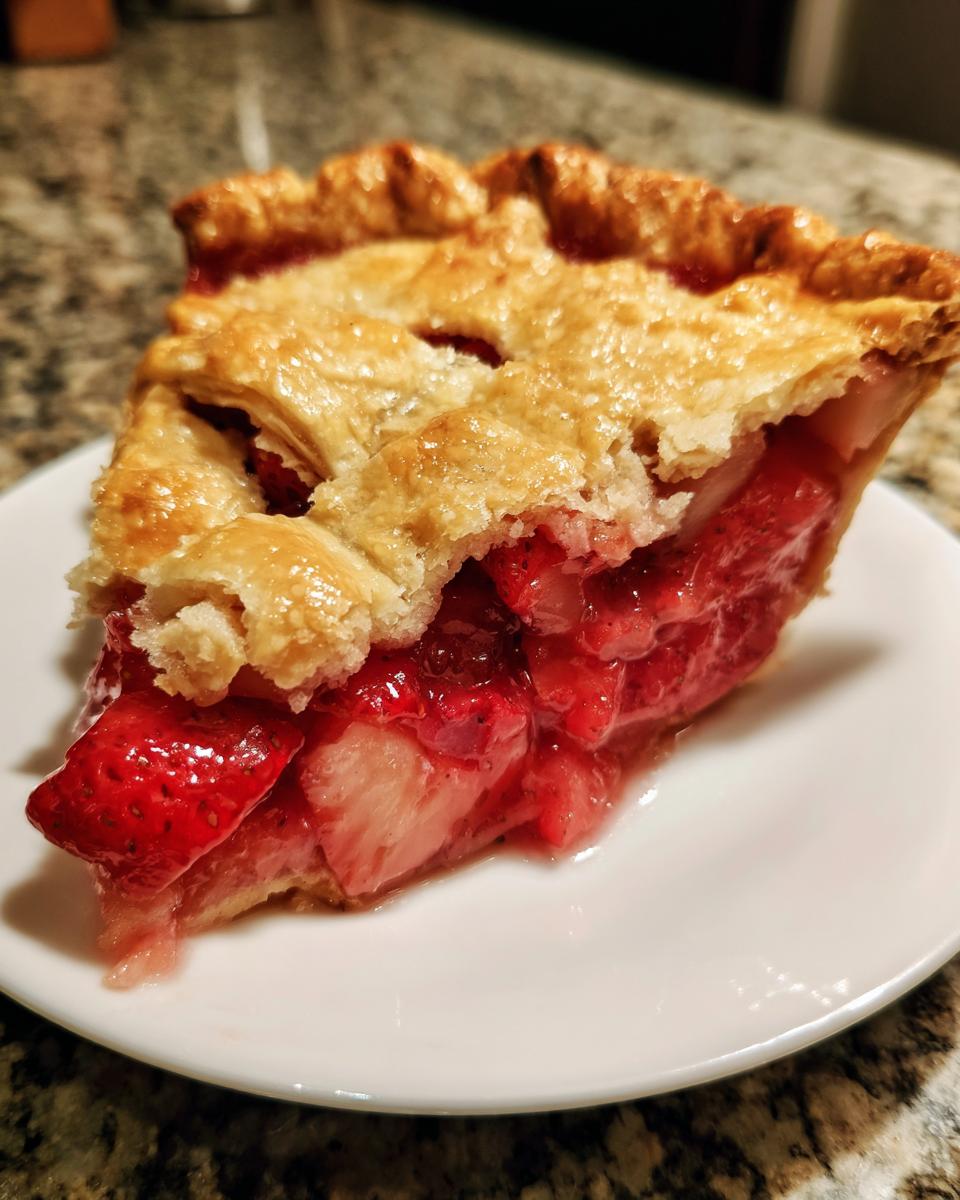
Oh, when those first bright pink stalks of rhubarb appear at the market, my heart just leaps! It signals that glorious time of year when we swap heavy spices for fresh, bright flavors. If you’ve ever been intimidated by making a perfect, gorgeous pie from scratch, I want you to stop worrying right now. That’s why I developed this recipe: The Best Classic Strawberry Rhubarb Pie with Foolproof Flaky Crust. I promise, this is the one that makes you feel like a champion baker. It captures that perfect, nostalgic taste we all look for in a strawberry rhubarb pie. Baking should be about joy, not stress, and this recipe delivers pure, homemade bliss. If you want to know more about my mission here at Bliss Batter to make baking approachable, check out my About Page!
- Why This Strawberry Rhubarb Pie Recipe is Your New Favorite Homemade Strawberry Rhubarb Dessert
- Gathering Ingredients for Your Classic Rhubarb Dessert
- Step-by-Step Instructions for the Best Strawberry Rhubarb Pie
- Tips for Success When Making Strawberry Rhubarb Pie
- Serving Suggestions for Your Sweet and Tart Fruit Pie
- Storage and Reheating Instructions for Homemade Strawberry Rhubarb Dessert
- Frequently Asked Questions About Making Rhubarb Pie Filling
- Nutritional Estimates for One Slice of Strawberry Rhubarb Pie
- Share Your Homemade Strawberry Rhubarb Dessert Creations
Why This Strawberry Rhubarb Pie Recipe is Your New Favorite Homemade Strawberry Rhubarb Dessert
I get so excited when people try this! Honestly, this homemade strawberry rhubarb dessert stands out because I obsessed over two things: flavor and texture. It’s the best strawberry rhubarb pie—I tested it until the filling just wouldn’t get any better. I want you to feel like a total pro, even if this is your first time making a summer pie recipe.
- It delivers that incredible sweet and tart fruit pie profile without any weird aftertaste.
- The crust is my secret weapon! It’s the ultimate pie recipe for beginners that gives you that restaurant-quality flakiness.
- Every ingredient ratio is already perfected so you can focus on the fun part. Head over to my Dessert Recipes page for more baked happiness!
Achieving the Perfect Sweet and Tart Fruit Pie Balance
Rhubarb is mighty tart, sisters, we know this! That’s why I don’t mess around with the sugar. The secret here is making sure you have just enough granulated sugar coating everything, but also incorporating cornstarch right into that sugar mix. When those juices bubble up, the cornstarch activates immediately. This builds a thick, glossy filling that holds its shape when sliced—no soupy mess here! It lets the fruity tang shine through without making your mouth pucker.
Foolproof Flaky Crust Tutorial for Every Baker
The flakiness? That’s all about the physics of coldness! My flaky pie crust tutorial breaks down exactly how to handle the butter. You need to cut it in until you have pieces the size of little peas, no smaller! Those cold butter chunks create steam pockets in the oven, which gives you those gorgeous, distinct flakes. My expert tip: if your kitchen is warm, chill your bowl before you even start. This is crucial!
Gathering Ingredients for Your Classic Rhubarb Dessert
Okay, now that we know *why* this pie is the absolute best, let’s talk about what you need to make it happen! Gathering your supplies is half the battle. I laid everything out here so you can see exactly what goes where. For the crust, keeping things cold isn’t suggested here—it’s the law! Seriously, if your butter isn’t ice-cold, your crust won’t flake. Also, pay attention to the fruit prep; those strawberries need to be halved or quartered so they bake evenly with the rhubarb.
If you’re looking to make a big batch of something warm and cozy later, you should check out my recipe for Slow Cooker Apple Butter!
Ingredients for the Foolproof Flaky Pie Crust
Remember, the colder the butter, the happier the crust! You want it rock solid right before you start cutting it in.
- 2 1/2 cups all-purpose flour
- 1 teaspoon salt
- 1 cup (2 sticks) unsalted butter, very cold and cut into small cubes
- 1/2 cup ice water, plus extra if needed
Ingredients for the Strawberry Rhubarb Pie Filling
This is where the magic happens. Taste your fruit before you start; if your rhubarb is screamingly tart, maybe use a tiny bit more sugar than listed below, but always start here!
- 4 cups fresh rhubarb, cut into 1-inch pieces
- 4 cups fresh strawberries, hulled and halved or quartered
- 1 1/2 cups granulated sugar (adjust based on fruit tartness)
- 1/4 cup cornstarch (for thickening)
- 1 tablespoon lemon juice
- 1 teaspoon vanilla extract
- 1 large egg, beaten with 1 teaspoon water (for egg wash)
- 1 tablespoon coarse sugar (for sprinkling)
Step-by-Step Instructions for the Best Strawberry Rhubarb Pie
Okay, this is where we put all that preparation to work! You’ve got your cold butter and your perfectly measured fruit waiting. Don’t rush these steps, especially the chilling time—that’s the difference between a good pie and the absolute best strawberry rhubarb pie you’ve ever made. If you’re looking for some other great baking how-tos, check out my Apple Pancake Guide for weekend fun! Let’s get this show on the road.
Making and Chilling the Flaky Pie Crust
First up, we make the dough, just like we talked about. Whisk your flour and salt, then use your pastry blender or fingertips to mash in that icy-cold butter. You’re aiming for just coarse crumbs with some pea-sized pieces of butter remaining—those are your future flakes! Add that ice water slowly, just until it barely holds together. Don’t knead it! Divide it into two disks, wrap them up tight, and they have to chill for at least 1 hour. Seriously, don’t cheat this step; cold dough keeps everything behaving beautifully.
How to Make Rhubarb Pie Filling
While your dough is getting frosty, mix up the filling. Gently toss those gorgeous rhubarb pieces and strawberries together in a big bowl. In a separate small bowl, whisk your sugar and cornstarch—it has to be fully combined before it hits the fruit! Pour that sugar mix over the fruit, drizzle in the lemon juice and vanilla, and give it a *gentle* toss. Then, just let it sit on the counter for 15 minutes. This resting time lets the sugar start drawing out those sweet strawberry juices.
Assembling and Sealing Your Strawberry Rhubarb Pie
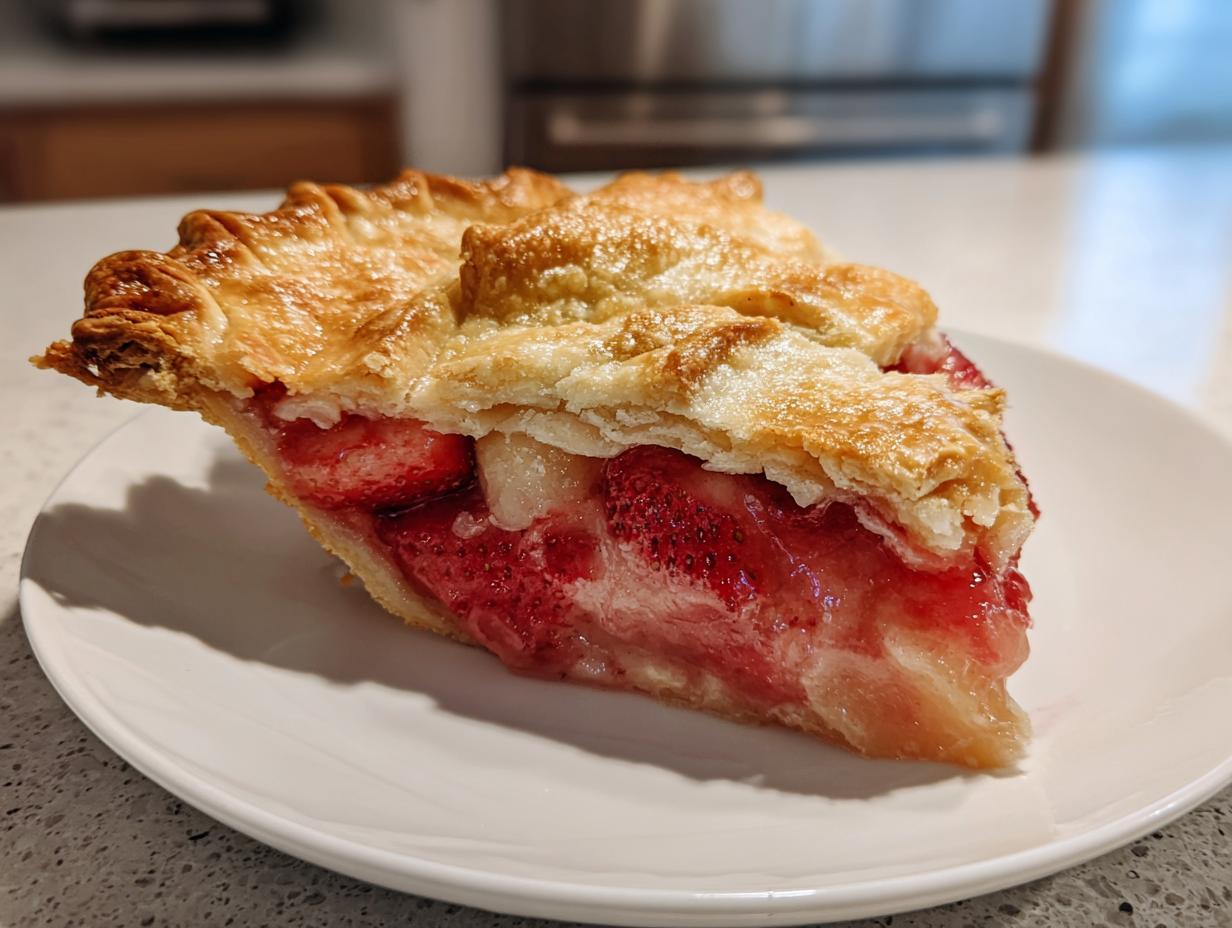
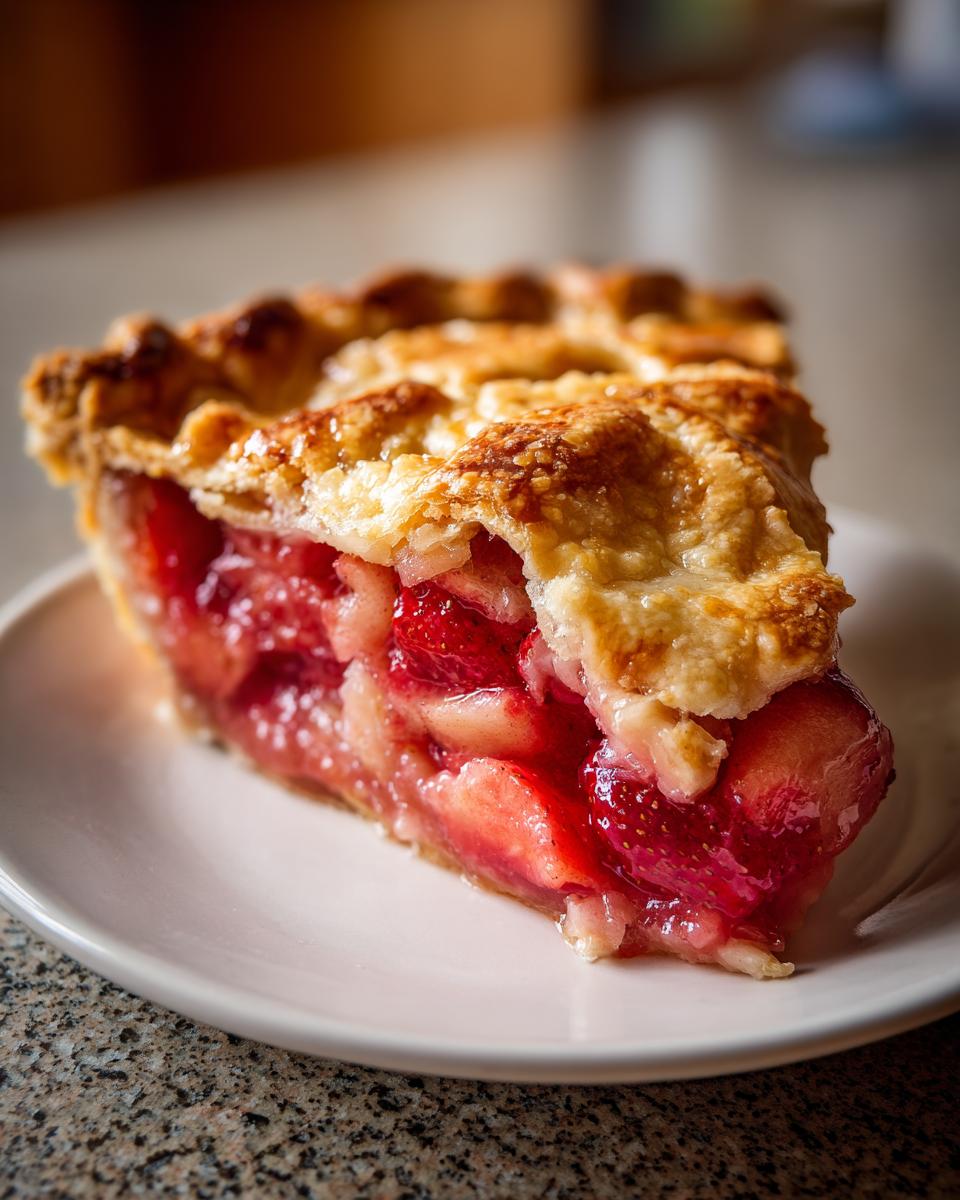
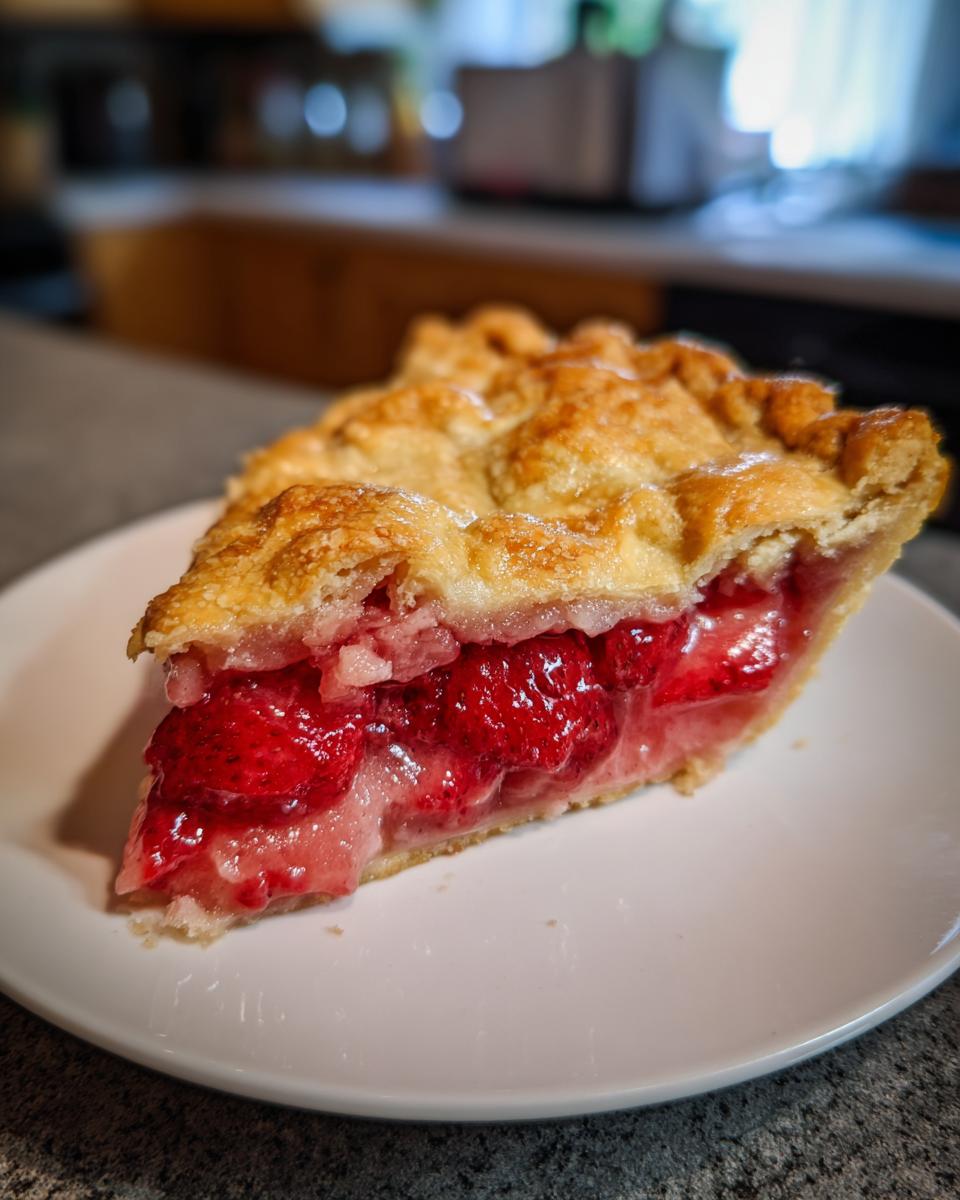
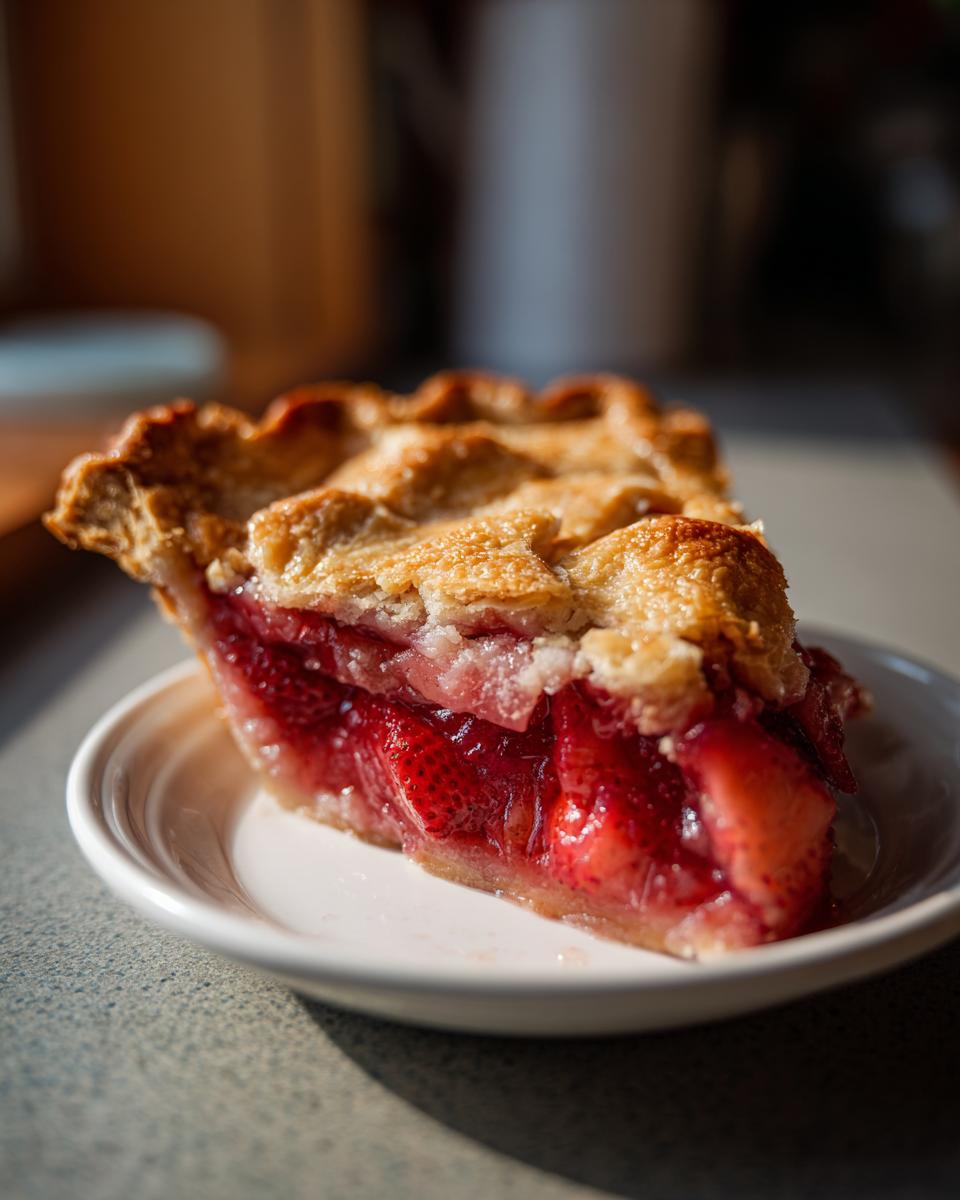
Grab one disk of dough and roll it out big enough for your 9-inch pie plate. Ease it into the plate gently, trim the edges to leave about an inch hanging over, and pop that whole thing back into the fridge while you work on the top. Next, roll out your second disk. You can cut strips for a pretty lattice pie top, or just roll a full circle. If you do a full circle, promise me you’ll cut a few slits right in the center so the steam can escape. Fill that chilled bottom crust with the fruit mixture, pop the top on, and crimp those edges tight! Brush it with your egg wash and sprinkle that coarse sugar on top for a nice crunch.
Baking and Setting the Strawberry Rhubarb Pie
Time for the oven! Preheat it to a hot 400°F (200°C) and set your pie on a baking sheet—trust me, it helps catch those drips. Bake it hard at 400°F for 20 minutes to set that crust. Then, drop the heat down to 375°F (190°C) and bake for another 35 to 45 minutes, until the filling is thick and bubbling. If the edges look like they’re burning before the center is done, just loosely cover them with aluminum foil. The hardest part? Cooling! You absolutely must let it sit on a wire rack for at least 3 to 4 hours. This lets the filling set up. If you cut it hot, it will run everywhere, and that’s just sad.
Tips for Success When Making Strawberry Rhubarb Pie
I know we’ve already covered the main steps for this incredible strawberry rhubarb pie recipe, but I wanted to share a few extra bits of wisdom I’ve gathered over the years. These little tweaks are what elevate the pie from great to award-winning caliber, which everyone wants from their classic rhubarb dessert, right? Plus, this helps us make sure our crust stays happy!
Are you thinking about making a delicious homemade strawberry rhubarb dessert when the fresh batch isn’t available? Don’t fret! If you’re looking for other foolproof recipes, my Buttermilk Biscuits are another great baking adventure!
Handling Frozen Fruit in Your Strawberry Rhubarb Pie
It happens—sometimes you just need pie! If you are using frozen strawberries and rhubarb, please, please, please, do not thaw it first. That releases all the precious juices prematurely. Just toss the frozen fruit straight into the filling components. Because frozen fruit holds more water, you need to increase your cornstarch by exactly 1 tablespoon. You’ll also want to add about 10 to 15 extra minutes to that final baking time so everything gets nice and hot in the middle.
Secrets to the Best Flaky Pie Crust
We can’t talk about success without talking about that crust one more time. I know I sound like a broken record, but it’s worth repeating because it works every time! Your butter and your water must be very cold. I mean, almost icy for the butter. If your kitchen is warm, the butter melts before it can steam in the oven, and then you get a tough, dense crust instead of those lovely, flaky layers we love in a seasonal fruit baking masterpiece.
Serving Suggestions for Your Sweet and Tart Fruit Pie
This pie is honestly wonderful all by itself, but sometimes a slice just calls for a little extra something, right? This sweet and tart fruit pie shines brightest when served slightly warm—not scorching hot—so I highly recommend giving it that 3 or 4 hours to cool down first. My favorite, tried-and-true classic combination is a slice of that ruby-red filling paired with a big, cold scoop of high-quality vanilla ice cream on the side. That temperature contrast is just delightful!
If you want to explore more amazing pairings, I wrote a whole piece on serving fruit pies with ice cream over on my Fruit Pie with Vanilla Ice Cream guide. Enjoy every bite!
Storage and Reheating Instructions for Homemade Strawberry Rhubarb Dessert
You made the absolute best strawberry rhubarb pie, and now you have leftovers—hooray! Don’t sweat how to keep them tasting great. Since this is a fruit pie made from scratch, you can actually leave it out on the counter at room temperature for about 24 hours, loosely covered. If you need it to last longer, definitely move it to the fridge. It keeps beautifully for up to four days in there.
When you want a slice later, skip the microwave! I find that reheating just makes the crust soggy. To keep that flaky texture you worked so hard for, take your slice and warm it up in a toaster oven or regular oven at about 300°F for just 8 to 10 minutes. It brings back that fresh-out-of-the-oven taste so nicely! For more tips on keeping baked goods wonderful, check out my guide on Cinnamon Monkey Bread.
Frequently Asked Questions About Making Rhubarb Pie Filling
I get so many helpful emails after people try my recipes, and I love hearing what questions pop up while you’re baking! Dealing with spring fruit can sometimes feel tricky, but once you know the score, it’s so easy. I’ve gathered a few of the most common questions I get about making this rhubarb pie filling and turning out the best strawberry rhubarb pie.
If you’re new to baking with rhubarb and want some more foundational bread knowledge, you should totally check out my Pumpkin Beer Bread post for a different kind of rustic bake!
Can I substitute strawberries with other fruit in this strawberry rhubarb pie recipe?
Yes, you absolutely can experiment! Strawberries and rhubarb are a classic match, but if you’re missing strawberries, you can often substitute them with blueberries or raspberries. Just know that berries like raspberries are naturally softer and release more liquid, so you might need to add an extra half-tablespoon of cornstarch to keep things tidy. It will still be a delicious sweet and tart fruit pie, just slightly different!
Why is my strawberry rhubarb pie filling runny?
Ah, the dreaded runny filling! There are usually two culprits here. First, you didn’t use quite enough cornstarch, or it wasn’t combined perfectly with the sugar before hitting the fruit. Second, and this is the big one: you cut the pie too early! That 3 to 4 hours of cooling time is non-negotiable. The cornstarch thickens as it cools down to room temperature. If you slice it when it’s still warm, it hasn’t had time to set up its structure yet, leading to a soupy mess.
Is this considered an easy rhubarb pie to make?
I fundamentally believe this is an easy rhubarb pie to tackle, especially if you follow my guide! The filling assembly is super quick—just tossing everything in a bowl. The only part that requires a little patience is the crust, but I wrote the flaky pie crust tutorial specifically so that beginners feel comfortable. As long as you keep that butter cold, you’ll end up with a pie that looks and tastes like it took days, not just a couple of hours!
Nutritional Estimates for One Slice of Strawberry Rhubarb Pie
I know lots of you are curious about what goes into this delicious dessert ingredient-wise, so I pulled together the estimates for a standard slice of this strawberry rhubarb pie. Now, remember, this is based on my recipe using standard ingredients. If you use extra butter or a ton more sugar, those numbers will shift! Baking is chemistry, but it’s also flexible, right? You can check out my recipe for Salted Caramel Latte if you’re looking for something sweet to enjoy afterward!
- Serving Size: 1 slice
- Calories: 450
- Sugar: 35g
- Sodium: 250mg
- Fat: 25g
- Saturated Fat: 15g
- Unsaturated Fat: 10g
- Trans Fat: 0g
- Carbohydrates: 55g
- Fiber: 3g
- Protein: 5g
- Cholesterol: 60mg
Share Your Homemade Strawberry Rhubarb Dessert Creations
Oh, I seriously cannot wait to see what you all bake up! Taking the time to make a homemade strawberry rhubarb dessert right from scratch is just special, and sharing a slice with someone you love is the whole point, isn’t it? Please, please, please, when you finish your beautiful strawberry rhubarb pie, snap a photo!
I just love seeing them pop up on social media—tag me so I can cheer you on! Don’t forget to leave a star rating right here on the recipe card. Your feedback helps other bakers feel confident stepping into the kitchen to tackle their first classic rhubarb dessert. If you run into any questions or need a little extra moral support while you’re baking, don’t hesitate to reach out through my Contact Page. Happy baking, friends!
PrintThe Best Classic Strawberry Rhubarb Pie with Foolproof Flaky Crust

Create the best strawberry rhubarb pie that balances sweet strawberries and tart rhubarb perfectly. This recipe includes instructions for a foolproof, flaky crust that beginners can master.
- Prep Time: 45 min
- Cook Time: 55 min
- Total Time: 5 hours 40 min
- Yield: 8 servings 1x
- Category: Dessert
- Method: Baking
- Cuisine: American
- Diet: Vegetarian
Ingredients
- 2 1/2 cups all-purpose flour
- 1 teaspoon salt
- 1 cup (2 sticks) unsalted butter, very cold and cut into small cubes
- 1/2 cup ice water, plus extra if needed
- 4 cups fresh rhubarb, cut into 1-inch pieces
- 4 cups fresh strawberries, hulled and halved or quartered
- 1 1/2 cups granulated sugar (adjust based on fruit tartness)
- 1/4 cup cornstarch (for thickening)
- 1 tablespoon lemon juice
- 1 teaspoon vanilla extract
- 1 large egg, beaten with 1 teaspoon water (for egg wash)
- 1 tablespoon coarse sugar (for sprinkling)
Instructions
- Prepare the Flaky Pie Crust: In a large bowl, whisk together the flour and salt. Cut in the cold butter using a pastry blender or your fingertips until the mixture resembles coarse crumbs with some pea-sized pieces of butter remaining. Gradually add the ice water, one tablespoon at a time, mixing just until the dough comes together. Do not overmix. Divide the dough in half, flatten each half into a disk, wrap in plastic, and chill for at least 1 hour.
- Prepare the Filling: In a large bowl, gently combine the cut rhubarb and strawberries. In a separate small bowl, whisk together the granulated sugar and cornstarch. Pour the sugar mixture and lemon juice over the fruit. Add the vanilla extract. Toss gently until the fruit is evenly coated. Let the filling sit for 15 minutes while you roll out the dough.
- Assemble the Bottom Crust: On a lightly floured surface, roll out one disk of chilled dough into a 12-inch circle. Carefully transfer the dough to a 9-inch pie plate. Trim the edges, leaving a 1-inch overhang. Chill the pie shell while you prepare the top crust.
- Create the Top Crust: Roll out the second disk of dough. You can cut strips for a lattice top or cut one large circle for a full top. If using a full top, cut several slits in the center to allow steam to escape.
- Fill and Seal: Pour the fruit filling into the chilled bottom crust. Place the top crust (or lattice) over the filling. Trim the top crust overhang to match the bottom. Crimp the edges to seal the pie. Brush the top crust lightly with the egg wash and sprinkle with coarse sugar.
- Bake the Pie: Preheat your oven to 400°F (200°C). Place the pie on a baking sheet (to catch drips). Bake for 20 minutes at 400°F. Reduce the oven temperature to 375°F (190°C) and continue baking for another 35 to 45 minutes, or until the crust is golden brown and the filling is bubbling thickly. If the edges brown too quickly, cover them loosely with foil.
- Cool Completely: Let the pie cool on a wire rack for at least 3 to 4 hours before slicing. This allows the filling to set properly.
Notes
- If you use frozen fruit, do not thaw it first. Increase the cornstarch by 1 tablespoon and add 10-15 minutes to the total baking time.
- For the best flaky pie crust, keep all your ingredients, especially the butter and water, very cold.
- Serve this sweet and tart fruit pie slightly warm with a scoop of high-quality vanilla ice cream.
Nutrition
- Serving Size: 1 slice
- Calories: 450
- Sugar: 35g
- Sodium: 250mg
- Fat: 25g
- Saturated Fat: 15g
- Unsaturated Fat: 10g
- Trans Fat: 0g
- Carbohydrates: 55g
- Fiber: 3g
- Protein: 5g
- Cholesterol: 60mg