
Oh my goodness, are you ready for Hanukkah? For me, the holiday just isn’t complete without that sweet, sticky burst of sunshine—that means we need to make authentic, melt-in-your-mouth Sufganiyot! I know, the idea of frying filled yeast doughnuts at home sounds intimidating, but trust me, this recipe is my secret weapon for achieving that perfect pillowy interior you usually only find at the best Jewish bakeries. When I was planning big corporate events, this was the one thing I missed most about home. Baking these incredibly soft, jam-filled treats brings me right back to that feeling of simple, pure bliss. Forget fighting the crowds; we’re making bakery-quality Sufganiyot right here in our kitchens! If you want to know more about what drives my love for these comforting recipes, check out the story behind Bliss Batter.
- Why You Will Love Making Homemade Sufganiyot
- Essential Ingredients for Perfect Sufganiyot
- Step-by-Step Instructions for Fluffy Sufganiyot
- Tips for Success When Making Sufganiyot
- Ingredient Notes and Substitutions for Sufganiyot
- Storage and Reheating Instructions for Sufganiyot
- Frequently Asked Questions About Sufganiyot
- Estimated Nutritional Profile for These Sufganiyot
- Share Your Homemade Jewish Holiday Desserts
Why You Will Love Making Homemade Sufganiyot
-
Soft, Yeast-Raised Texture
Honestly, the texture is why we bother! These are unlike the heavy, dense doughnuts you sometimes find. We are aiming for ultra-light, pillowy rounds that practically sigh when you bite into them. You get that perfect, airy crumb every single time.
-
Perfect for Sharing During Hanukkah
There is nothing better than bringing a platter of freshly fried, warm Sufganiyot to your Hanukkah celebration. They symbolize all the oil and light of the holiday, and they disappear faster than you can find the matches for the menorah!
Essential Ingredients for Perfect Sufganiyot
Okay, let’s talk about what you need because quality ingredients make or break these delicate little bombs of joy. If the dough is happy, the doughnut shines! I’ve listed everything below, but pay close attention to the state of the butter and milk—that’s where we start building flavor.
Dough Components Clarity
The base needs room-temperature love to come together properly. Don’t just grab eggs straight from the fridge; they won’t incorporate well!
- Milk: This needs to be nice and cozy, warmed gently to 105–115°F. Too hot and you shock the yeast; too cold and they won’t wake up.
- Yeast: Active dry yeast is what we are using here! We’ll wake it up nice and slow.
- Eggs: Make sure these buddies are at room temperature before you mix them in.
- Butter: It must be softened, not melted! We need that soft texture so it creams nicely with the sugar.
- Flour: See that range from 3 1/2 to 4 cups? That’s because humidity plays tricks on us! Start with 3 1/2 cups and only add more gradually until the dough comes together but isn’t stiff. Trust your hands on this part!
Filling and Finishing for Your Sufganiyot
Once they are golden and drained, that’s when the real magic happens. This part is non-negotiable for that classic bakery experience!
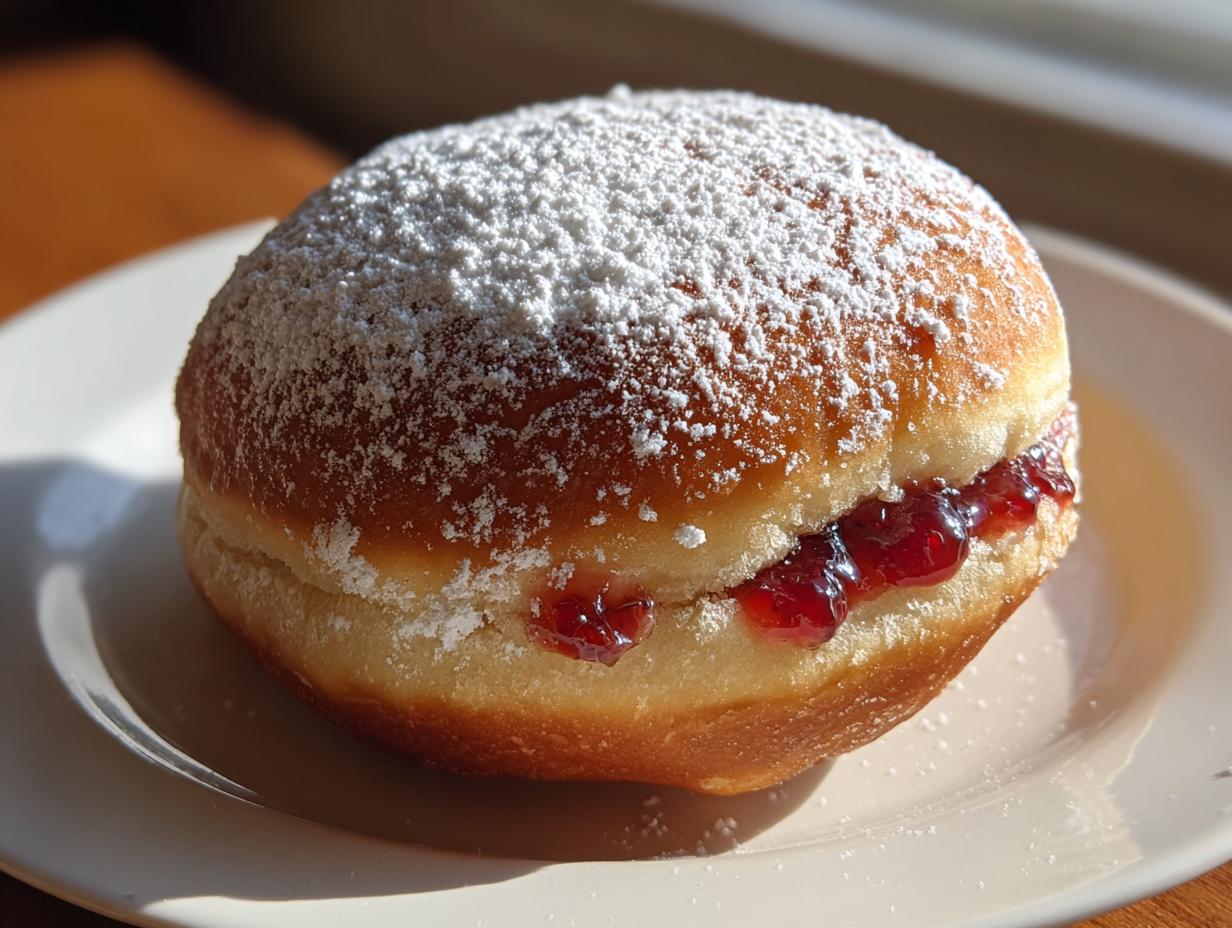
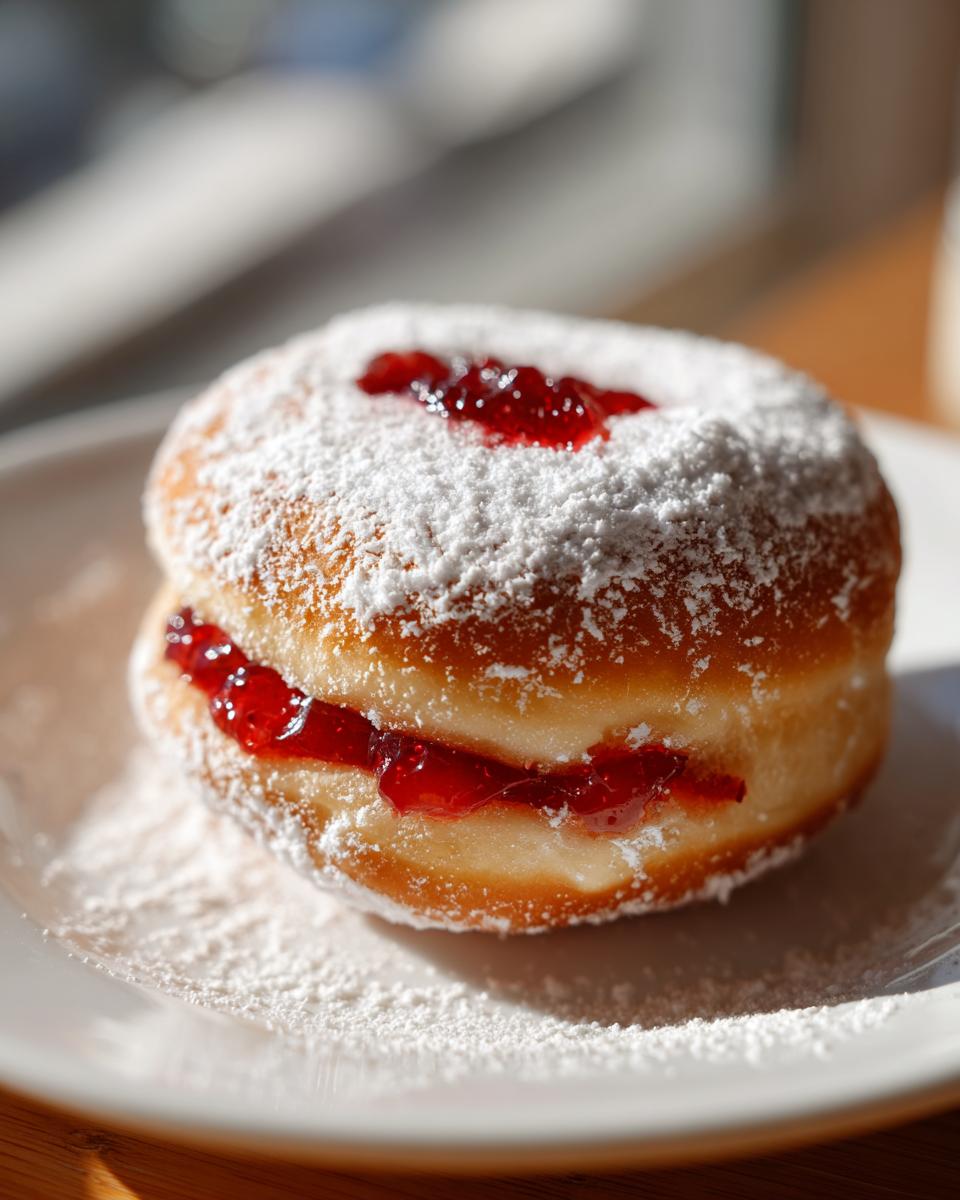
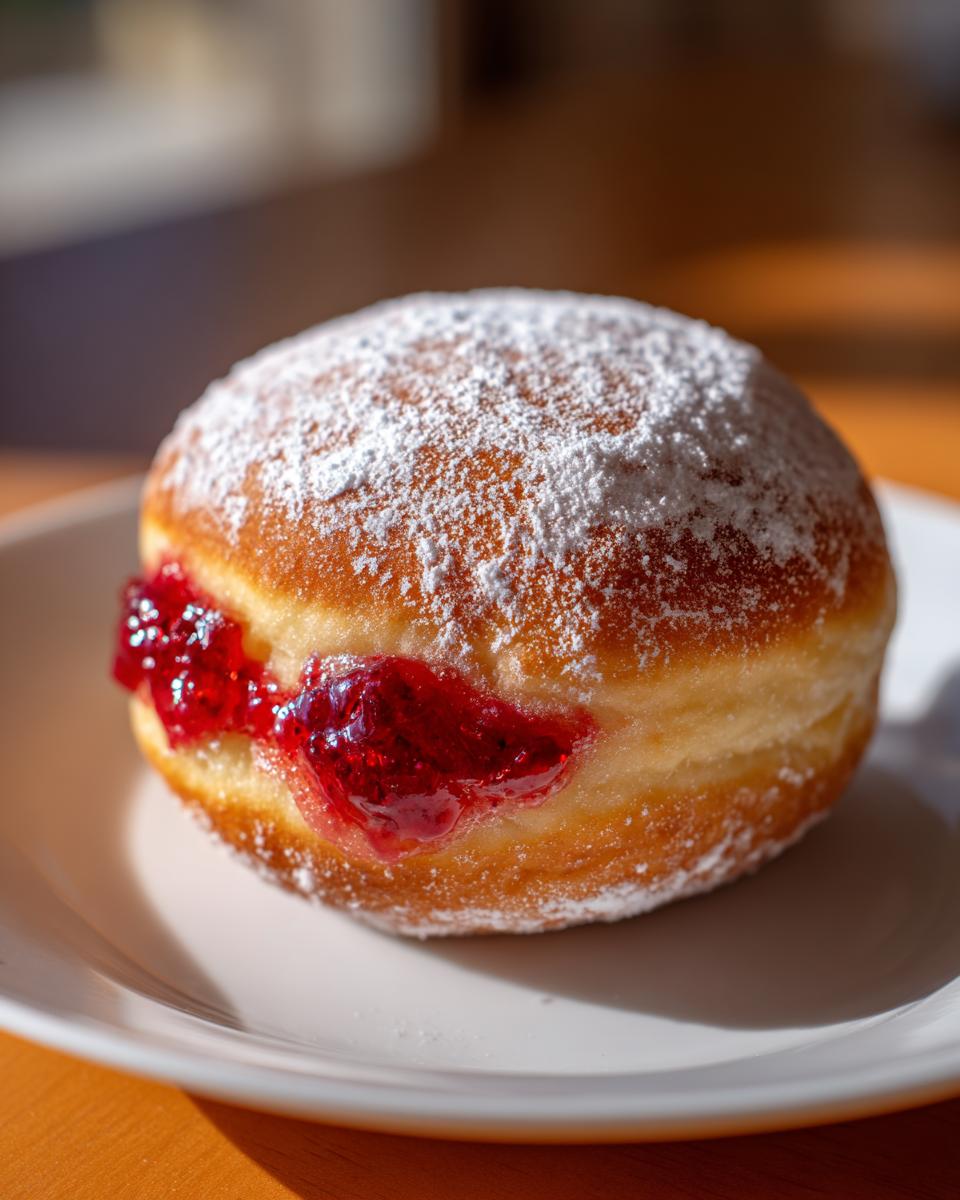
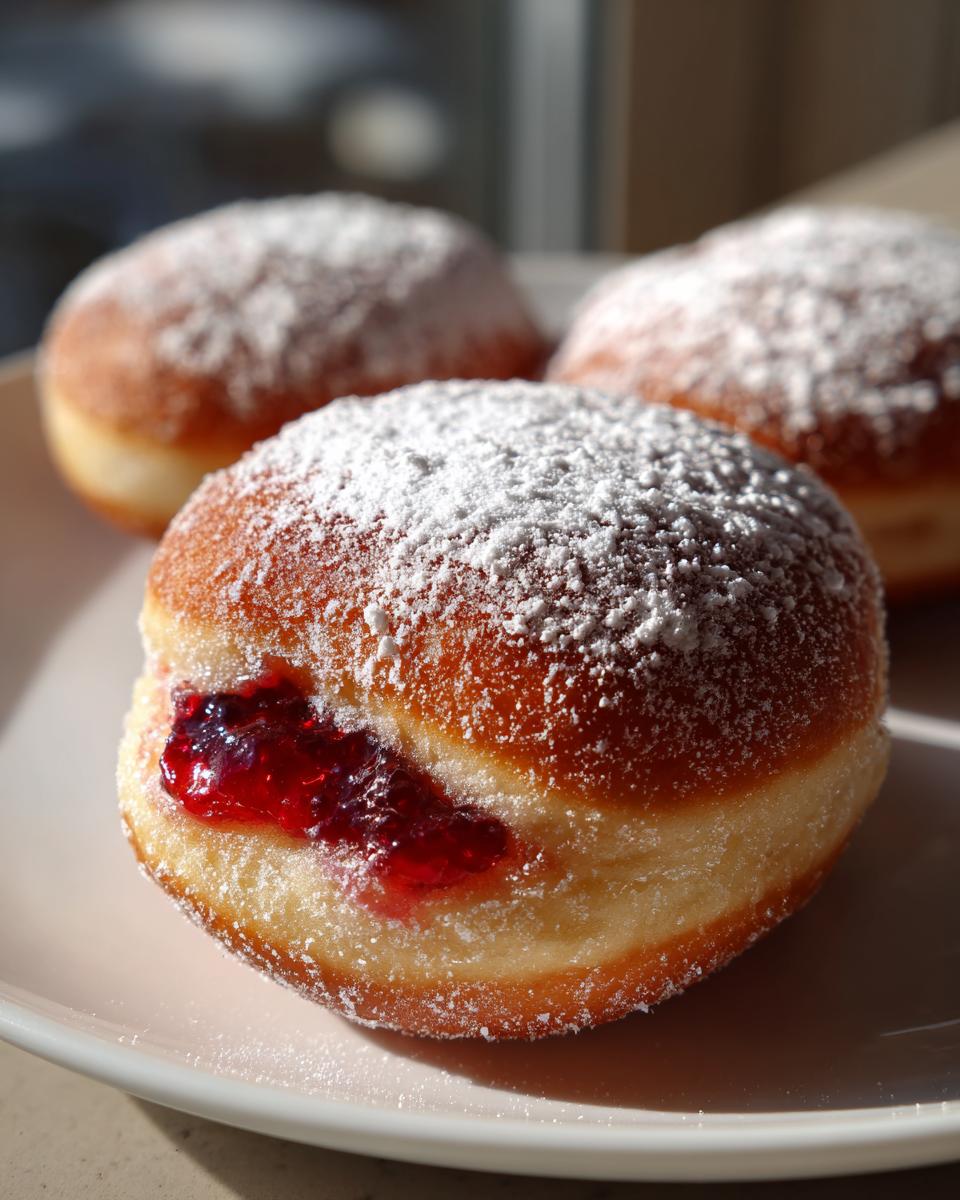
- Jam: You absolutely need a good, bright fruit preserve. I love strawberry or raspberry because their tartness cuts through the richness of the fried dough perfectly. Don’t use jelly; you want that slightly thicker preserve texture.
- Powdered Sugar: Get the finest powdered sugar you can find! We are not messing around here. A generous, thick coating is required so everyone gets a nice white mustache when they bite into their Sufganiyot.
Step-by-Step Instructions for Fluffy Sufganiyot
This is where the real fun begins! Making Sufganiyot from scratch takes a little patience—we’re dealing with yeast, which needs time to bloom and grow—but honestly, the process is so relaxing. I find that putting on some good music while I work the dough is non-negotiable! Make sure you clear a spot on the counter because we’re going to be moving the dough around a bit.
Activating Yeast and Mixing the Dough Base
First things first: wake up that yeast! Grab your biggest mixing bowl. We combine the warm milk (remember, cozy, not hot!) with just a tiny bit of that sugar and the yeast. Give it a gentle swirl. If you don’t see foam after about ten minutes, your yeast might be sad, and we need to start that step over, so pay attention here! Once it’s foamy, throw in the rest of the sugar, your room-temperature eggs, vanilla, and salt. Now, start adding the flour slowly. You keep mixing until you get what I call a ‘shaggy dough’—meaning it’s just coming together in a messy ball but is still slightly sticky to the touch. Don’t add all four cups upfront; save that last half cup just in case!
Kneading and First Rise for Sufganiyot Dough
Dump that shaggy mess right onto a lightly floured spot. Now, we need to introduce the softened butter. This is part of why these are richer than regular doughnuts! Work that butter into the dough thoroughly before you start the main kneading. You want to knead hard and steadily for a solid 8 to 10 minutes. When you are finished, the dough should feel smooth, elastic, and just slightly tacky—it shouldn’t stick aggressively to your hands anymore. Pop that smooth ball into a greased bowl, cover it with plastic wrap, and put it somewhere warm. We need this rise to be thorough, so let it go for about 1 to 1.5 hours until it has delightfully doubled in size. This gives us the airy structure we need for perfect Sufganiyot!
Shaping and Second Proofing
Gently punch down the risen dough—that’s always fun! Dust your surface lightly with flour, and then roll the dough out until it’s about a half-inch thick. Don’t roll it too thin, or they won’t be puffy enough! Use a 2.5-inch round cutter to stamp out your doughnuts. You can use the scraps, too, just gently re-roll and cut again. Place these circles onto baking sheets lined with small squares of parchment paper—this stops them from sticking to each other or the sheet later. Cover them loosely with a tea towel and let them puff up again for 30 to 45 minutes. They should look visibly plumper before they hit the oil. If you’re planning your cooking schedule, this is a great time to organize your frying station. If you are thinking about your weekly routine, you can check out some general meal planning ideas while these proof!
How to Fry Filled Doughnuts Safely
This is the step where folks get nervous, but if you control the heat, you control the outcome! You must use a heavy pot or Dutch oven. Pour in enough vegetable oil to cover your doughnuts by about two inches, and use a reliable candy thermometer. Get that oil steady at 350°F. Seriously, don’t guess! If the oil is too cool, your Sufganiyot will soak up grease and be heavy. If it’s too hot, they’ll burn outside and be raw inside. Carefully drop just 3 or 4 doughnuts in at a time. We don’t want the temperature to drop too much! Fry them for only 1 to 2 minutes per side until they hit that perfect golden color. Use a slotted spoon to lift them out gently and place them on paper-towel-lined racks to drain. Don’t poke them! We want that beautiful white ring around the middle where they weren’t submerged.
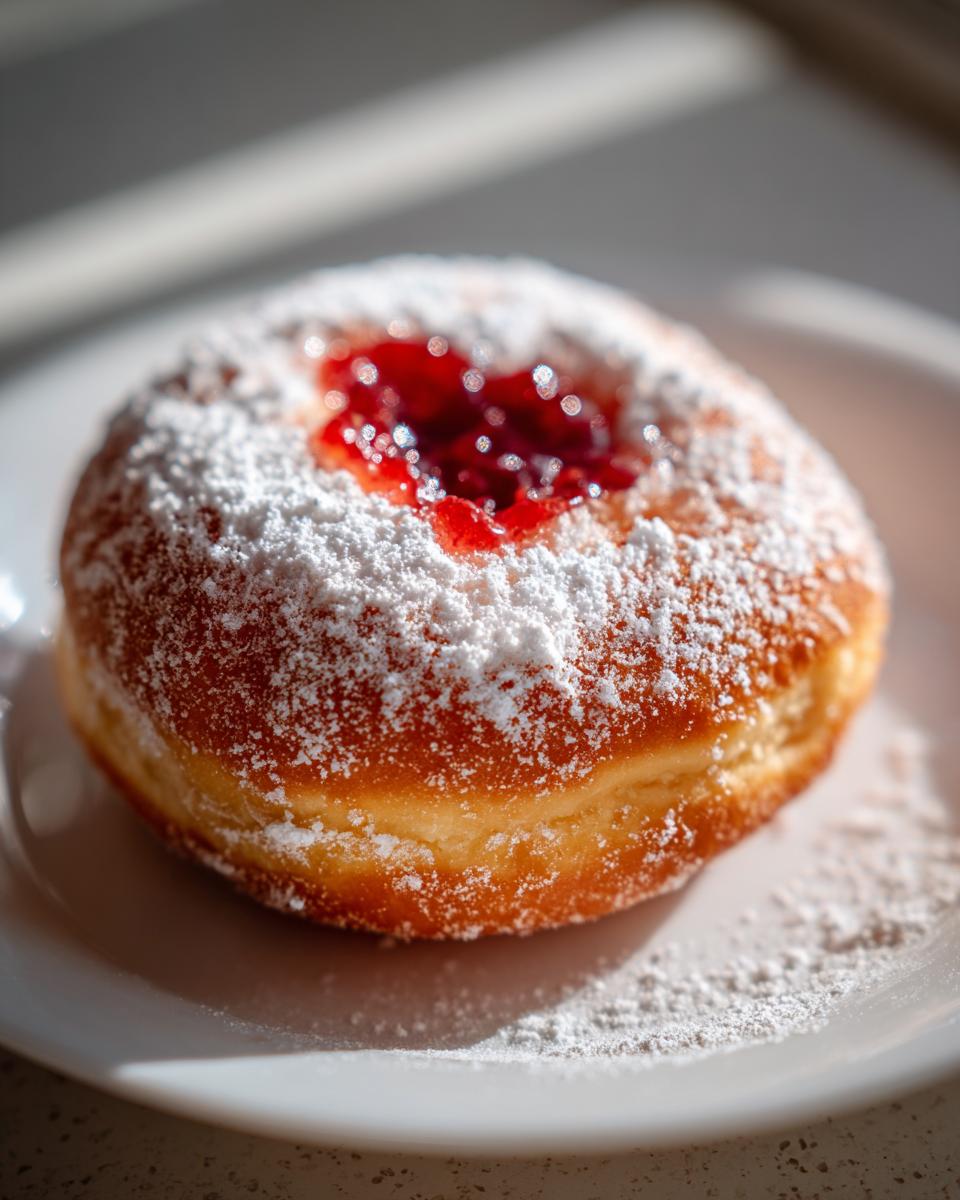
Filling and Finishing Your Homemade Sufganiyot
Hold on—don’t fill them piping hot! Let the doughnuts cool for about 15 minutes until they are warm but safe to handle. This is important so the jam doesn’t just dissolve instantly! Now, take your jam and load it into a piping bag fitted with a long, narrow tip, or use a small funnel if you have one. Gently insert the tip into the side of the doughnut—right where you see that white ring—and squeeze until you feel the doughnut get slightly heavy. You don’t want to overfill! Finally, dust them heavily. Seriously, use a fine-mesh sieve and give them a huge cloud of powdered sugar. Serve them right away while they are tender, and watch the smiles instantly appear!
Tips for Success When Making Sufganiyot
If you’ve made it this far, you are practically a master of Sufganiyot! But I always have a few things that I learned over years of trial and error, especially when dealing with frying yeast dough, which can be a little temperamental. These aren’t just guidelines; these are the tweaks that turn a good doughnut into a spectacular one. Follow these tips, and you’ll never have a disappointing batch again. If you ever struggle with keeping baked goods tender, you should check out my tips for achieving a moist coffee cake crumb—the principles of handling delicate dough are often the same!
Temperature Control for Frying
I can’t stress this enough: buy a deep-fry or candy thermometer! It’s the single most important piece of equipment for this recipe. If your oil dips even slightly below 340°F because you added too many Sufganiyot at once, those beautiful dough balls will start sucking up oil like sponges, and your final product will feel heavy and greasy rather than light and fluffy. On the flip side, if your oil is reading 375°F or higher, the outside will turn dark brown almost instantly while the inside remains completely raw. We want a gentle, consistent heat around 350°F so the inside has time to cook through evenly before achieving that perfect golden exterior.
Handling the Soft Dough
Remember how we kneaded the butter in, making this a richer dough? That means it’s going to be stickier than standard bread dough. When you roll it out to cut those rounds, use the least amount of flour possible on your surface. A heavy dusting of flour at this stage will bake into a crust, making your final Sufganiyot feel tougher. Flour your cutter lightly, press firmly, and lift gently. If the dough sticks to your hands while transferring them to the oil, lightly dust your fingertips with flour rather than trying to scrape off the sticky bits. We want to keep all that beautiful, airy structure intact!
Ingredient Notes and Substitutions for Sufganiyot
You know, when you’re making something as specific and traditional as Sufganiyot, you can’t just wing it with every ingredient. Yeast, especially, is a living thing, and it needs the right environment to do its job well! While I preach flexibility in baking, for this traditional fried doughnut, we need to stick to a few guidelines so we get that perfect rise and golden-brown color. If you’re trying to organize your week around baking a big batch of these, I totally get it; having a loose meal planning structure can help you find the time for the rises!
Yeast Type Clarification
I specify Active Dry Yeast for a very good reason in the recipe instructions! You need that yeast to bloom and expand its little network of bubbles during the initial warm milk soak. If you are using Instant Yeast (also called Rapid-Rise), you can skip that 10-minute waiting period and mix it right in with your dry ingredients because it doesn’t need as much encouragement. However, I still recommend letting it sit in the warm milk for five minutes just to make absolutely sure everything is happy before you invest the rest of your time in mixing and kneading that dough. It’s a small check that saves a lot of heartbreak!
Jam Alternatives
Fruit preserves are the classic, non-negotiable filling for Sufganiyot—the whole point is that burst of sweet-tart contrast against the rich, neutral fried dough. Strawberry and raspberry are the superstars here! But hey, I won’t stop you if you want to get creative once you’ve mastered the basic dough. Lemon curd makes an amazing, zingy filling, though you might want to thin it slightly with a teaspoon of water before piping. And for the chocolate lovers out there, a rich, homemade chocolate ganache piped in after they cool completely is just heavenly. Just remember, the thicker the filling, the easier it is to inject without making a huge mess!
Storage and Reheating Instructions for Sufganiyot
Now, here’s the slightly sad truth about all yeast-raised, fried beautiful things: they are absolutely best enjoyed on the day you make them. Those initial hours after they come out of the oil, soak up the jam, and settle under that beautiful blanket of powdered sugar? That is peak magic hour for Sufganiyot. The tenderness fades surprisingly fast as the dough starts to dry out a bit.
If you absolutely must store them, keep them in a single layer in an airtight container at room temperature. Do not refrigerate them! The fridge is the enemy of airy fried dough; it turns them sad and stiff instantly. They should stay okay for a full day, maybe even two if you’re lucky, though they won’t have that amazing puffiness anymore.
If you find yourself with leftovers the next day—and you’ve already wiped away the initial layer of powdered sugar (because that gets clumpy when stored)—here is my hack for reheating:
- I try to gently refresh them in the oven. Set your oven to a very low temperature, maybe 250°F.
- Place the Sufganiyot directly on the oven rack for just about 5 to 7 minutes. You are trying to warm the internal soft structure back up; you are *not* trying to re-crisp the outside.
- Once warmed through, you absolutely must re-dust them completely with fresh powdered sugar. That old sugar will have completely melted into a glaze, and that’s not what we want for a classic powdered sugar jelly donut experience!
If they are filled, go easy on the reheating time, especially if the jam inside is very runny. Honestly though, the best storage method is never having any leftovers in the first place!
Frequently Asked Questions About Sufganiyot
I know you might have a few things rattling around in your head, especially if it’s your first time tackling yeast dough or deep frying. That’s totally normal! Frying can feel scary, but once you get the temperature right, it’s actually faster than baking. We want these Jewish holiday desserts to come out perfectly every time, so let’s clear up those last few sticking points!
Can I bake these instead of frying my Hanukkah jelly doughnuts?
Look, I love to bake, and I’m all about making recipes accessible, but I have to be honest here: if you bake Sufganiyot, you are making a lovely, sweet baked yeast roll, not a traditional Hanukkah doughnut. Frying is what gives these their signature lightness, that thin, delicate exterior crust, and the beautiful white ring around the middle. Baking will result in a much denser, cake-like texture, totally different from what we are aiming for here—that beautiful, slightly greasy, pillowy bite! For the authentic experience, frying is the way to go.
What is the best way to fill the powdered sugar jelly donuts without making a mess?
This is where finesse counts! You want that lovely burst of jam inside without tearing open the side and having it ooze out all over your pretty powdered sugar blanket. Seriously, grab a metal piping tip—the long, narrow kind is best, or even a small pastry funnel if you have one handy. You poke the tip gently into the side of the cooled doughnut, right on the pale ‘equator’ ring, and squeeze slowly. Stop when you feel resistance or when the top starts to look noticeably plump, but before it gets distorted. The absolute key here, though, is to only fill them right before you plan to serve them! If you fill them too early, the moisture from the jam starts to soften the doughnut crumb too quickly.
Is this a sufganiyot recipe easy enough for beginners?
I think so, truly! Now, let’s be real; any recipe that involves yeast and proofing takes more hands-off time than just whipping up a cookie. But the actual *active* work is very straightforward: mix, knead, wait, cut, wait a bit more, and fry. There aren’t any fussy folding techniques or weird ingredients. Because I break the steps down so clearly—especially monitoring that oil temperature—even if you’ve never touched yeast before, you can definitely tackle these. Follow the timing for the two rises, and you’ll be rewarded with what I promise are the best Sufganiyot you’ve ever made. If you want to browse other straightforward recipes we have, feel free to check out all the dessert recipes on the site!
Estimated Nutritional Profile for These Sufganiyot
Okay, let’s talk about the numbers, because let’s be honest, these are a holiday treat, not an everyday snack! I’ve run the averages for these beautiful, jam-filled Sufganiyot, but please keep in mind that because we are frying them and adding generous jam and sugar, these figures are only estimates. If you eat five (and who wouldn’t?), you’ll need to multiply accordingly—but that’s the joy of the holiday, right?
This breakdown is based on assuming one doughnut is served with a standard amount of filling and dusting. Remember, these are made with whole milk and butter, making them rich and delicious!
- Serving Size: 1 doughnut
- Calories: Approximately 300
- Fat: Around 15g (that includes the healthy frying oil, of course!)
- Carbohydrates: About 35g, mostly from the dough and that wonderful jam.
- Protein: Roughly 5g, thanks to the milk and eggs in the dough base.
Don’t sweat the numbers too much, though! These are meant to be celebrated, not scrutinized. The fat content is essential because that’s what gives the dough that signature delicate, airy fry when handled at the perfect 350°F.
Share Your Homemade Jewish Holiday Desserts
Phew! We did it! We took simple milk, flour, and yeast and turned them into the most incredible, puffy, jam-stuffed Sufganiyot you can imagine. That moment when you dust them with sugar and they look exactly like the holiday doughnuts you dream about—it’s just the best feeling, isn’t it?
I truly hope these recipes become part of your family’s tradition during the Festival of Lights. They bring such warmth and joy to the table. Now, I need to know everything! Did you go the classic route with strawberry, or did you try something wilder in the middle? Please, please leave a comment below letting me know how the frying went and what your family thought of these Jewish holiday desserts!
If you snapped a picture of your beautiful, golden rings dusted with sugar, I would absolutely love to see! Tag me on social media so I can ooh and aah over your incredible work. If you have any final burning questions that I didn’t cover, don’t hesitate to reach out via my contact page. Until the next batch of deliciousness, happy celebrating!
PrintClassic Homemade Sufganiyot (Hanukkah Jelly Doughnuts)

Make soft, yeast-raised sufganiyot at home. These fried doughnuts are filled with jam and dusted with powdered sugar, perfect for celebrating Hanukkah.
- Prep Time: 45 min
- Cook Time: 20 min
- Total Time: 2 hours 5 minutes
- Yield: 12-15 doughnuts 1x
- Category: Dessert
- Method: Frying
- Cuisine: Jewish
- Diet: Vegetarian
Ingredients
- 1 cup whole milk, warmed to 105-115°F
- 2 1/4 teaspoons active dry yeast
- 1/4 cup granulated sugar, plus 1 teaspoon for yeast
- 2 large eggs, room temperature
- 1 teaspoon vanilla extract
- 1/2 teaspoon salt
- 3 1/2 to 4 cups all-purpose flour, plus more for dusting
- 1/4 cup unsalted butter, softened
- Vegetable oil, for frying
- 1 cup strawberry or raspberry jam
- 1 cup powdered sugar, for dusting
Instructions
- Activate the yeast: In a large bowl, combine the warm milk, 1 teaspoon of sugar, and the yeast. Let stand for 5 to 10 minutes until foamy.
- Mix the dough: Add the remaining 1/4 cup sugar, eggs, vanilla extract, and salt to the yeast mixture. Mix well. Gradually add the flour, mixing until a shaggy dough forms.
- Knead: Turn the dough onto a lightly floured surface. Add the softened butter. Knead for 8 to 10 minutes until the dough is smooth and elastic.
- First Rise: Place the dough in a lightly oiled bowl, turning to coat. Cover the bowl with plastic wrap and let it rise in a warm place for 1 to 1.5 hours, or until doubled in size.
- Shape the doughnuts: Gently punch down the dough. Roll it out to a 1/2-inch thickness on a lightly floured surface. Use a 2.5-inch round cutter to cut out circles.
- Second Rise: Place the cutouts on parchment-lined baking sheets, leaving space between them. Cover loosely and let rise for 30 to 45 minutes until puffy.
- Fry: Heat 2 to 3 inches of vegetable oil in a deep, heavy-bottomed pot or Dutch oven to 350°F. Carefully drop 3 or 4 doughnuts into the hot oil, ensuring not to overcrowd the pot.
- Cook: Fry for 1 to 2 minutes per side until golden brown. Use a slotted spoon to remove them and place them on a wire rack lined with paper towels to drain excess oil.
- Fill: Once the doughnuts are cool enough to handle, use a piping tip or a small funnel to inject about 1 tablespoon of jam into the center of each doughnut.
- Finish: Place the powdered sugar in a shallow bowl. Roll or dust the filled sufganiyot generously with powdered sugar. Serve fresh.
Notes
- For best results, use a candy thermometer to monitor the oil temperature; if the oil is too cool, the doughnuts will absorb too much grease.
- If you are planning your weekly meals, consider how these fit into your schedule; this recipe works well when paired with a simple meal plan.
- If you want to try other cooking methods, this recipe is not suitable for sous-vide precision cooker techniques.
Nutrition
- Serving Size: 1 doughnut
- Calories: 300
- Sugar: 20
- Sodium: 150
- Fat: 15
- Saturated Fat: 4
- Unsaturated Fat: 11
- Trans Fat: 0
- Carbohydrates: 35
- Fiber: 1
- Protein: 5
- Cholesterol: 50